


Event software training
How to use Floor plans?
Where does the stage go, how many round tables fit in the room, and who sits at table 7? Plan / Seating answers all three. You draw the floor plan of your venue to scale: tables, seat rows, the stage, the bar, the dance floor, walls and doors, on top of the venue's own drawing if you have one. The same plan is your seating plan: for an event with invitations, you seat the guests yourself; for an event with tickets, your guests pick their own seat while they order. It is part of the event software of eventplanner.net, and every event has one plan.
You do not need seats to use it. A floor plan without a single chair is just as useful: it tells your venue, your caterer and your crew where everything goes, and the overview counts what you have to order.
Want to see what the floor plan designer and the seating plan can do before you start? Have a look at the overview pages first.
Where to find it: log in, choose event software in the main menu and open Plan / Seating in the menu of your event.
1. Before you start
Plan / Seating is a .PRO tool
Plan / Seating is only available to .PRO members. Without a membership you see Unlock .PRO features instead of the designer, with a button to upgrade.
The membership is checked per person, not per event. Every team member who opens Plan / Seating needs their own .PRO membership, also when you are a member and give them access to the tool, and also when they may only look at the plan. We recommend .PRO for the people who draw the plan and seat the guests. Colleagues who only need the guest list or the tasks can keep working in those tools without a membership.
An event, in metres or in feet
The plan belongs to an event, so create one first if you have none yet. Read how to set up an event for the details.
Every size on the plan is shown in the unit of your event. The form of your event has a field Measurement unit with two options: Metric (metres) and Imperial (feet and inches). We fill it in from your country, and you can change it at any time, also while your plan exists and your event sells tickets: the plan stays exactly the same, only the labels and the input fields change. A table of 1.8 m then reads as 5 ft 11 in.
Three ways to use the plan
Decide what the plan is for before you draw, because it changes what you need:
- A floor plan only. You want a plan to scale for the venue, the caterer and the crew, and nobody is assigned to a seat. Draw the room and skip sections 4 to 6.
- You seat the guests yourself. Your event works with personal invitations, an RSVP event in Tickets. You drag every guest onto a chair. Read section 5.
- Your guests pick their own seat. Your event sells free or paid tickets, and buyers choose their seats on the plan while they order, like for a concert. Read section 6.
The type of your event is set in Tickets. Read how to use Tickets to choose it. A plan you drew stays when you change the type later.
2. Draw the floor plan
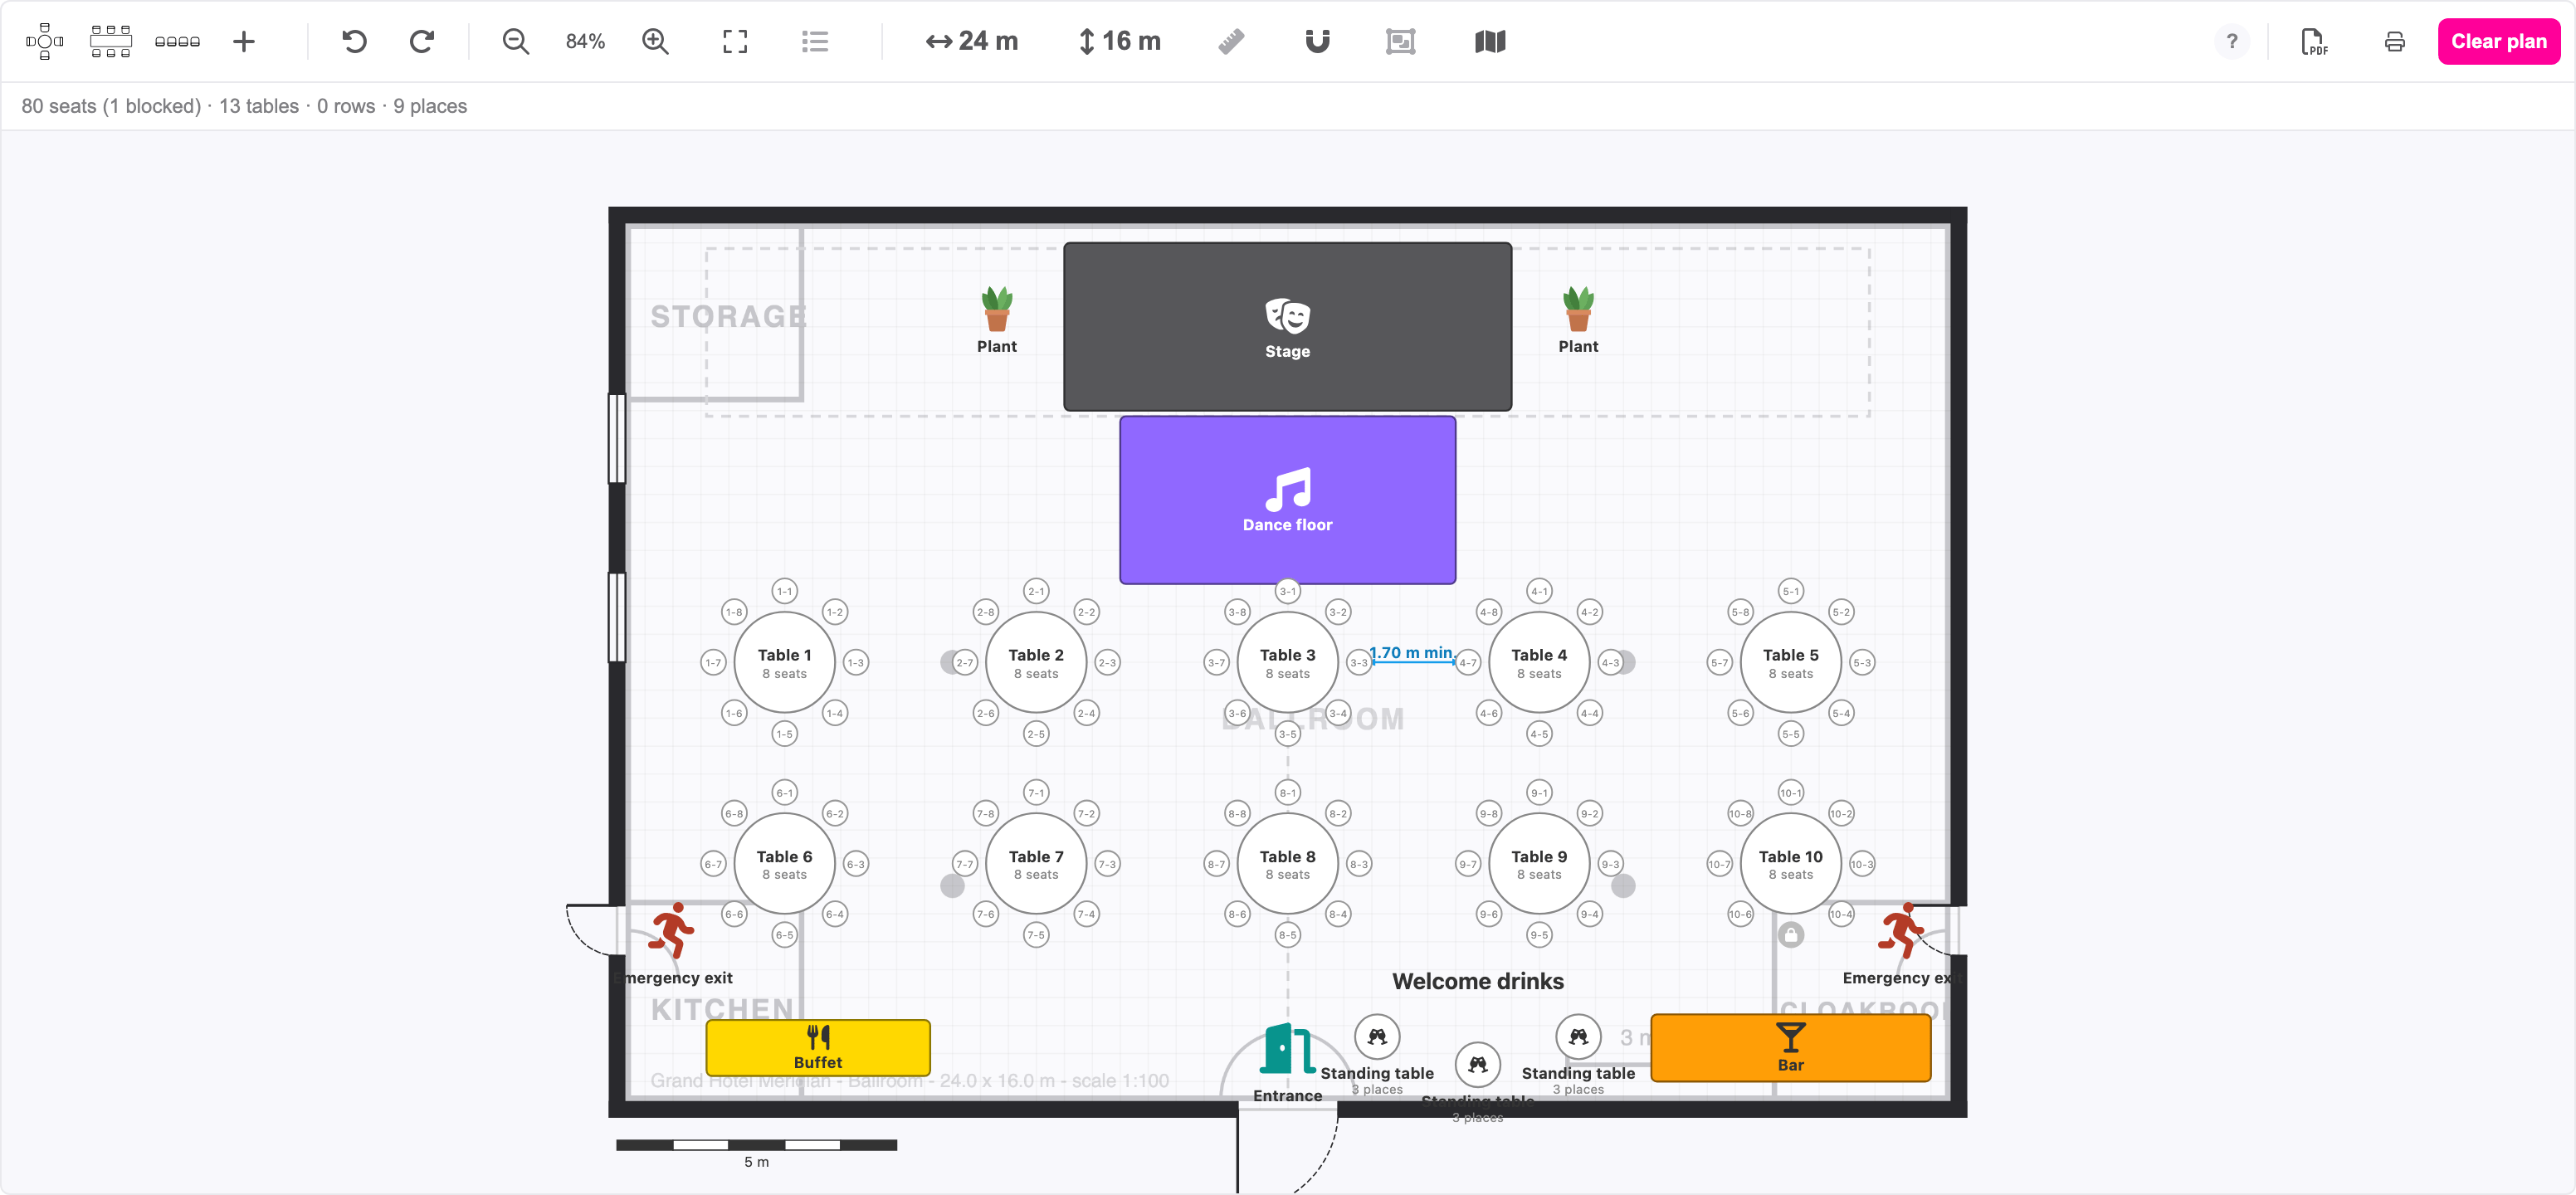
Open Plan / Seating for your event. The page is called Seating - design the plan: a toolbar at the top, the drawing in the middle, and a panel on the right that appears when you select something.
The room
A new plan starts as an empty room of 25 by 15 metres. Click the two buttons with the arrows in the toolbar to set Room width (m) and Room depth (m), from 1 to 500 metres. The light grid behind the room is half a metre (one foot on an imperial plan). Everything you place snaps to that grid, so tables line up on their own. Click Snap to the grid (the magnet) to switch snapping off when something has to sit exactly where you want it.
Scroll to zoom, drag the empty canvas to pan, and use Zoom in, Zoom out and Fit in the toolbar. Fit shows the whole room again.
Tables and seat rows
The first three buttons of the toolbar add the elements that carry seats:
- Add round table: a round table with chairs around it.
- Add rectangular table: a long table with chairs on the sides you choose.
- Add seat row: a row of chairs, for a theatre or a ceremony.
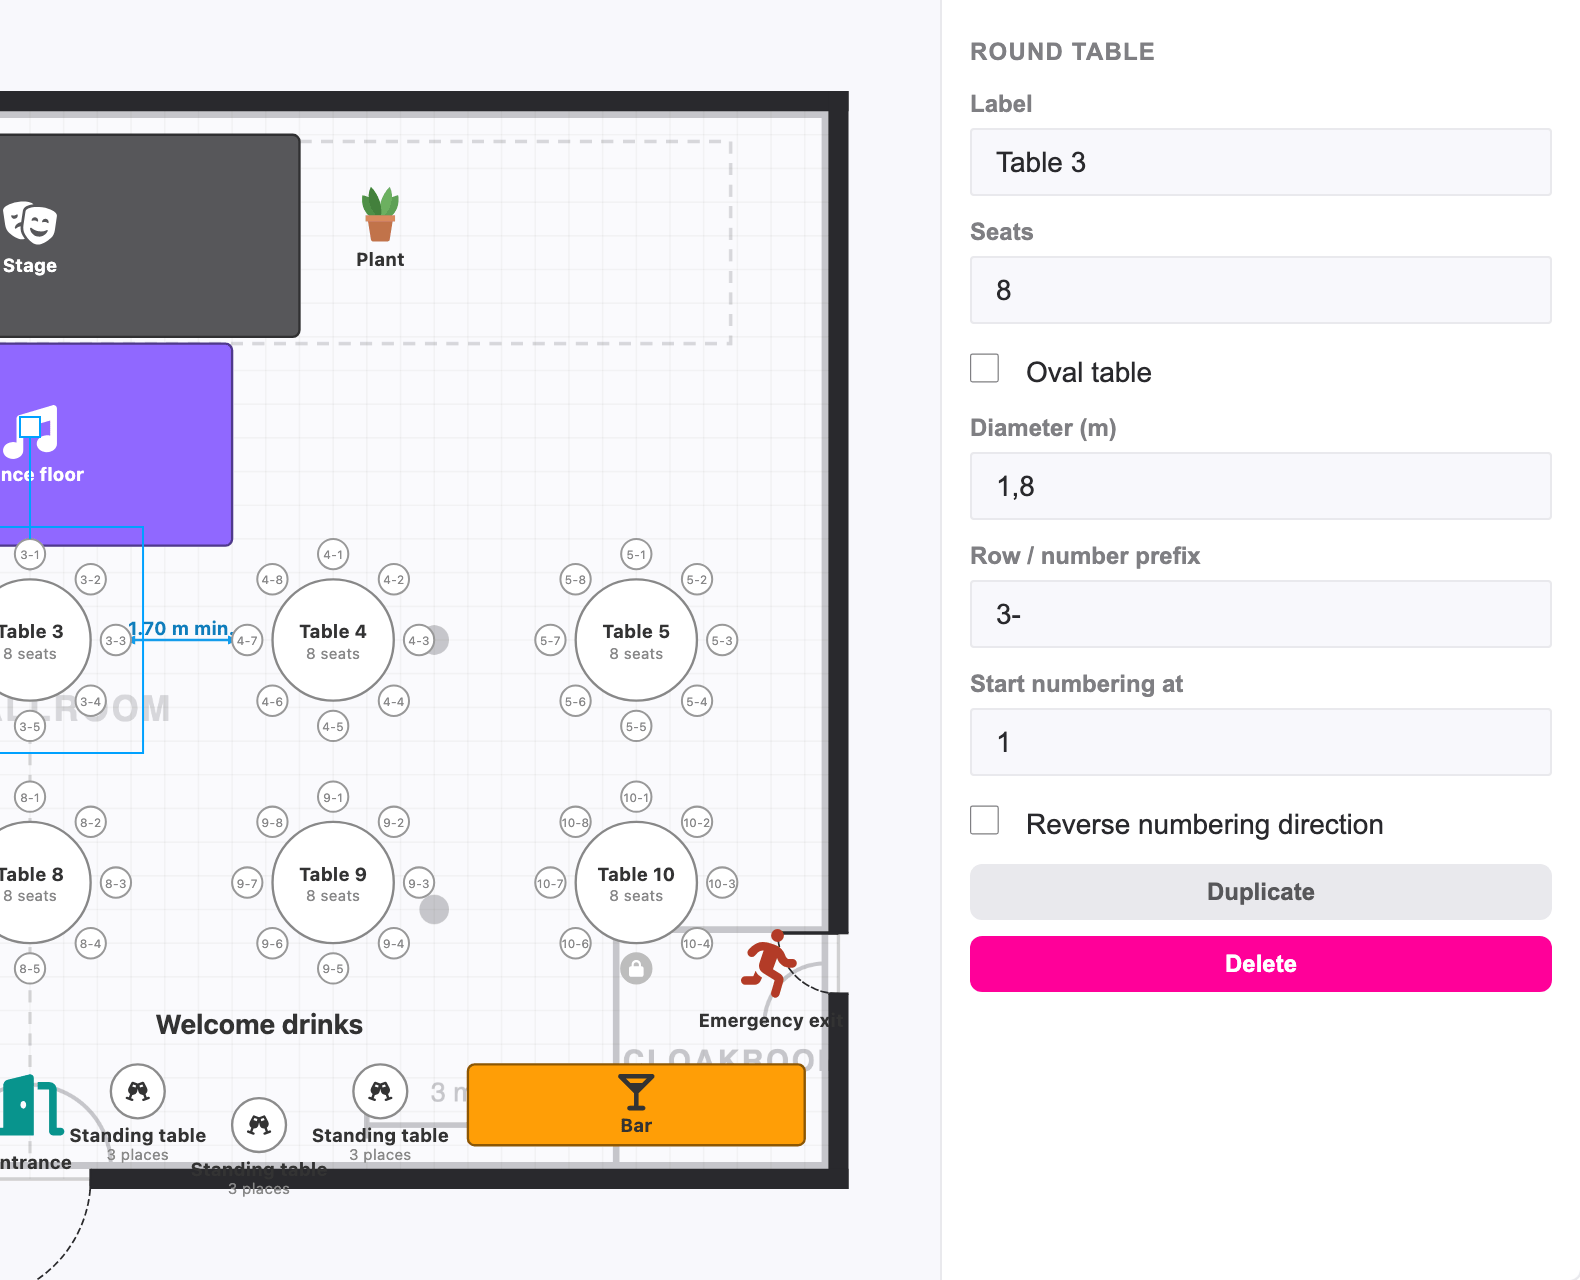
A new element lands in the middle of your view. Drag it to its place, use the corner handles to resize it, and the top handle to rotate it. Click it, and the panel on the right shows its properties:
| Property | What it does |
|---|---|
| Label | The name on the plan, such as "Table 7" or "Head table". Every table and row gets a letter and a name of its own when you add it (Table A, Table B, ...). Change it as you like. |
| Seats | The number of chairs around a round table or in a row, up to 30. |
| Oval table | Tick it to stretch a round table into an oval. You then set a Width (m) and a Depth (m) instead of one Diameter (m). |
| Distribute seats automatically | On a rectangular table: type the Seats (total), up to 40, and tick the sides that get chairs: Top side, Bottom side, Left side, Right side. The chairs are spread over those sides. Untick it to type Seats top, Seats bottom, Seats left and Seats right yourself, up to 20 per side. A head table has chairs on one side only. |
| Seat spacing (m, centre to centre) | On a seat row: the distance between two chairs, from 0.40 to 1.00 m. |
| Zone | On an event with zones: the zone the seats of this table or row belong to. Read section 6. |
The numbering fields below them are explained in section 4. The counter right under the toolbar keeps count while you draw: seats, tables, rows and places.
Everything else: the element catalog
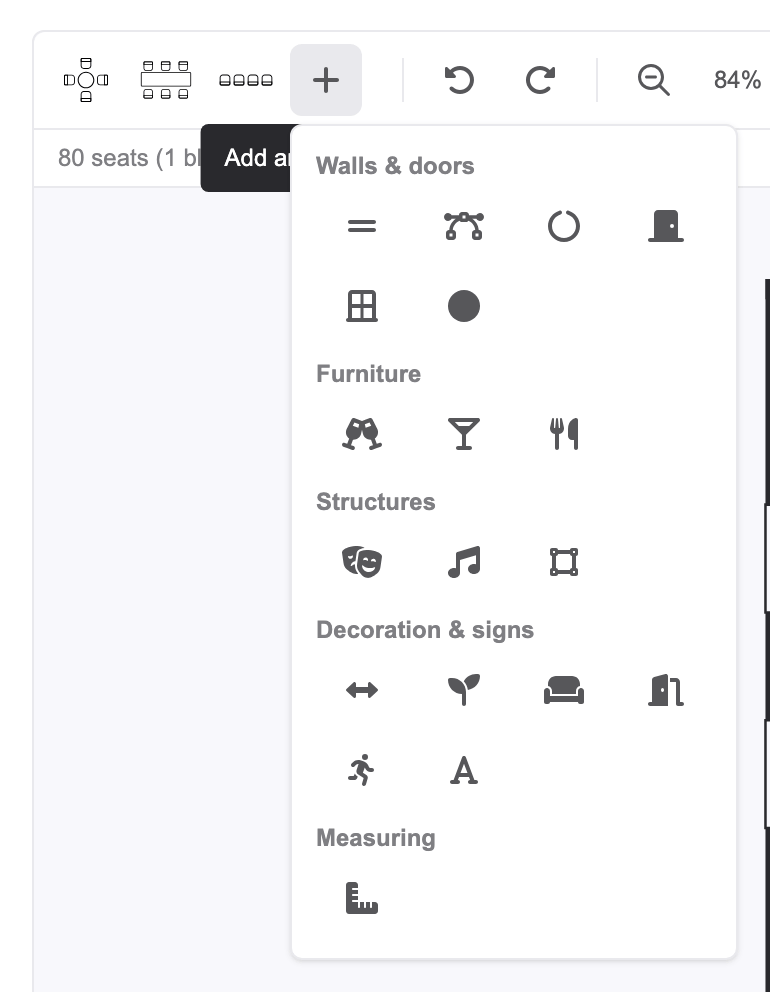
Click Add another element (the plus) to open the catalog. It has five groups:
| Group | Elements |
|---|---|
| Furniture | Standing table, Bar, Buffet. A standing table has Places instead of seats: how many people stand at it. Places count in the overview, but nobody can be assigned to them and they are never sold. |
| Structures | Stage, Dance floor, Area. An area is a coloured rectangle with a name, to mark a part of the room: the lounge, the catering area, the cloakroom. |
| Decoration & signs | Free passage for a corridor that has to stay clear, Plant, Other furniture, Entrance, Emergency exit and Text label for a note on the plan. |
| Walls & doors | Wall, Curved wall, Corner, Door, Window and Pillar, to draw the contour of the room. |
| Measuring | Distance marker: a measurement that stays on the plan. |
Every element has a real size: a stage of 6 by 4 metres, a bar of 4.5 by 4.5 metres, a plant of half a metre. Drop it in, then change Width (m), Depth (m) or Diameter (m) in the panel to the size you ordered. Most elements take a Colour from a fixed set of print-friendly colours, and a Show the icon on the plan switch for the small picture in them. A Text label has a Text size (m) that scales with the plan.
Walls, doors and windows
Walls make the plan look like the real room and tell everyone where the exits are. A Wall is drawn by dragging its two ends, or by typing its Length (m) in the panel. Set its Wall thickness (m). A Curved wall also has a Curve (m, negative bends the other way). A Corner joins two walls at an angle: type the Length of each side (m), the Corner angle (degrees) and the Roundness (m, 0 is a sharp corner). Walls that meet snap to each other.
Drop a Door or a Window onto a wall and it attaches to it: the wall opens up where the door is, and the door moves along when you move the wall. Set the Door width (m) or Window width (m). A door has two more options: Open to the other side and Hinge on the other end (for double doors). Two doors side by side with the hinge on the outer ends make a double door. A Pillar is Round or Square, with its own size.
Tip: draw the walls, doors and emergency exits before the tables. A plan with the contour of the room is what your venue and your safety officer want to see, and it keeps you from placing a table in front of an exit.
Move, copy and delete
- Drag an element to move it. While you drag, guide lines show the distance to the elements around it.
- Click Select several elements (the dotted square) and drag a rectangle across the plan to select everything in it. Or hold Shift and drag. Shift-click adds or removes one element. Drag any element of the selection to move them all, keeping their spacing. The panel shows the Selection with a Duplicate and a Delete button for the whole set.
- Duplicate in the panel copies the selected element next to the original, with the next free letter for a table or a row. Copy a table once you have one you like, instead of setting the same options again.
- Delete in the panel, or the Del key, removes the selection.
- Undo (Ctrl+Z) and Redo (Ctrl+Y) go back and forth through your changes. Ctrl+A selects the whole plan, Esc drops the selection.
- Every change is saved on its own. Saved ✓ in the toolbar confirms it. There is no save button.
- Clear plan removes everything from the plan at once, including the guests you seated. It asks you to confirm.
Measure
Click Measure a distance (the ruler), then click two points on the plan: the distance between them appears at the top. Click again to measure something else, or press Esc to stop. Nothing is added to the plan. For a distance that has to stay on the plan, such as the width of the passage between two rows, add a Distance marker from the catalogue: drag its two ends to the points, or type the Distance in the panel, and give it a note such as "min." in the Label field. Hold Shift while you drag an end to keep the marker exactly horizontal or vertical.
The overview: what to order
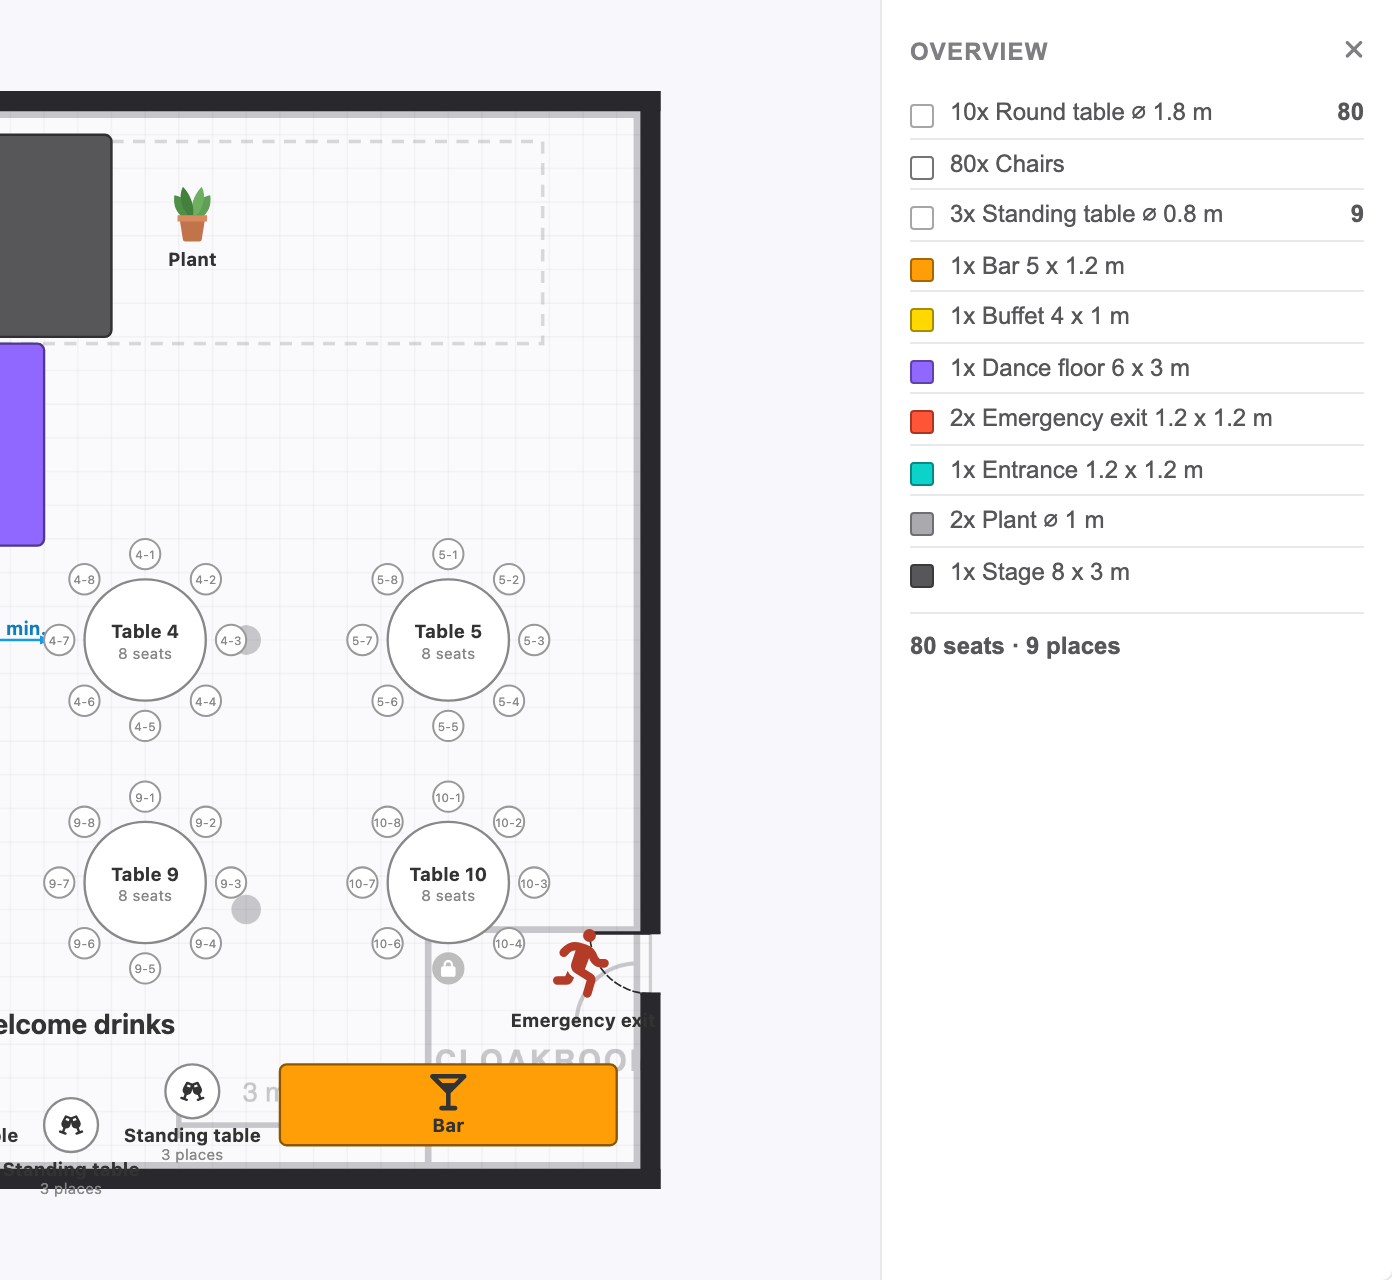
Click Overview (the list icon) in the toolbar. The panel lists every element of the plan with its size and colour and how many of them you have: 12 round tables of 1.8 m, 3 standing tables, 1 bar, 1 stage. The total at the bottom counts the seats and the places. This is the list you send to the rental company, and it must never disagree with the drawing, because it is based on the drawing. Walls, text labels and distance markers are not in it: they are the room, not what you order.
3. Start from a drawing you already have
Nobody likes to draw a room from scratch. Click Venue plan (the map icon) in the toolbar. The window offers three shortcuts.
Trace the plan of your venue
Most venues have a drawing of their rooms: a PDF or an image, often to scale. Click Upload venue plan and pick the file: PNG, JPG or PDF, up to 15 MB. A PDF is converted to an image in your browser, first page only. The drawing appears under your plan, half transparent, and you draw on top of it.
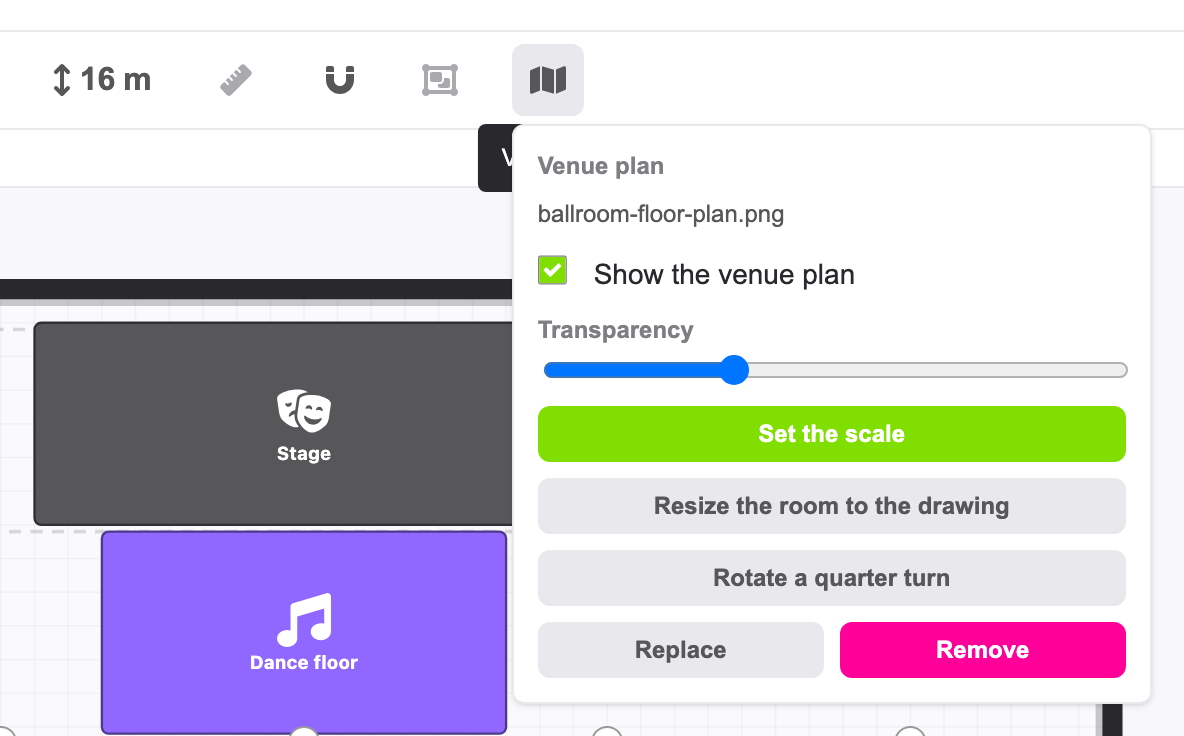
A drawing has no scale of its own, so tell the plan how big it is. Click Set the scale, then click two points on the drawing that you know the real distance between, such as the two ends of a wall or the scale bar printed on the plan. Type the distance and click Apply. Until you do, the window shows Not calibrated yet - set the scale so the measurements on your plan are correct. Then click Resize the room to the drawing so the room is as big as the venue.
In the same window, you set the Transparency of the drawing, hide it with Show the venue plan, rotate it a quarter turn, replace it with another file or remove** it. Removing the drawing leaves your tables and elements where they are.
Good to know: the drawing is only visible to people with access to your plan, and it is included when you export or print the plan. Switch Show the venue plan off before you export if your caterer only needs your own drawing.
Copy the plan of an earlier event
Did you draw this room last year? The section Copy a plan from an earlier event lists your earlier events with a plan. Pick an event and click Copy this plan. Everything comes along: the room, every element, the colours, the numbering, the blocked seats and the venue drawing with its scale. Guests and seats they had do not: the plan is yours to fill again.
Two rules. The section is only there while your plan is still empty: as soon as you place one element, you can no longer copy a plan onto it. And it only lists events you can manage, so a colleague's event plan does not appear unless they gave you that access. If you already uploaded a venue drawing for this event, copying a plan replaces it, and you are asked to confirm.
Tip: starting your new event as a copy of an earlier one, in the event wizard, copies the plan too. You do not have to import it afterwards.
Import the floor plan of your venue
Venues with a business page on eventplanner.net can publish the floor plans of their rooms: the real room with its walls, doors and fixed elements, and ready-made setups such as a banquet or theatre layout. Under Import a venue floor plan, type the Venue name or city, Pick your venue in the list, then Pick the room and the floor plan or setup and click Import this plan. You start from the real room, drawn by the people who know it. Like the copy above, this only works while your plan is still empty.
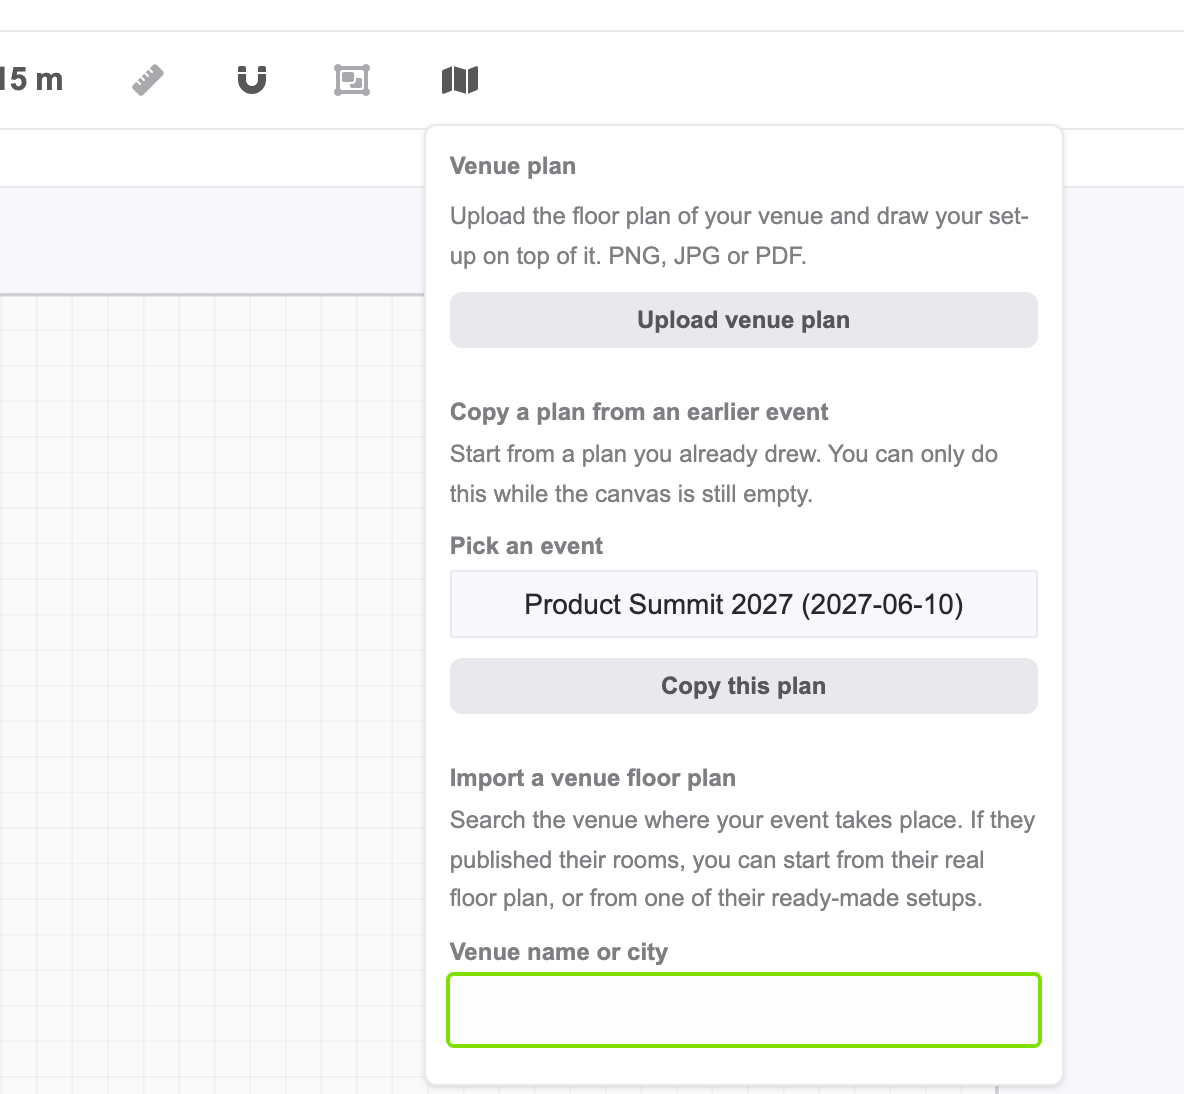
Did the venue not publish its floor plans yet? Click Request the venue to submit their floor plan. We send the venue a message from you through your eventplanner.net inbox, and you follow it up there.
4. Seat numbers and blocked seats
Every chair on the plan has a number, and that number is what your guests see on their ticket and what you read in the seating list. By default, the chairs of a table or a row are numbered with the letter of the element: A1, A2, A3 on table A, B1, B2 on table B. Change it per table or row in the panel:
- Row / number prefix: the text in front of the number, glued to it. "A" gives A1, A2, "7-" gives 7-1, 7-2, and "Balcony " gives Balcony 1, Balcony 2.
- Start numbering at: the first number, for a row that continues the numbering of the row before it.
- Reverse numbering direction: count from the other end.
- Seat numbering: Consecutive (1, 2, 3), Odd only (1, 3, 5) or Even only (2, 4, 6). Theatres number the left of the aisle odd and the right even. Only seat rows have this option.
Click one chair on the plan to change that chair alone. The panel shows the Chair with its number. Type your own text in Seat number / label, or leave it empty for the automatic number. Tick Blocked (not assignable) to take the chair out of use: a blocked chair is never sold and nobody can be seated on it. Use it for the chair behind the pillar, the seat of the sound engineer or the seats you keep free for yourself. Blocked chairs are counted separately in the counter under the toolbar.
Every number on the plan has to be unique. If two chairs end up with the same number, a warning above the plan lists them: Duplicate seat numbers. Fix it before you publish or seat anyone.
Tip: number the chairs the way the venue numbers them, with the venue's row letters and seat numbers. The seat on the ticket then matches the plate on the chair, and your guests find their seat without help.
5. Seat your guests yourself (RSVP events)
Is your event an RSVP event, with a personal invitation per guest? Then you decide who sits where. As soon as your plan has seats, Plan / Seating opens on Seating - assign guests. The green button Assign guests in the designer and the grey button Edit floorplan in the assign view take you from one to the other.
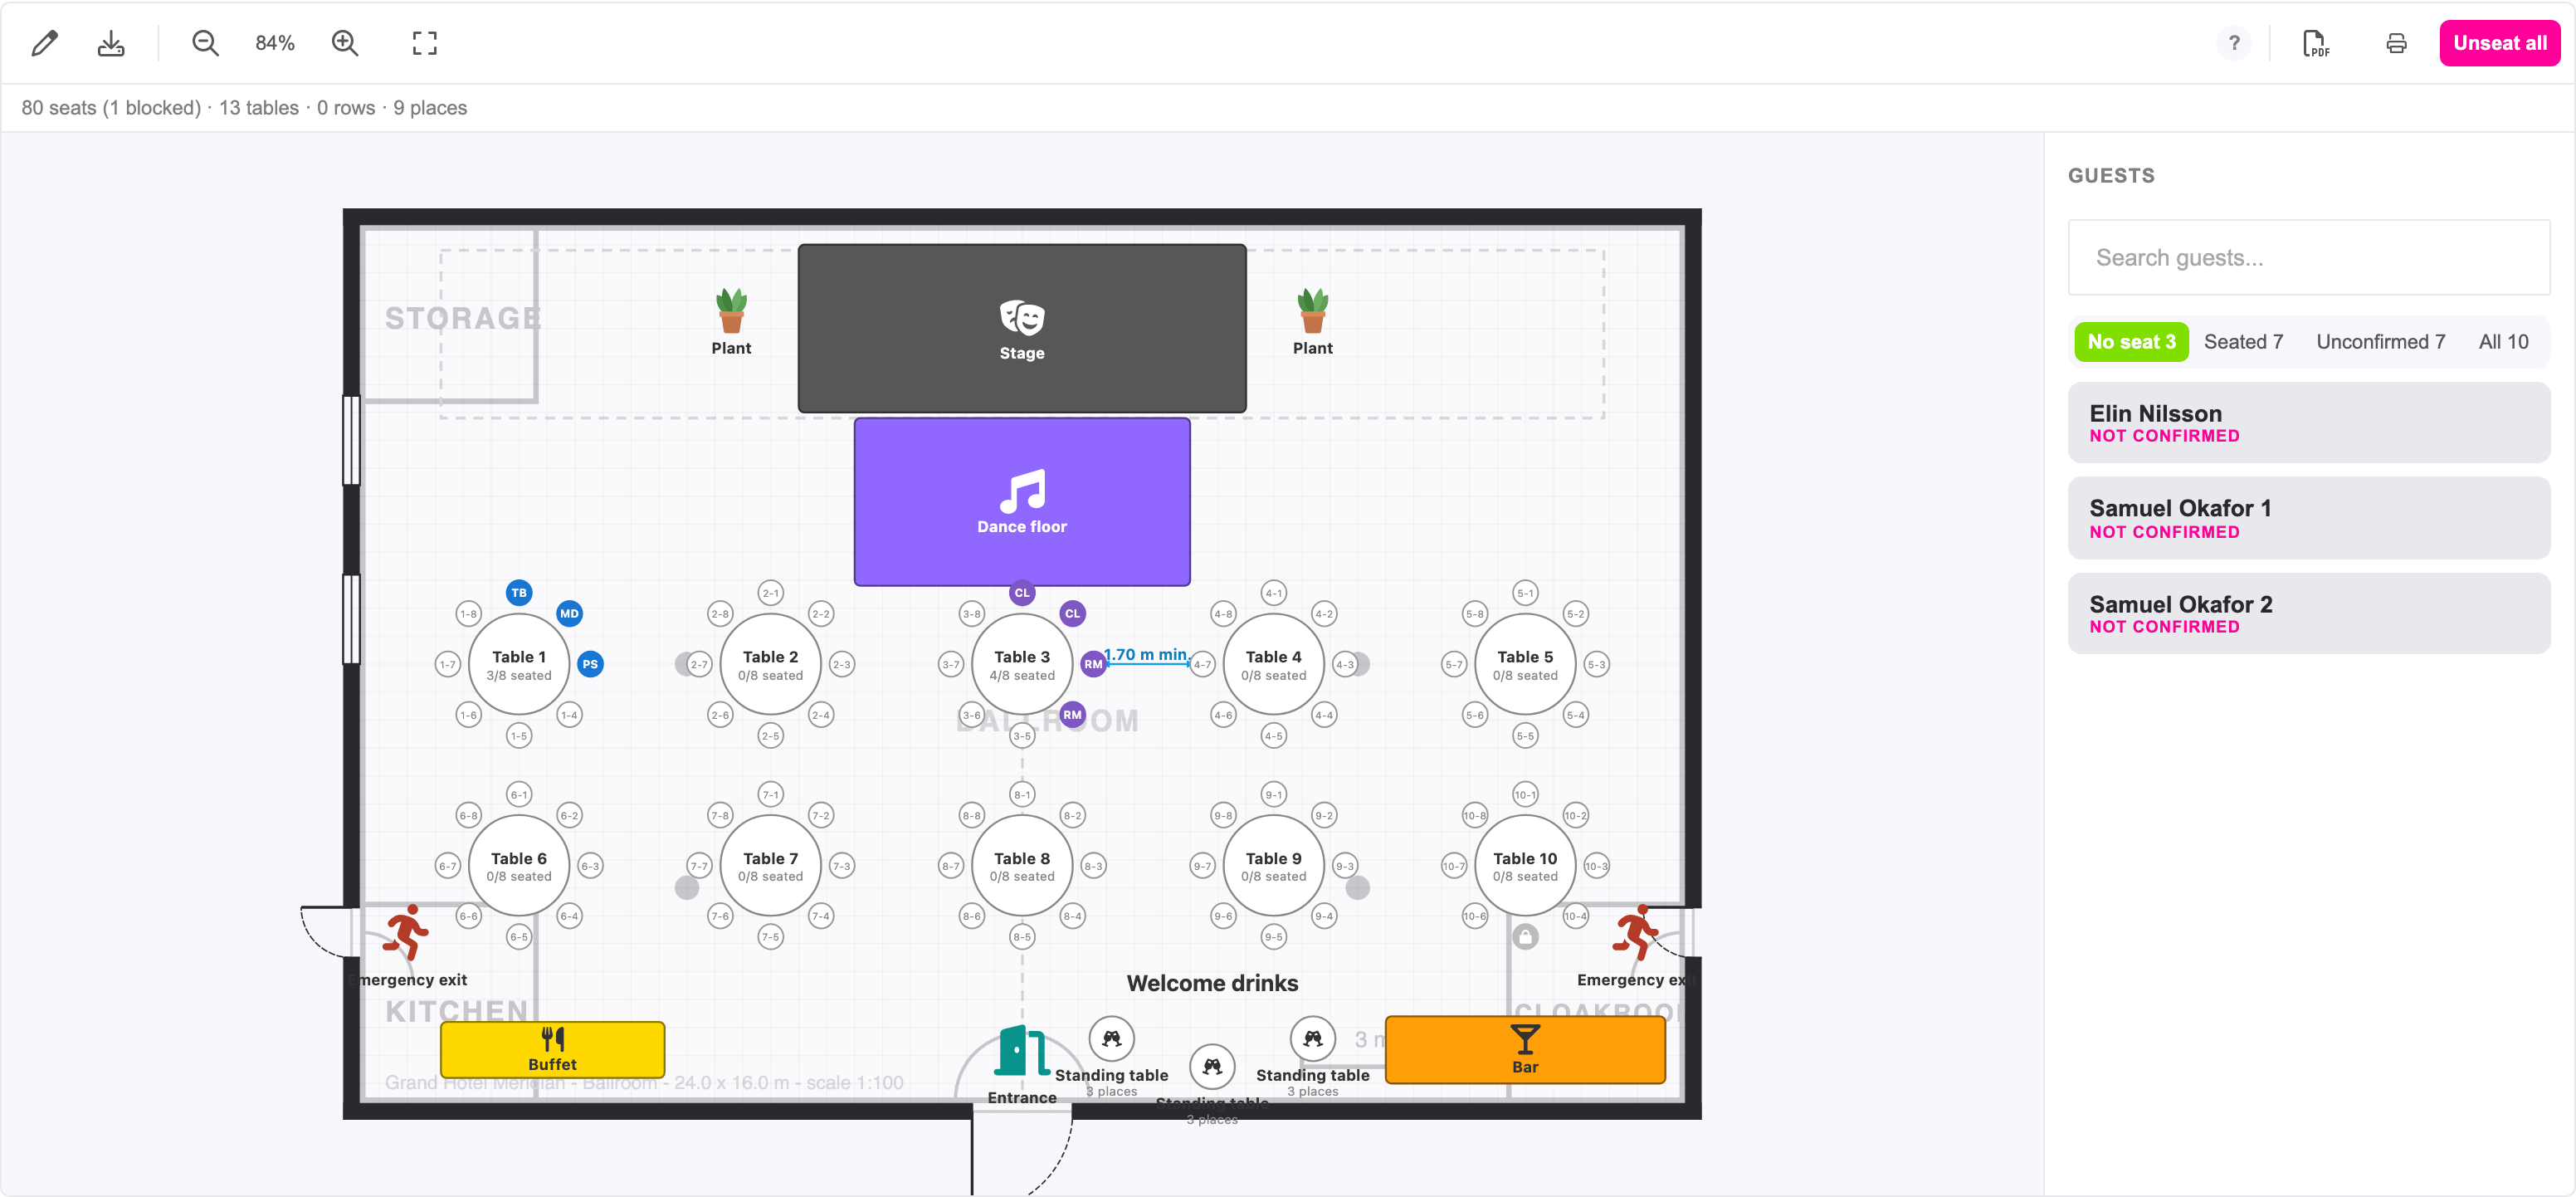
The list on the right holds your guests, with a search field Search guests... and four filters: No seat, Seated, Unconfirmed and All. Each filter shows its count, so you always know how many guests still need a seat. Drag a guest onto a chair, or click the guest and then the chair. Drag an occupied chair to move that guest to another seat, or click it to unseat the guest. The counter at the top reads how many of your guests are seated. Unseat all empties every chair.
Your guest list and your plan stay in step:
- Guests who have not answered yet are in the list as well, marked Unconfirmed. An invitation for two shows as two guests: "Marie Dubois 1" and "Marie Dubois 2". Seat them in advance. When they confirm, the seats go to the real guests, one by one. When they decline, their seats are free again.
- A guest who confirmed is in the list by name. Guests you invited for two and who confirm for two are two guests in the list.
- Too few seats? When your guests outnumber the seats they can be assigned to, a warning above the plan tells you how many guests you have for how many seats.
- Changing the plan while guests are seated is allowed. Delete a table, and its guests go back to No seat. A notice tells you how many.
Seating your guests is for you and your team: nobody gets a message when you seat or move a guest. A guest whose placeholder you seated before they confirmed does get the seat on their ticket, because the ticket is made at the moment they confirm, and the seat is already theirs by then. At the door, the ticket scanner shows the seat with every scanned ticket, and section 7 explains how to print the seating list for your hosts.
Good to know: an RSVP event has no zones and no seat picking. Your guests never see the plan; only you do.
6. Let your guests pick a seat (free and paid events)
For an event that sells tickets, the plan becomes a seat picker: your guests choose their seats on the plan while they order, the way they do for a concert or a show. Three things make that work: a plan with seats, ticket types that are seated, and, when not every ticket may sit everywhere, zones.
Mark a ticket type as seated
Draw the plan first, so that it has seats. Then open Tickets for your event. The settings board has a step Seating: it is checked once your plan has seats that can be sold, and its button brings you to the designer, Set up while you have no plan yet and Open once you have one. In the ticket settings, every ticket type has a section Seating with one option: Buyers of this ticket pick a seat on the seating plan. Tick it for the ticket types that come with a seat. A ticket type without the tick is general admission: its buyers get no seat and skip the seat picker. You can mix both, a seated grandstand and a standing floor, in one event.
The option is only there when your plan has seats that can be sold, and it is not there when your event uses time slots: seat picking does not work together with time slots. You never sell more tickets of a seated type than there are free seats for it.
Zones: which ticket sits where
Without zones every seated ticket type may pick any seat on the plan. Want the VIP tickets in front of the stage and the standard tickets behind them? Then you need zones. A zone is a part of your venue with its own colour on the plan and its own ticket types, and the ticket scanner uses the same zones at the door. Read how to use Tickets for everything zones do there.
Click Zones (the layers icon) in the toolbar of the designer. The panel lists the zones of your event, each with its colour, the number of seats painted into it and the number of ticket types linked to it. Click Add a zone, type the Zone name, choose a Colour and click Save. Then paint tables and rows into their zone: select them and choose the zone in the Zone field of the panel, or click Paint the selection next to the zone. The seats take the colour of their zone.
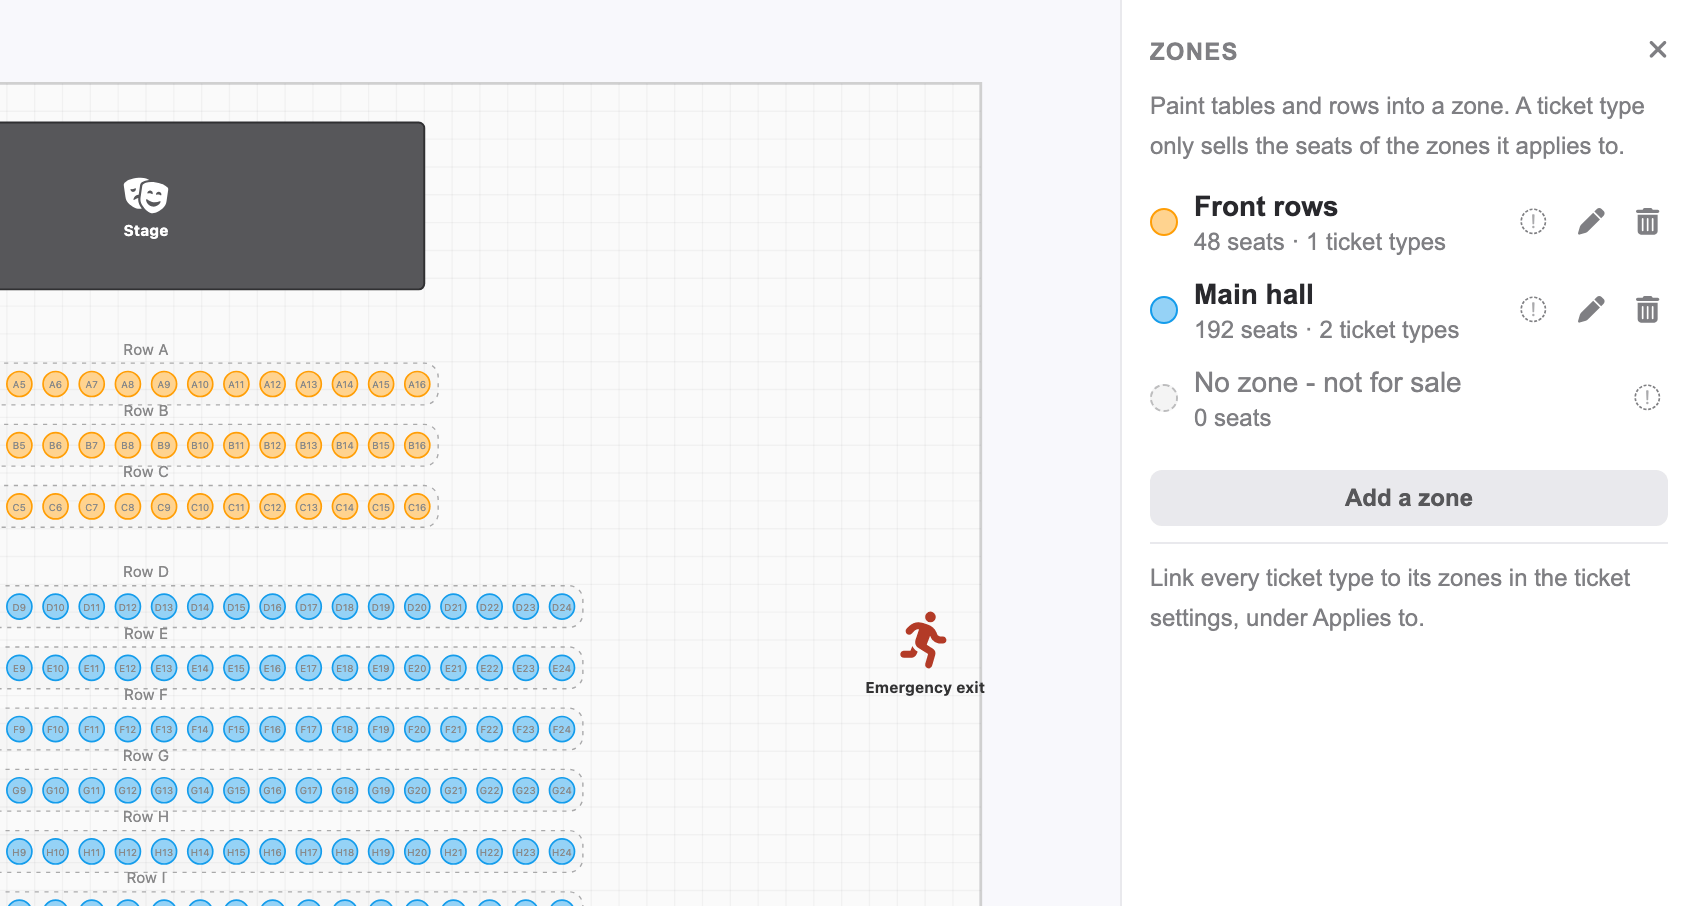
Finally, link every seated ticket type to its zones in the ticket settings, under Applies to. A ticket type then only sells the seats of the zones it applies to.
Locks: on an event with zones, a seat that is in no zone is not sold. The panel lists those seats as No zone - not for sale, the designer warns you above the plan, and the publish step of Tickets repeats the count. Paint every table and row before you publish. Zone names lock once your event is published; the colours never do. Creating, renaming and deleting a zone needs the manage right on Tickets next to the right on Plan / Seating, because a zone is ticket configuration. Painting tables into an existing zone only needs Plan / Seating.
What your guests see
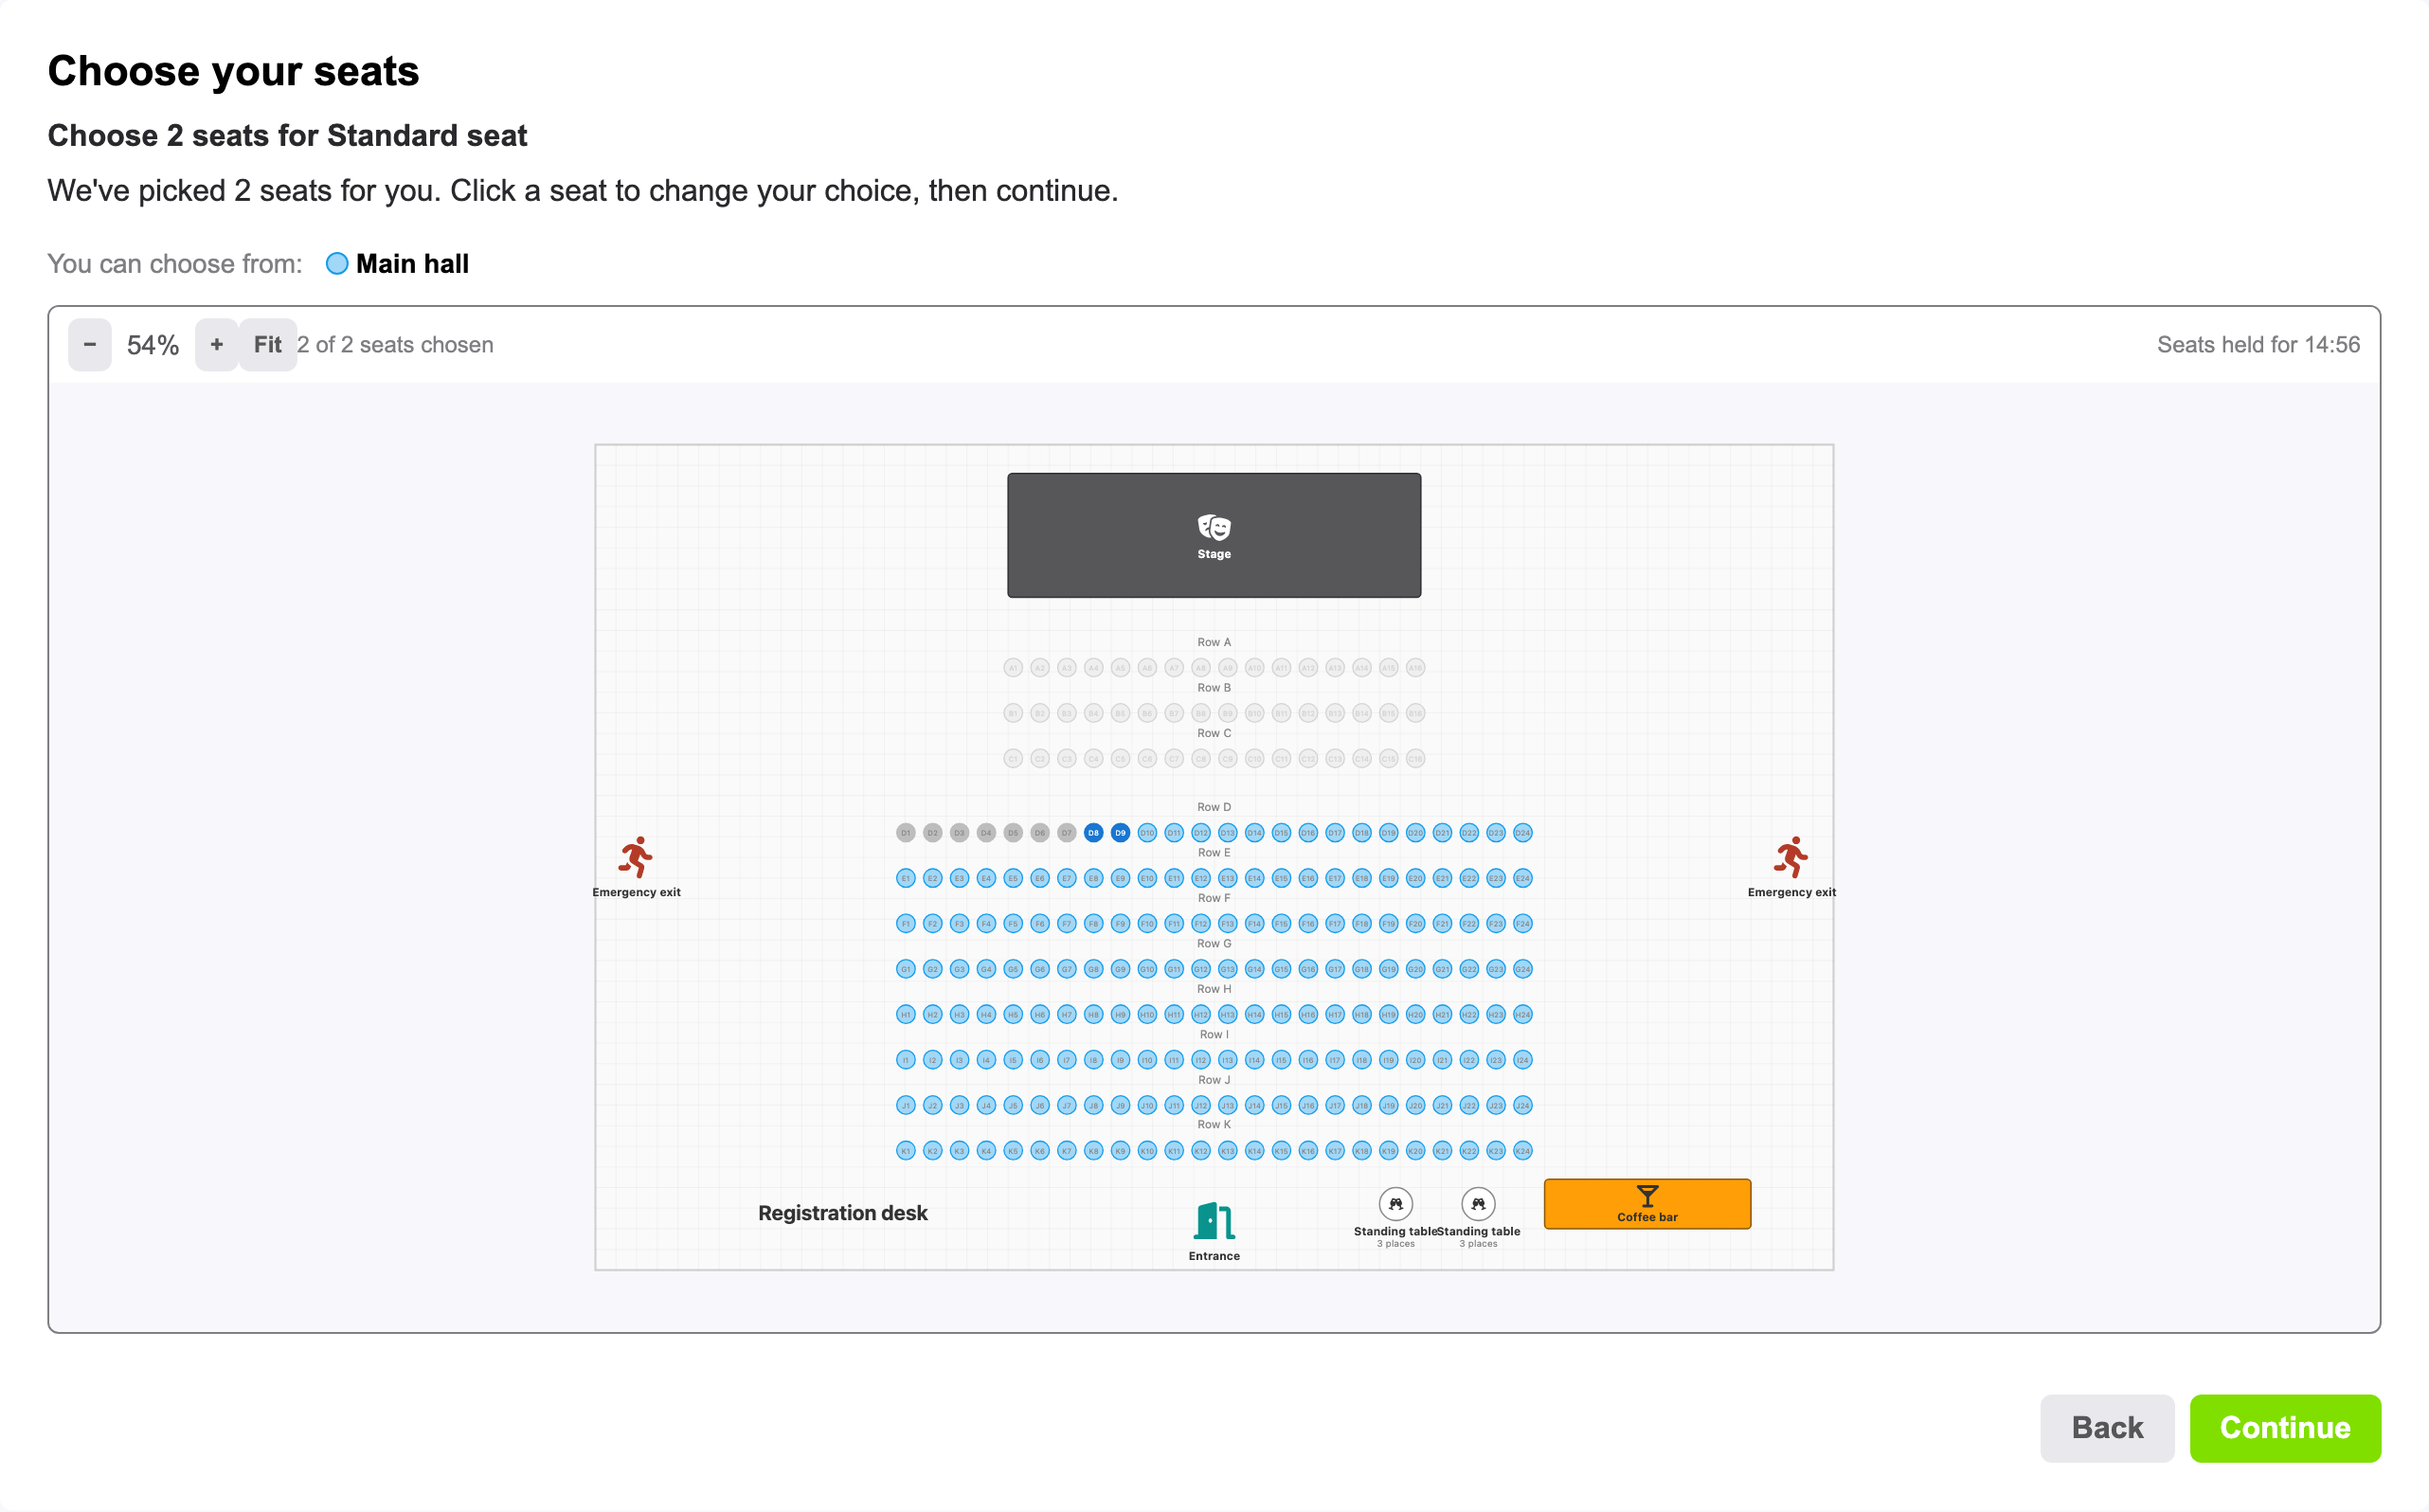
A guest who orders a seated ticket gets a step Choose your seats between the tickets and the checkout. We pick seats for them straight away: next to each other at one table or in one row, and never leaving a single empty seat between two taken ones. The guest can accept the proposal with Continue, or click other seats on the plan to change the choice. Seats of zones their ticket does not apply to are greyed out, and the plan says which zones they can choose from. Their seats are held for 15 minutes while they finish the order, so nobody else can take them. If they pick seats that would leave one seat on its own, the picker asks them not to. With more than one seated ticket type in the order, they pick the seats of each type in turn: Step 1 of 2, Step 2 of 2.
The seat ends up everywhere the ticket is: in the confirmation e-mail, on the ticket PDF, in the wallet pass and in the ticket scanner at the door. Read how to use Tickets for the order flow around it.
Who sits where
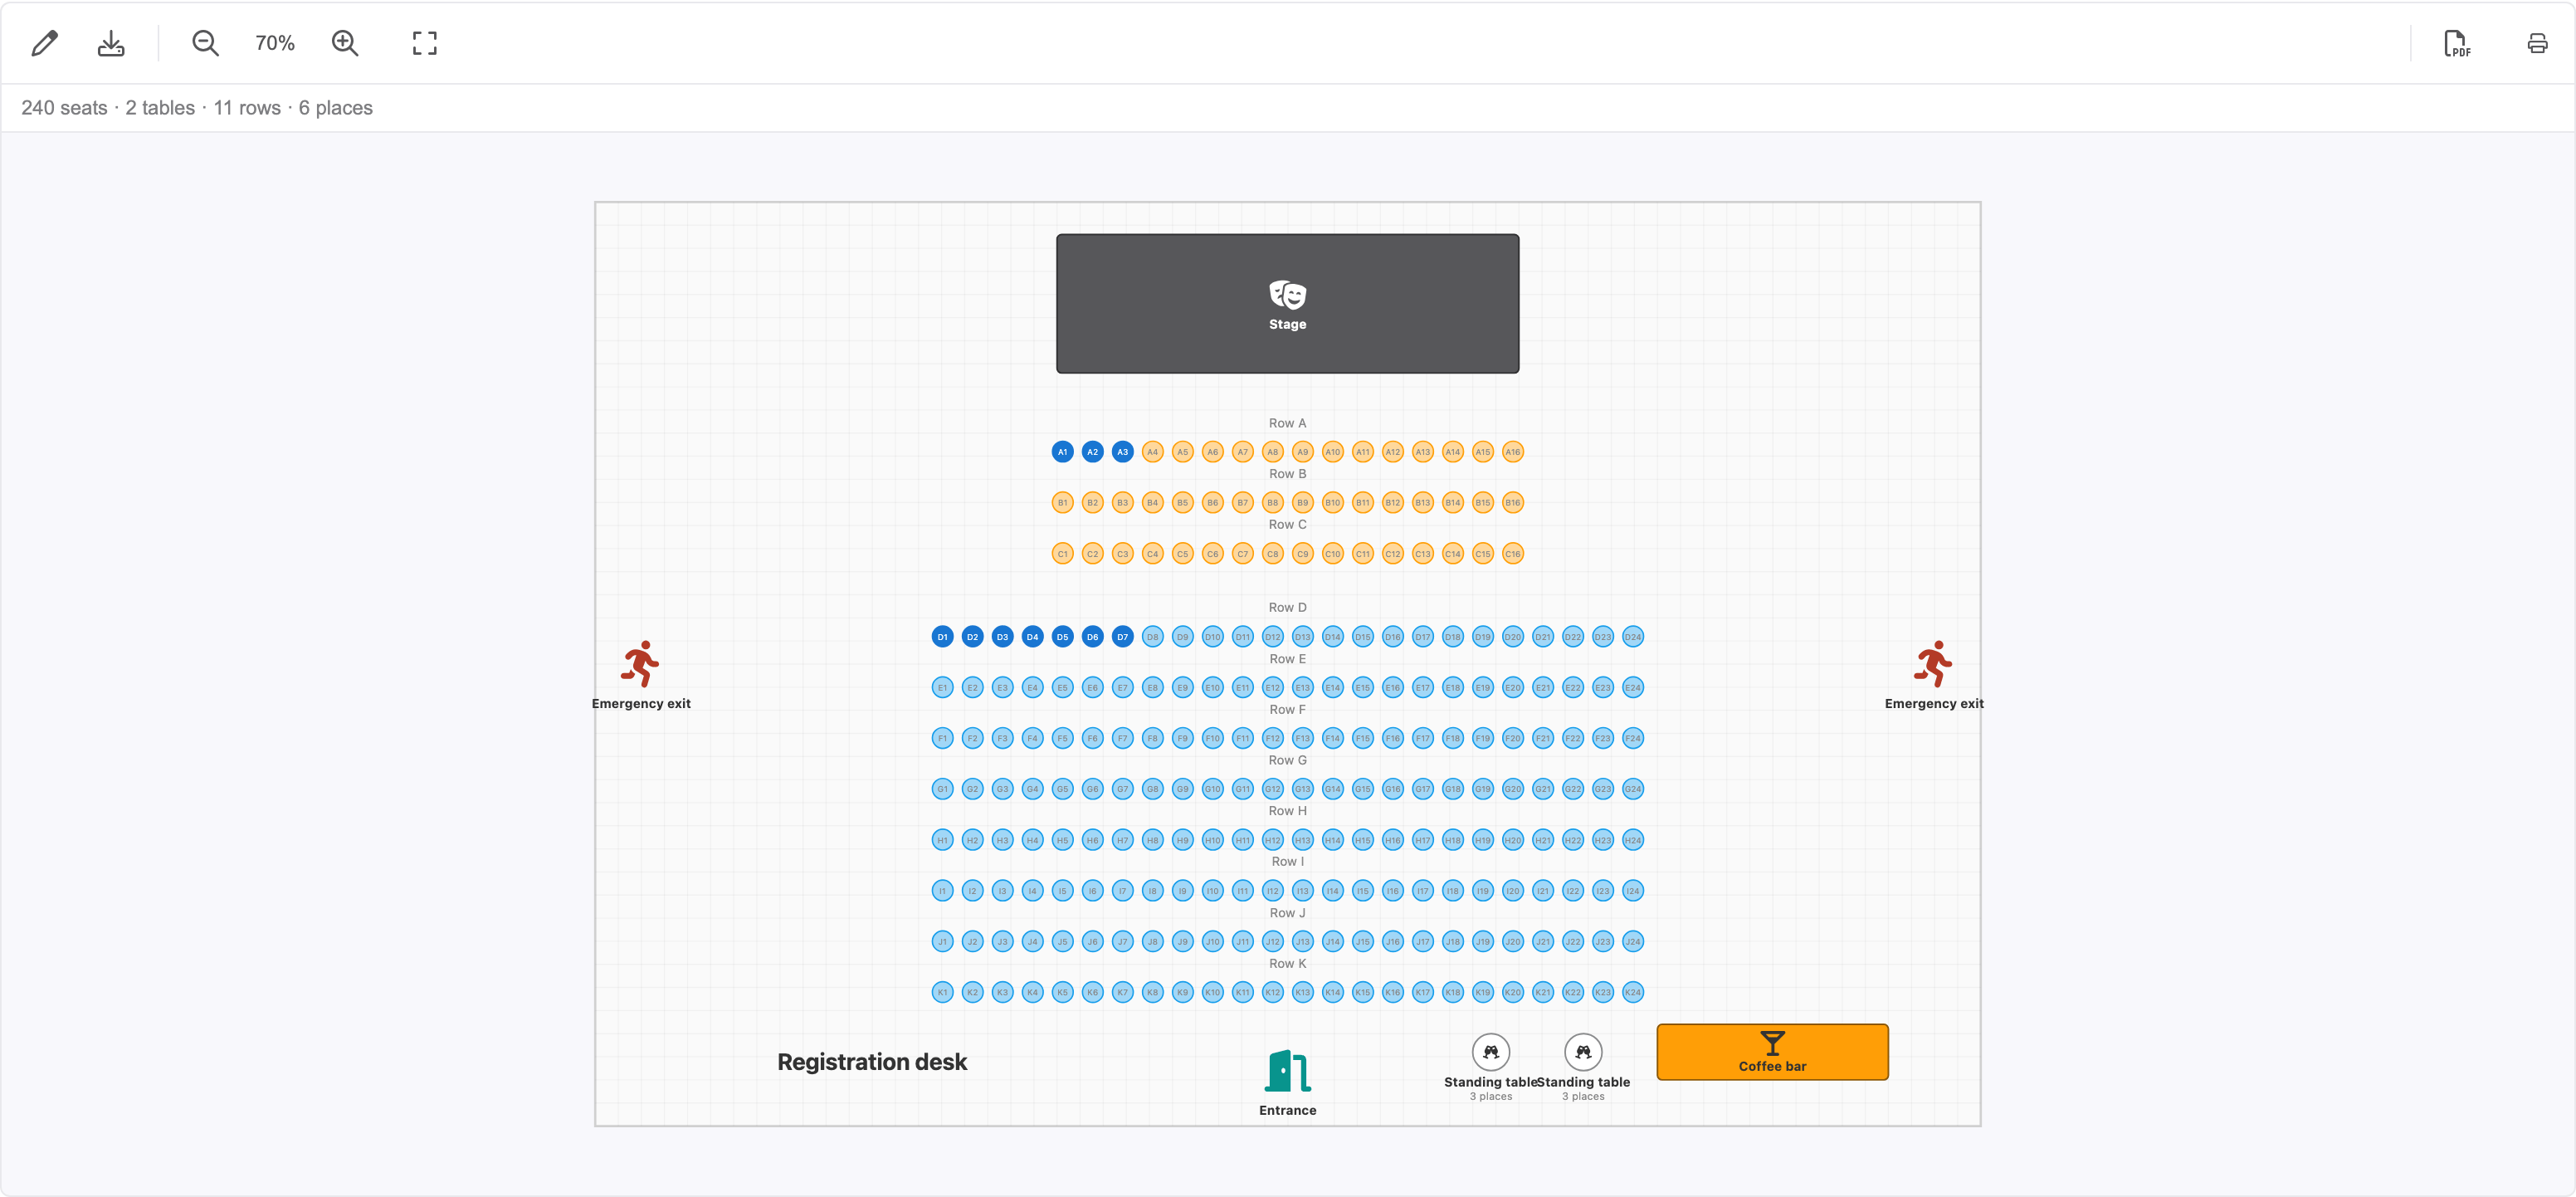
Once your event is published and seats are being sold, Plan / Seating opens on Seating - who sits where: your plan, read-only, with the sold seats filled in. The counter reads how many seats are sold, free and blocked, per zone as well. Move your mouse over a seat to see who booked it. Edit floorplan brings you back to the designer.
Locks: from the moment your event is published, a seat that is booked cannot be removed, blocked or moved to another zone, and that includes deleting its table, lowering the number of seats of its row or clearing the plan. A sold seat is a ticket in someone's hands. Everything else stays possible: add tables, rename, move, recolour, add walls and decoration, block seats that are not sold. You cannot move a buyer to another seat either: cancel the ticket in Tickets and let the guest order again.
7. Print, export and share the plan
Every view of the plan has the same two buttons on the right of the toolbar, for everyone who can open the plan:
- Download the plan as a PDF opens a small window: choose the Paper size, A4 or A3, tick or untick Include the element list and click Download as PDF. The PDF is sharp enough to print and places the plan as large as the page allows: a plan that is deeper than wide prints in portrait on its own. Untick the element list to give the plan the whole page. The overview of section 2 is the element list.
- Print opens a page with the plan, the zones, the overview and the Seating list: every table and row with its seats, the name of the guest on each seat and whether they confirmed. Print it for the hosts at the door, or save it as a PDF from your browser.
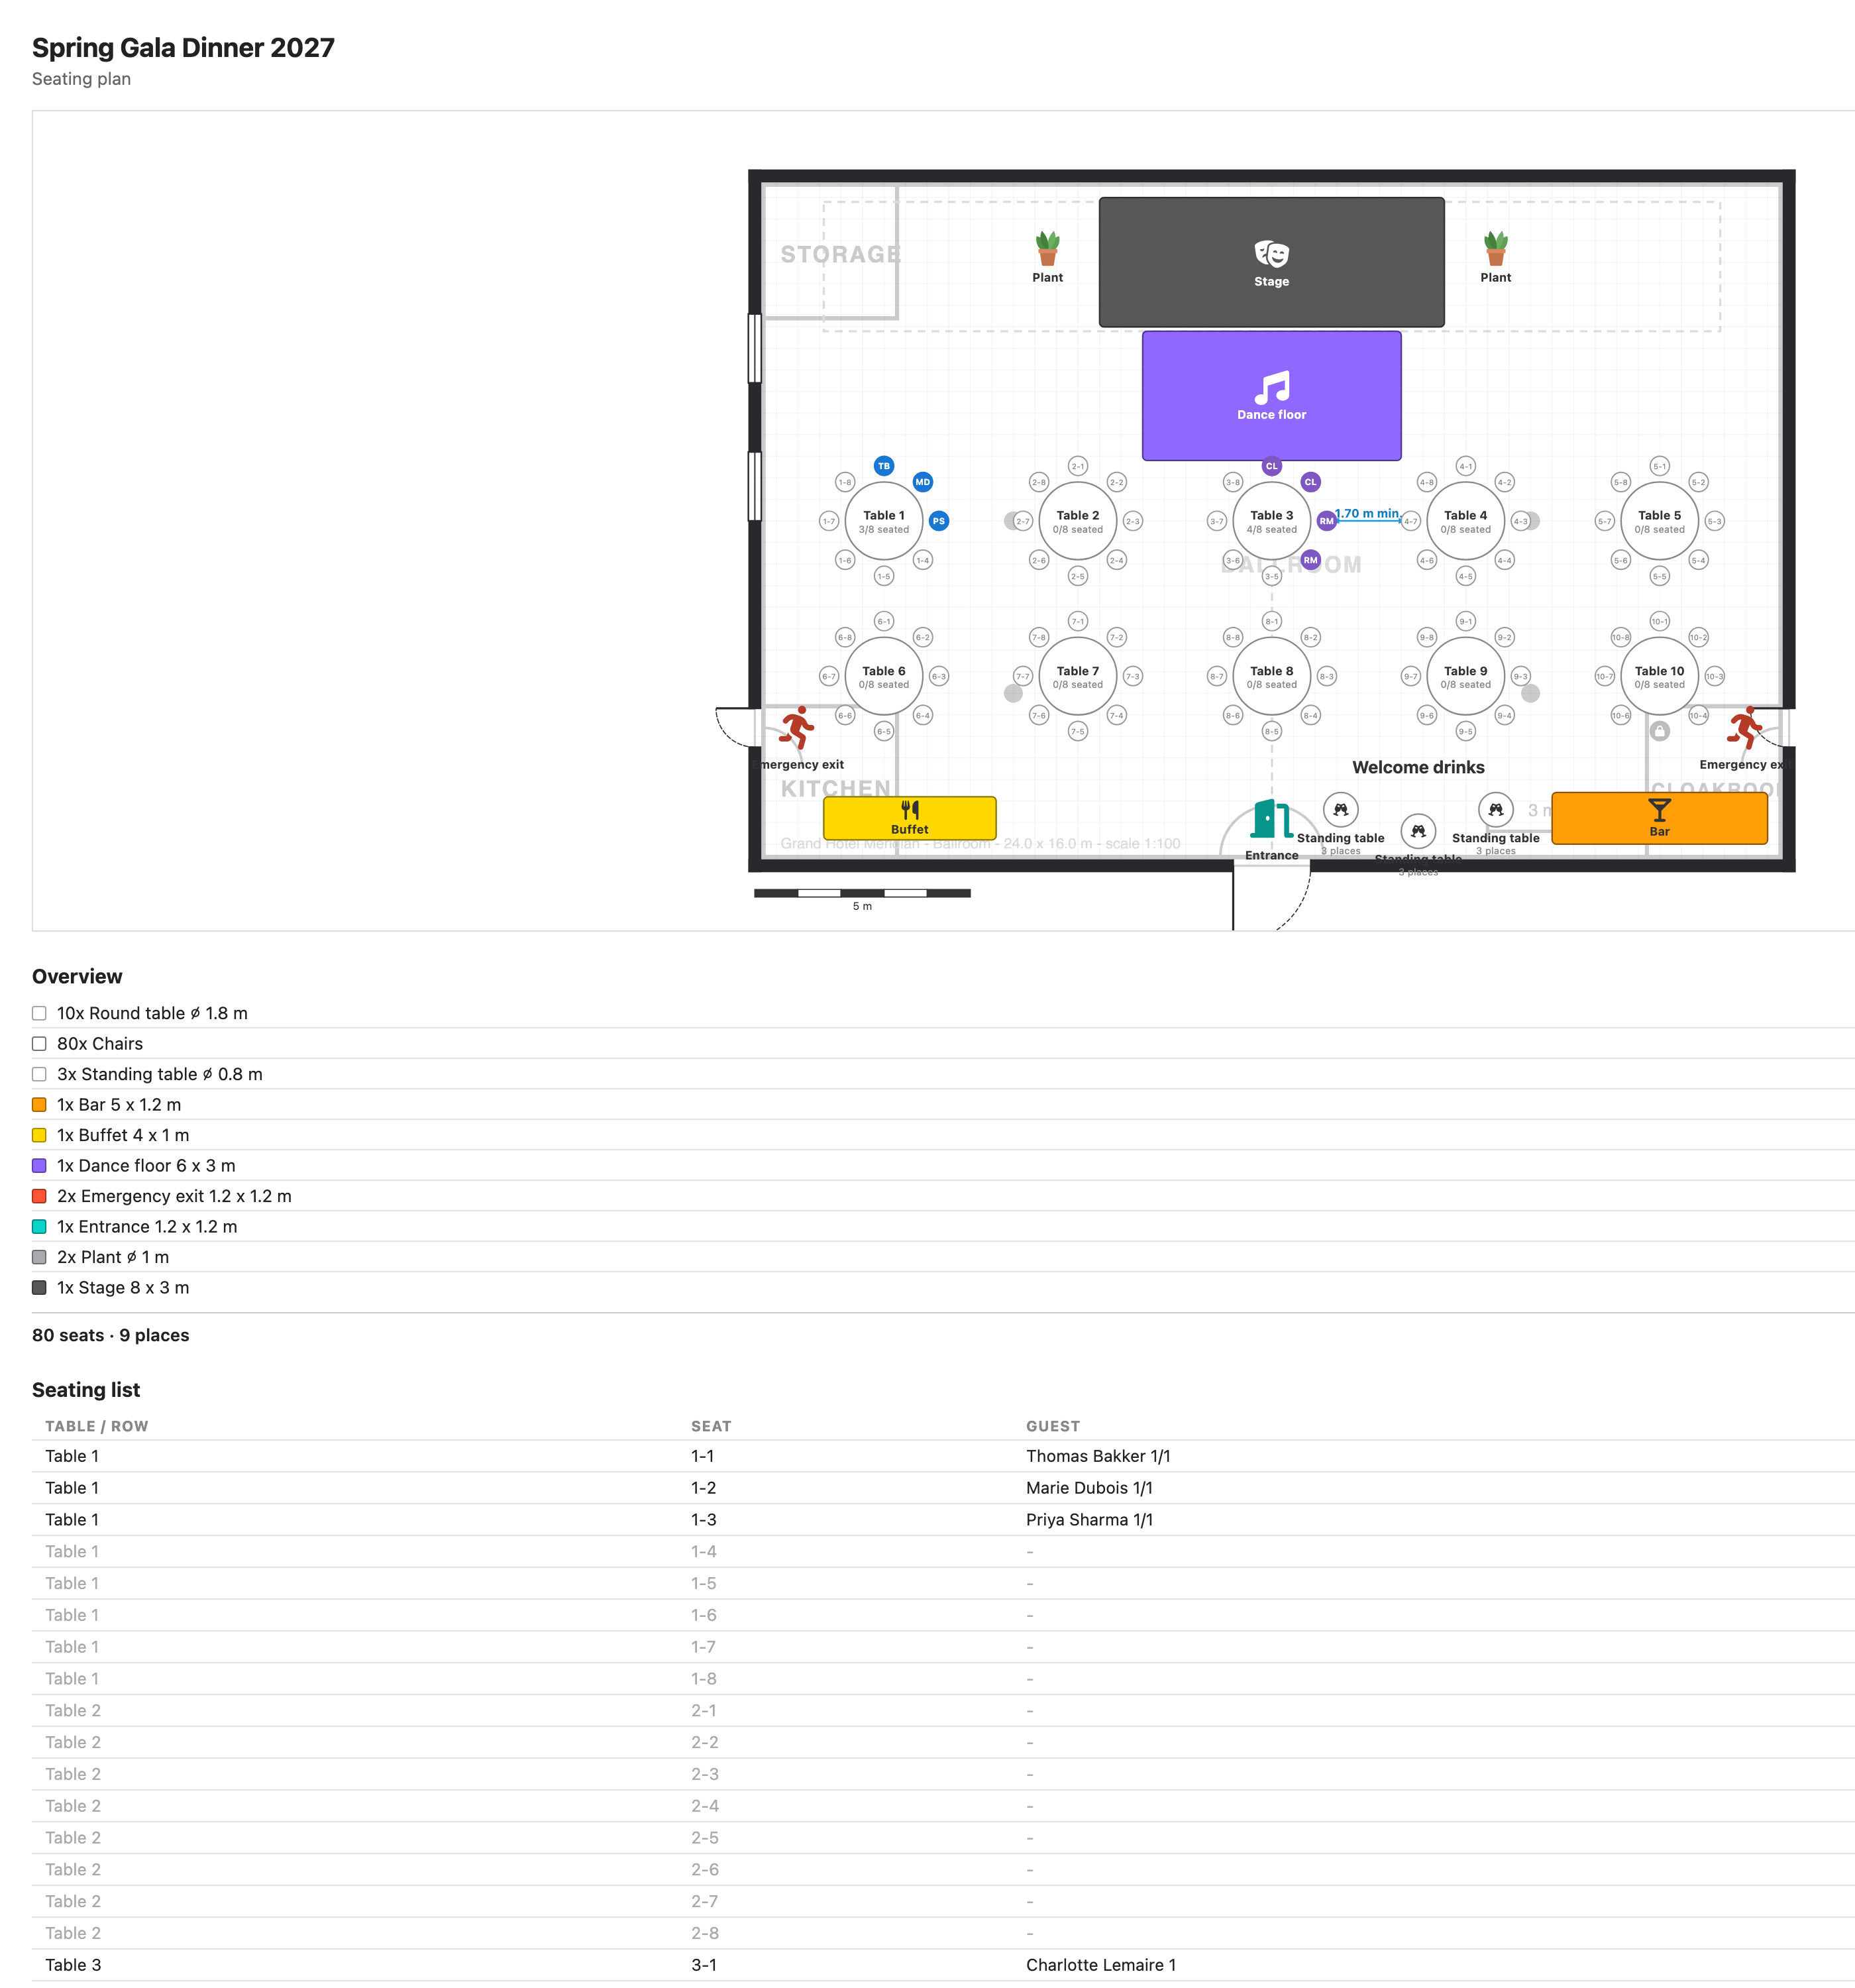
In the assign view and the who-sits-where view there is a third button, Download seating list: the same list as an Excel file, with the columns Table / row, Seat, Guest and Status, for the caterer who prints the name cards.
Tip: your suppliers do not need an account to receive the plan. Attach the PDF to a briefing in Briefings, or give your venue contact read access to the plan itself (section 8). Read how to use Briefings.
Tip: the plan also opens in the eventplanner.net app on your phone or tablet, handy on the day to check the room. Drawing is more comfortable with a mouse and a large screen.
8. Work on it together
Add the people you work with in the Contacts tool of your event. Under Set contact access, choose what each of them may do in Plan / Seating:
| Access | What they can do |
|---|---|
| No access | They do not see the plan. This is the default for a new contact. |
| Read | They see the plan, zoom, measure, read the overview, print it and download the PDF. They cannot change anything, and the editing tools are not shown to them. |
| Manage | They draw the plan: add, move and delete elements, upload a venue drawing, import a plan and paint zones. |
The plan and the people in it are two different things. Plan / Seating is about the room. Who sits in it, the guest names in the assign view, the who-sits-where view and the seating list, is guest data, and guest data belongs to Tickets. A contact who should also seat guests or see who booked which seat needs Read or Manage on Tickets as well, and that right needs 2-factor authentication on their account, as it does for everyone who can see your guest list. A contact with Plan / Seating alone gets the designer, the print view without names and the PDF, and never a guest name: your venue or production contact can draw the room without seeing a single guest, and without setting up 2FA. Read how to manage users in the event software for the details of contacts and rights.
Two things to keep in mind:
- Every person who opens Plan / Seating needs a .PRO membership of their own, whatever their access. A colleague without a membership sees Unlock .PRO features, also with Manage access.
- A contact who may manage the plan but not the guests cannot remove or block a seat that is already on the plan, because removing a seat could unseat a guest they are not allowed to know about. The designer tells them so: Removing or blocking a seat needs access to the guest list. You can still add, move and rename.
Good to know: the seating list holds the names of your guests. You process them as the organiser of the event under our processing agreement. Share the printed list and the Excel file only with the people who need them, and collect them again after the event.
9. Limits
| What | Limit |
|---|---|
| Room size | 1 to 500 metres wide and deep |
| Seats per plan | 2,000 |
| Elements per plan | 5,000 |
| Chairs on a round table or in a seat row | 30 |
| Chairs on a rectangular table | 40 in total, 20 per side |
| Venue drawing | PNG, JPG or PDF, 15 MB |
| Seats held while a guest orders | 15 minutes |
Frequently asked questions
Is Plan / Seating free? No. Plan / Seating is a .PRO tool. Without a membership you see Unlock .PRO features with a button to upgrade. All other tools of the event software keep working without a membership, with the limits of the free version.
My colleague has access to Plan / Seating but sees Unlock .PRO features. Why? The membership is checked for the person who opens the tool. Your colleague needs a .PRO membership of their own, also when you are a member and gave them Manage access.
Can I use the floor plan without selling or assigning seats? Yes. Draw the room with tables, standing tables, the bar and the stage, print it or download the PDF, and never open the seating side of it. The overview counts what you have to order.
Where is the option to let buyers pick a seat? The option Buyers of this ticket pick a seat on the seating plan only appears in the ticket settings when your plan has seats that can be sold, and never when your event uses time slots. Draw the tables or rows first, and check that none of your sections has a time slot.
Why can't I copy an earlier plan or import a venue plan? Both only work while your plan is still empty. Remove the elements you placed, or use Clear plan, and the options come back. The earlier events listed are the ones where you may manage the plan and that have a plan with something on it.
Can I still change the plan after my event is published? Yes, except for the seats that are booked: they cannot be removed, blocked or moved to another zone. Adding, moving, renaming and recolouring is always possible.
Can I move a guest to another seat? For an RSVP event, yes: drag the occupied chair to another chair. For a guest who bought a seated ticket, no: the seat is on their ticket. Cancel the ticket in Tickets and let the guest order again.
Why are some seats not sold? On an event with zones, a seat that is in no zone is not for sale. Open Zones in the designer: the panel lists those seats as No zone - not for sale. Paint the table or row into a zone.
How do I switch from metres to feet? Open the form of your event and change Measurement unit. The plan stays the same, the labels change.
What is the difference between seats and places? A seat is a chair someone can be assigned to or can buy. A place is standing room: the people at a standing table or at the bar. Places count in the overview but are never sold or assigned.
Does my guest see which seat they have? A guest who picked a seat sees it in the confirmation e-mail, on the ticket PDF, in the wallet pass and at the door when the ticket is scanned. A guest you seated yourself on an RSVP event is not told: print the seating list for your hosts, or tell them yourself.
My PDF is small. How do I make it bigger? Choose A3 and untick Include the element list in the export window. The plan then takes the whole page, in the orientation that fits it best.
Can I have more than one plan for my event? No. Every event has one plan. For a day with a dinner and a conference in two rooms, create two events or draw both rooms in one plan.
Read also
- Master eventplanner.net: Complete guide and training to our event software
- How to set up an event in the eventplanner.net event software
- How to use Moodboards?
- How to use Checklists?
- How to use Callsheets?
- How to use Budgets?
- How to use Supplier Management?
- How to use Briefings?
- How to use Tickets?
- How to manage users in the eventplanner.net event software?
- eventplanner.net certification
