


Event software training
How to set up an event in the eventplanner.net event software
Everything you do in the event software of eventplanner.net belongs to an event: your moodboard, your checklist, your callsheet, your budget, your tickets and the people you work with. So the first thing you do is create an event. It takes less than a minute, and you can change most of it afterwards.
This guide shows you the ways to create an event, what eventplanner.net prepares for you, how to copy an earlier event, how to switch between your events and how to archive the ones that are over.
Where to find it: log in and choose event software in the main menu. You land on Events, the list of your events. Open an event and it opens on its Overview. The menu on the left shows its tools: Overview, then Checklist, Callsheet, Moodboard, Briefings and Floor plan & seating under Plan, Team & access, Suppliers, Guests & tickets and Marketing under People, Budget under Money, and Event settings at the bottom.
1. Create your first event
Start by opening the event software. It opens on Events, the list of all your events, which stays empty until you create one. Click New event to open the Add new event form.
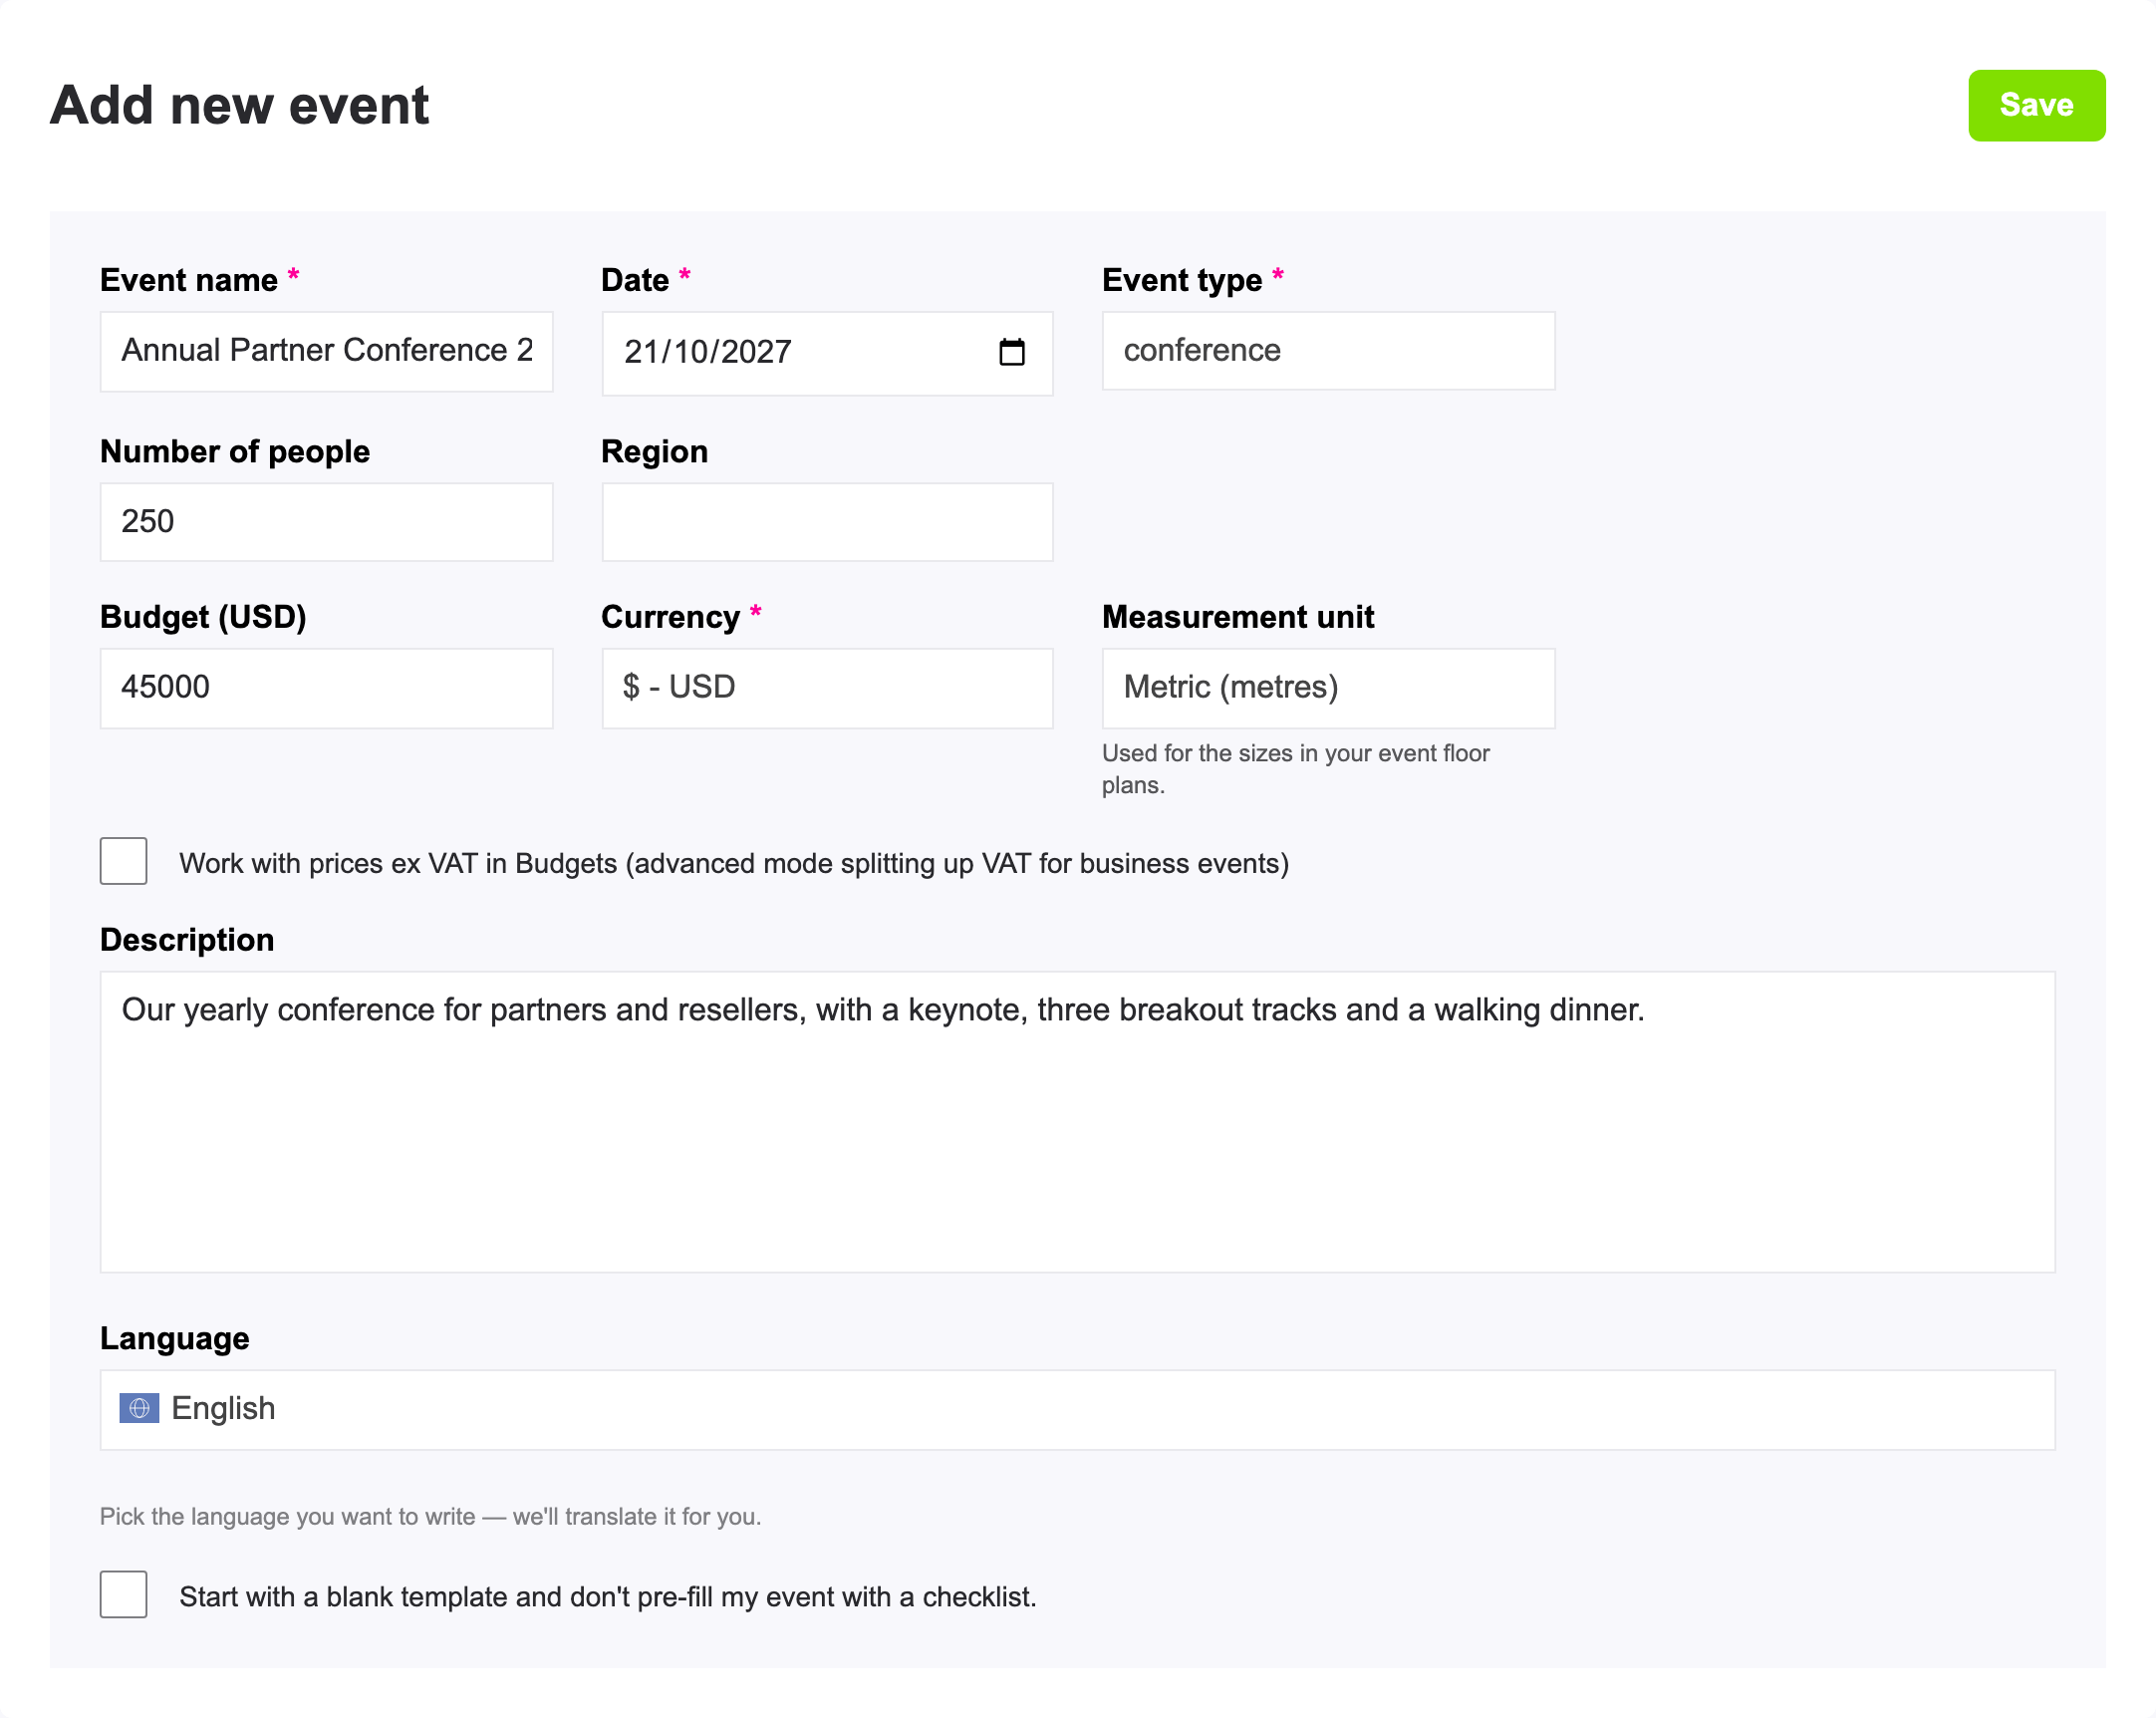
| Field | What to fill in |
|---|---|
| Event name | A name you will recognise later between your other events, such as "Annual Partner Conference 2027" rather than "Conference". Required. |
| Date | The day of your event. Required. Deadlines in your checklist and callsheet are calculated from this date. |
| Event type | Business event, staff party, product launch, meeting, conference, team building, concert, wedding, private party or other. Required. It decides which suggested tasks you get (see below). |
| Number of people | How many guests you expect. |
| Region | Where the event takes place. Start typing and pick a region from the list. |
| Budget | The total budget you have in mind. |
| Currency | The currency of your budgets: euro, US dollar, British pound, Australian dollar, New Zealand dollar, Swedish krona, Danish krone, Norwegian krone or Icelandic krona. It starts on the currency of your country, or of your site when your country uses another one. Changing it later does not convert any amounts. Required. |
| Measurement unit | Metric (metres) or Imperial (feet and inches), used for the sizes in your floor plans. It starts on the unit of your country. |
| Work with prices ex VAT in Budgets (advanced mode splitting up VAT for business events) | Tick this when you organise a business event and want to see your costs without VAT, with the VAT on a separate line. For a private event, leave it off. |
| Description | Anything you want to remember about the event: the occasion, the client, the style. You can write it in one language and have it translated automatically. |
| Start with a blank template and don't pre-fill my event with a checklist. | Tick this if you want to start with an empty checklist and callsheet (see below). |
Click Save at the top of the form. Your event is created and you go straight to its overview (see below), or back to the tool you came from, with the name of your event at the top of the screen.
Locks: the Event type can only be chosen when you create the event. Once the VAT option is on, you cannot switch it off again. Everything else can be changed later (see section 6).
What eventplanner.net prepares for you
You do not start from an empty event. Based on the event type you chose, eventplanner.net fills in:
- your checklist with suggested tasks, such as booking the venue or sending the invitations, each with a sensible date before your event. Read more in how to use Checklists.
- your callsheet with a suggested running order for the day itself.
Change, move or delete the suggestions as you like. Do you prefer to start from scratch? Tick Start with a blank template and don't pre-fill my event with a checklist. when you create the event. This choice is only there when you create the event, not afterwards.
Good to know: you are automatically added to the contacts of your own event, with full access to every tool. Want to plan together with a colleague, a client or a supplier? Add them in Team & access in the menu of your event. Read more in how to manage users in the event software.
The overview of your event
Every event opens on its Overview: one page that shows how your event is doing, with a tile for each tool.
- At the top, a countdown runs to the date of your event. When your registration has its own start date, the countdown runs to that one.
- Under the countdown you see how ready your event is, such as 81% Ready: the share of the tasks in your checklist that are done. Next to it, a status compares that share with the deadlines of your tasks. The deadline of a task is its date, or the day of your event when the task has no date.
- On track: no open task is past its deadline.
- At risk: you are keeping up overall, but at least one open task is past its deadline.
- Behind plan: the share of tasks that are done is more than 10 percentage points below the share of tasks whose deadline has passed. A task you finish early makes up for one that is late.
- Needs you next lists what is waiting for you: your own tasks that are late or due within a day, invites nobody has accepted yet, replies from suppliers you have not read, e-mails to your guests that are still a draft and briefings that are not published yet.
- The tiles show each tool at a glance, such as the open tasks of your checklist in the order of the board, the next items of your callsheet, your tickets or RSVPs, the seats assigned on your floor plan and the costs and revenue of your budget. Each tile links to its tool.
As long as your checklist has no tasks, there is no readiness yet: add the first task to start it. You only see the tiles of the tools you have access to. A .PRO tool you do not have yet, such as Suppliers or Floor plan & seating, shows what it does, with a button to Upgrade to .PRO.
2. Create your next event: from scratch or as a copy
Once you have an event, you add the next one with New event on Events, or from the menu on the left: click the name of your current event at the top of the menu and choose New event.
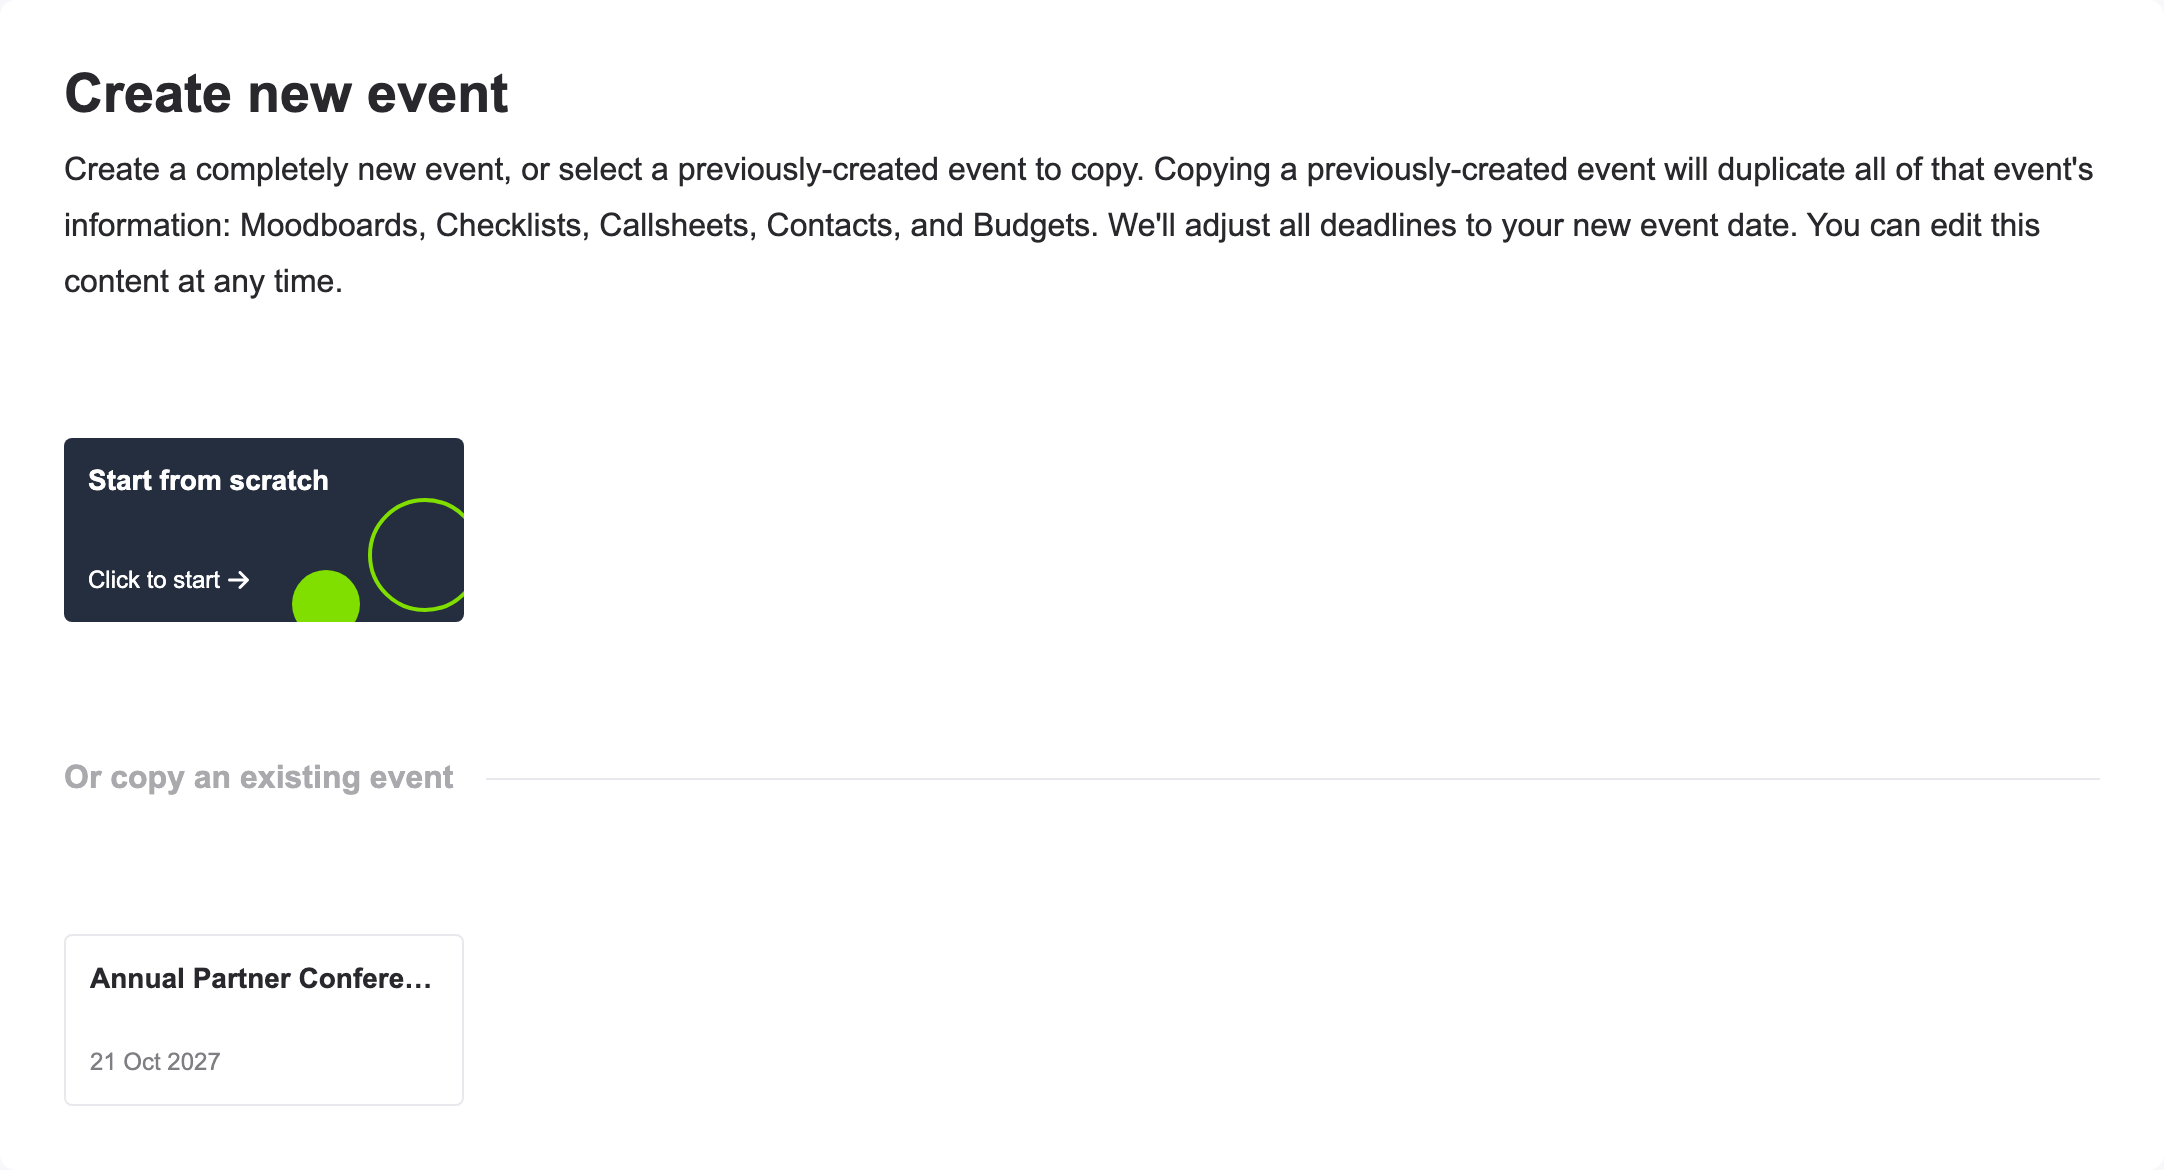
The Create new event screen then lets you choose:
- Start from scratch: you get the same Add new event form as for your first event.
- Or copy an existing event: pick one of your events to use as the starting point (see section 3).
3. Copy an earlier event
Do you organise the same kind of event every year, or a series of similar events? Copy an earlier event instead of starting again. You keep all the work you put into it, and eventplanner.net moves every date along with the new date of your event.
Click Copy event on the event you want to copy. A short wizard guides you through four steps. Click Next to go to the following step, and Finish & copy event on the last one.
- General: give the new event its Event name and Date. The other details are filled in from the original event, and you can change them here, the Event type included.
- Contacts: choose which contacts of the original event come along. All of them are ticked, so untick the ones you do not need this time. You are always copied yourself. The contacts you copy are added silently: they do not get an e-mail about the new event.
- Suppliers: choose which suppliers come along, with their role and contact details.
- Tickets: choose which ticket types come along.

What is copied, and what is not
| Copied | Not copied |
|---|---|
| All tasks of your checklist. They start again in To do. | Your moodboard. |
| Your callsheet. | Quotes, invoices and payments of your suppliers. |
| All versions and lines of your budget. | Ticket sales, attendees and registrations. |
| The contacts, suppliers and ticket types you selected. | The questions of your registration form: set them up again on the new event. |
| The layout of your seating plan. | The seat assignments of your guests. |
Every date moves with your event: a task that was due 30 days before the original event is due 30 days before the new one. Copied ticket types start as drafts, so nothing is for sale until you publish them. Tasks and callsheet items of a contact you did not copy are assigned to you.
4. An event created from a quote request
You can also create an event without opening the event software. When you ask a venue or supplier on eventplanner.net for a quote, the request form asks which event it is about. Choose one of your events, or Create a new event: your request then creates a new event with the date, number of people and type of event you filled in. You find it in the event software, with its suggested tasks, like any other event.
Good to know: for an event created this way, reminders are off. Your checklist then shows Notifications are disabled for this checklist. Click Click here to enable notifications to turn them on.
5. Switch between your events
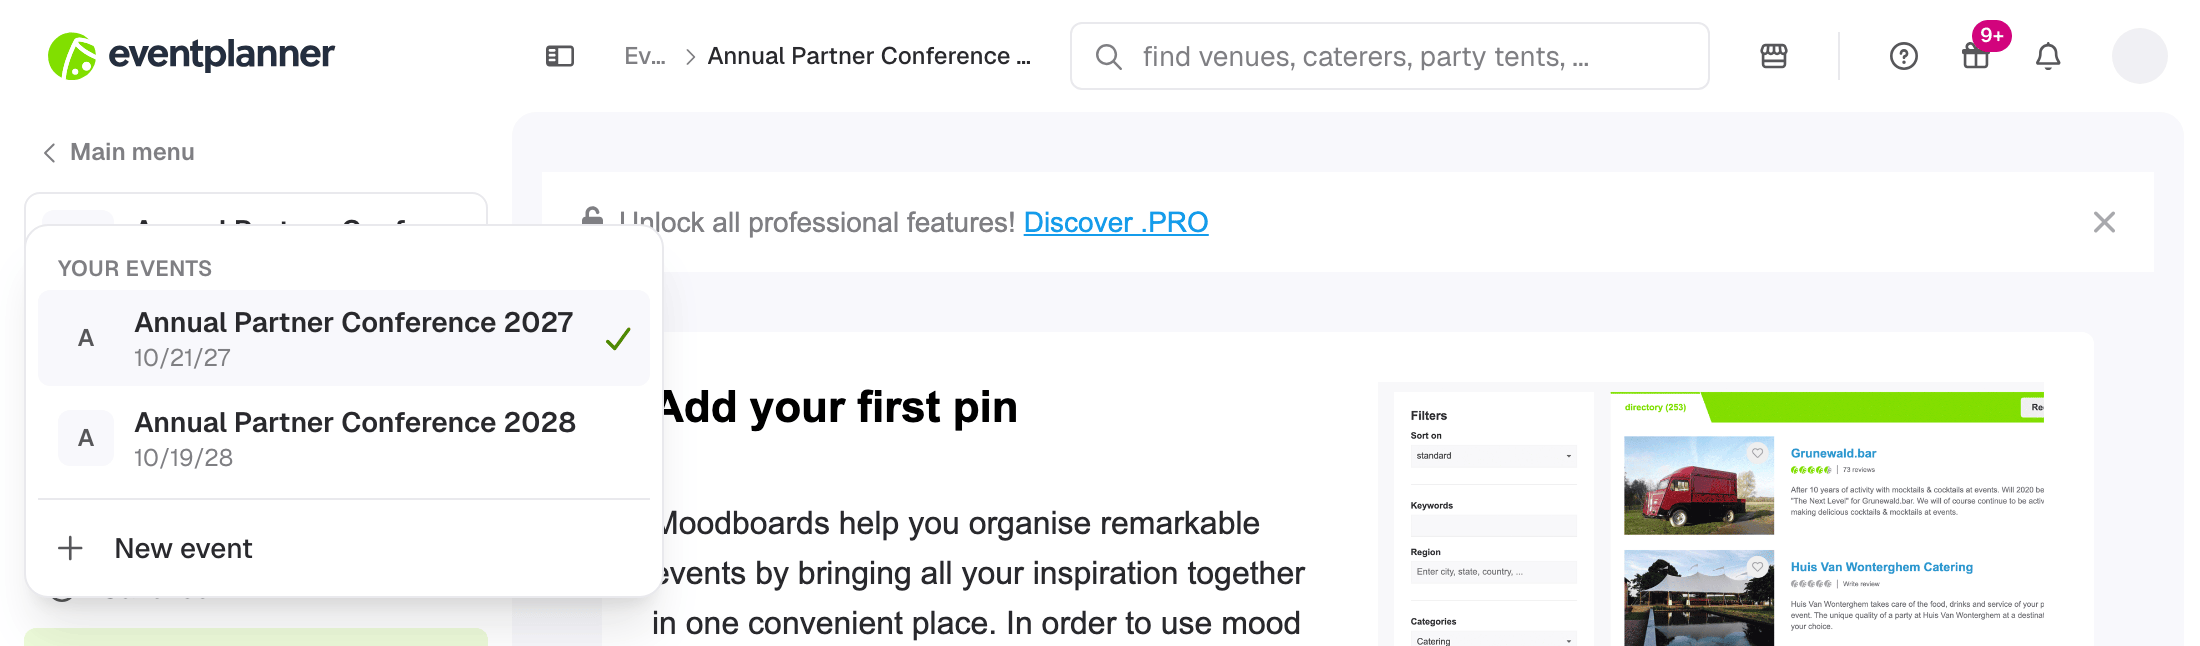
The name of the event you are working on is always at the top of the screen. Click it to open the list of your events and pick another one. All tools then show that event, until you switch again.
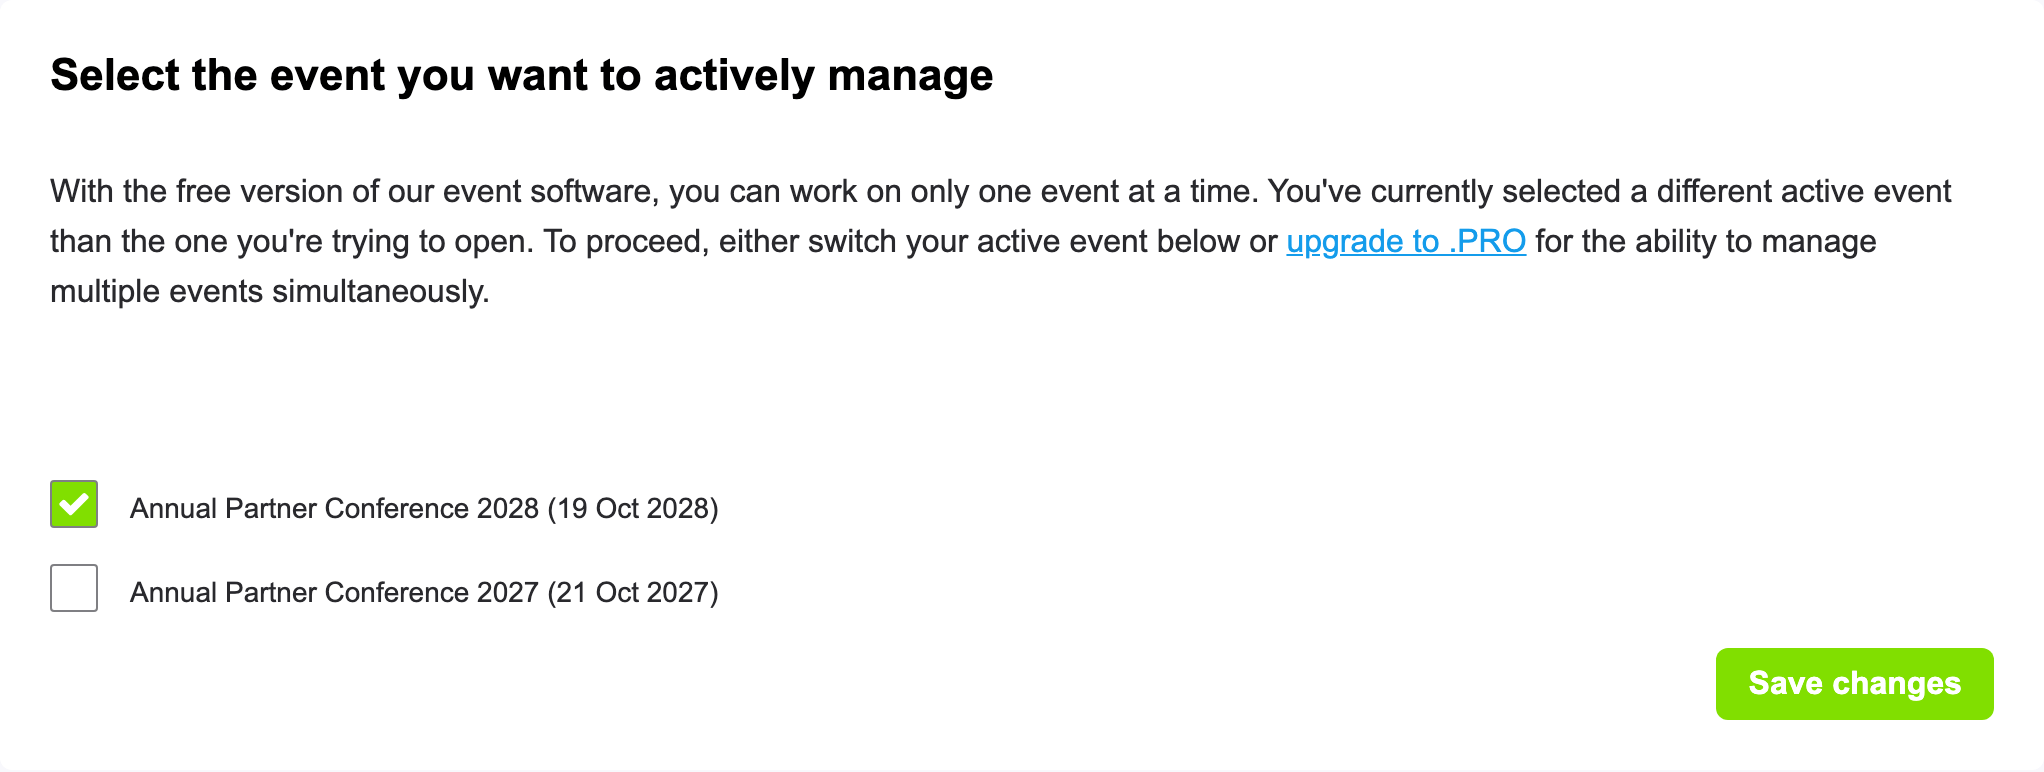
One active event in the free version
With the free version of the event software you can create as many events as you like, but you work on one of them at a time: your active event. When you open another event, on its overview or in Checklists, Callsheets, Budgets, Tickets, Suppliers or Contacts, you are asked to Select the event you want to actively manage. Tick the event you want to work on and click Save changes. The other events stay as they are, and you can switch back at any time.
Moodboards and Briefings are not limited: you can use them for all your events.
Do you work on several events at the same time, for example as a professional planner? With .PRO, all your events are active at once, and the limits per event are higher (see the questions below). .PRO is per person: only the people who own and manage events need it, not the contacts you invite.
6. Edit the details of your event
Click Event settings at the bottom of the menu on the left, or at the top right of the overview of your event. You get the same fields as when you created the event, with two differences: the Event type cannot be changed, and the VAT option stays on once you have ticked it. Click Save at the top of the page to keep your changes. Do you leave the page before saving? You are asked whether you want to Save changes or Discard changes.
Changing the date does not move the dates of your tasks and callsheet. Move the ones that should change yourself.
7. Archive an event that is over
Is your event over, or did it not go ahead? Archive it. An archived event no longer shows up in your list of events or in the event lists elsewhere on eventplanner.net, so your list stays clean. Nothing is deleted: you can still open it and look up everything in it.
Open the Event settings of the event, click Archive event at the top of the page, and confirm with Archive.

To find an archived event again, open Events and choose the Archived tab. To bring an event back, open it, go to its Event settings and click Unarchive event.
Good to know: events cannot be deleted, only archived. That way you never lose an event by accident, and you can always copy it for a next edition.
8. Choose how you are kept up to date
The event software sends you notifications: when someone assigns a task to you, a reminder the day before a task is due, a comment from a colleague. Choose how you get them in your own settings: open the menu of your account at the top right, choose Personal and scroll to Notification preferences.
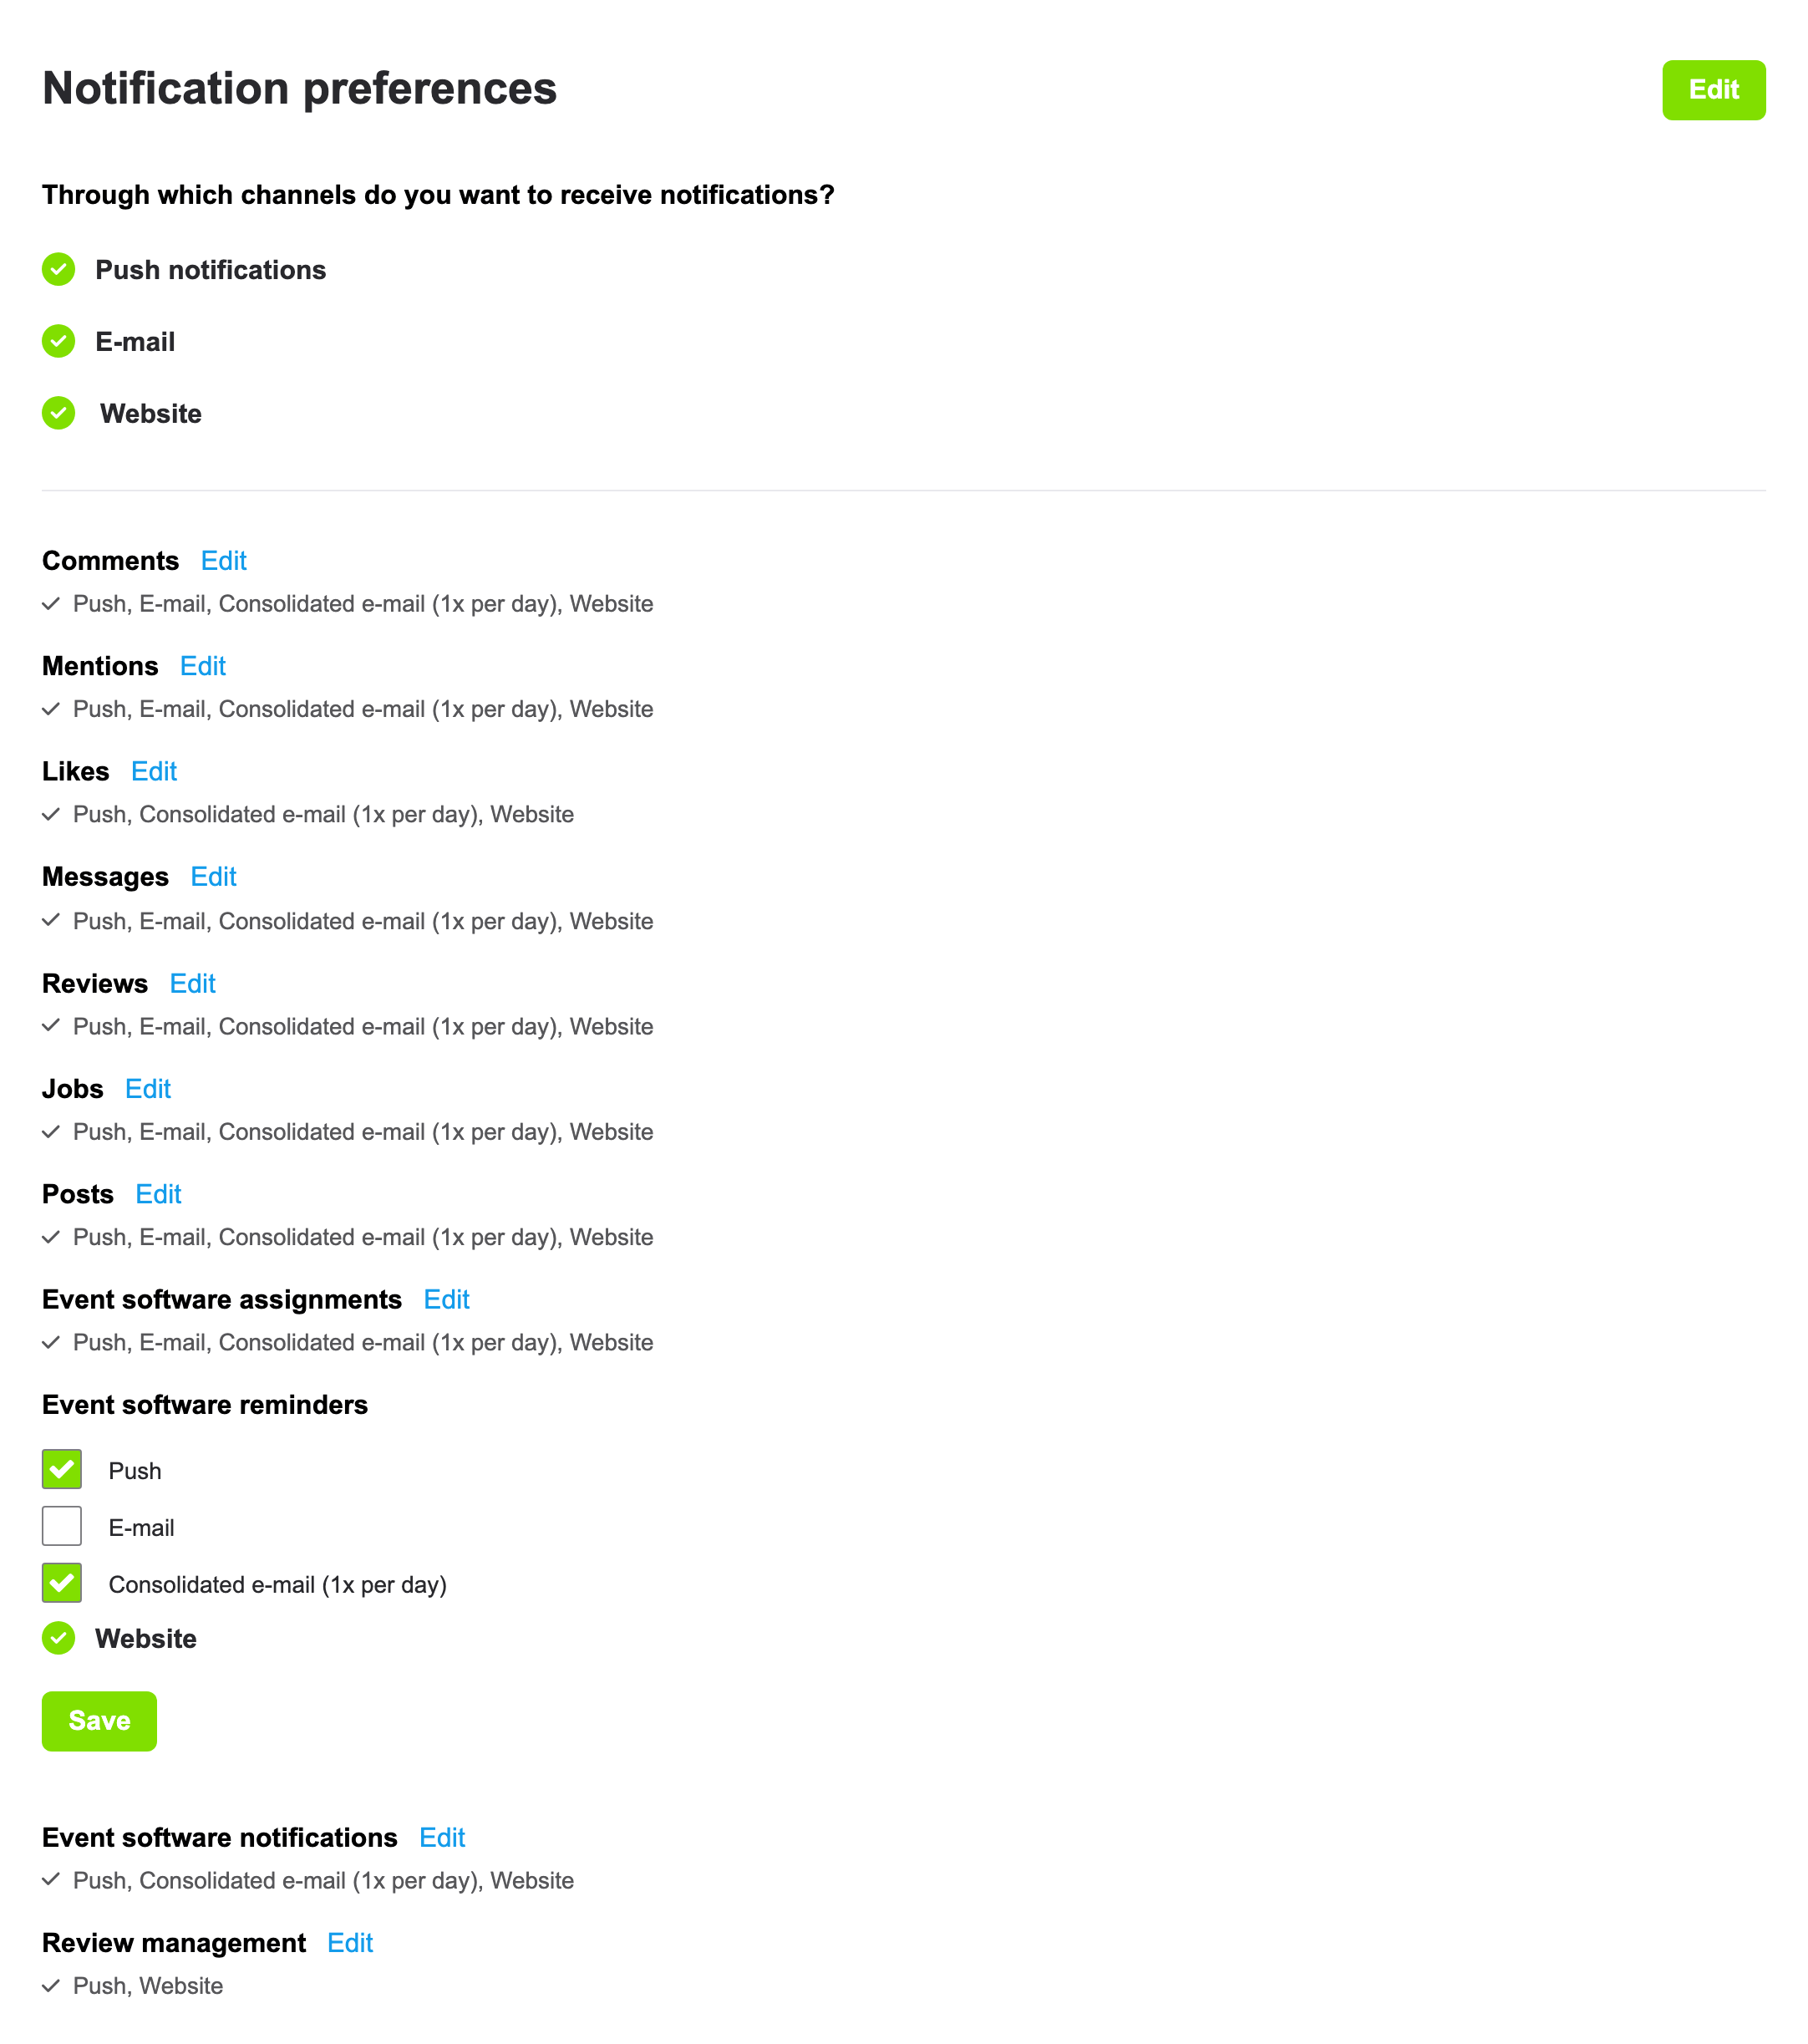
- Channels: click Edit in the Notification preferences box. Under Through which channels do you want to receive notifications? tick Push notifications and E-mail, and click Save. Notifications on the website are always on.
- Per type of notification: next to Event software assignments, Event software reminders and Event software notifications, click Edit to choose how you get them: Push, E-mail or Consolidated e-mail (1x per day), one e-mail a day with everything together. Click Save.
Tip: install the eventplanner.net app on your phone. You get the notifications as push notifications, and you open the tools of your events from the tools tab.
Frequently asked questions
Is the event software free? Yes. You can create events and use all the basic tools for free. The free version has a few limits: you work on one active event at a time, and an event holds up to 100 tasks, 75 callsheet items, 50 contacts and 200 suppliers. With .PRO, all your events are active at once and those limits go up. Some tools, such as Suppliers and Floor plan & seating, are part of .PRO.
How many events can I create? Up to 400 events per account, archived events included. Do you need more? Contact us and we will look at it together.
I chose the wrong event type. Can I change it? Not on the event itself. Copy the event (section 3): in the first step of the wizard, you can choose another event type. Then archive the old event.
Can I delete an event? No, you can archive it. An archived event no longer shows up in your lists, but you can still open it, copy it or bring it back.
I changed the date of my event. Do my tasks move along? No. Only when you copy an event do all dates move with the new date. After changing the date of an existing event, check your checklist and callsheet and move the dates that should change.
Why am I asked to select an active event? In the free version, you work on one event at a time. Pick the event you want to work on now, or upgrade to .PRO to work on all of them at once.
Are my contacts told when I copy an event? No. Copied contacts are added silently and do not get an e-mail about the new event.
Can I create an event in the app? Yes. Open the tools tab of the app, open a tool and add your event there, with the same form as on the website.
Read also
- Master eventplanner.net: Complete guide and training to our event software
- How to use Moodboards?
- How to use Checklists?
- How to use Callsheets?
- How to use Budgets?
- How to use Supplier Management?
- How to use Briefings?
- How to use Tickets?
- How to use Floor plans?
- How to manage users in the eventplanner.net event software?
- eventplanner.net certification
