Keep track of every important detail with ease thanks to Checklists.
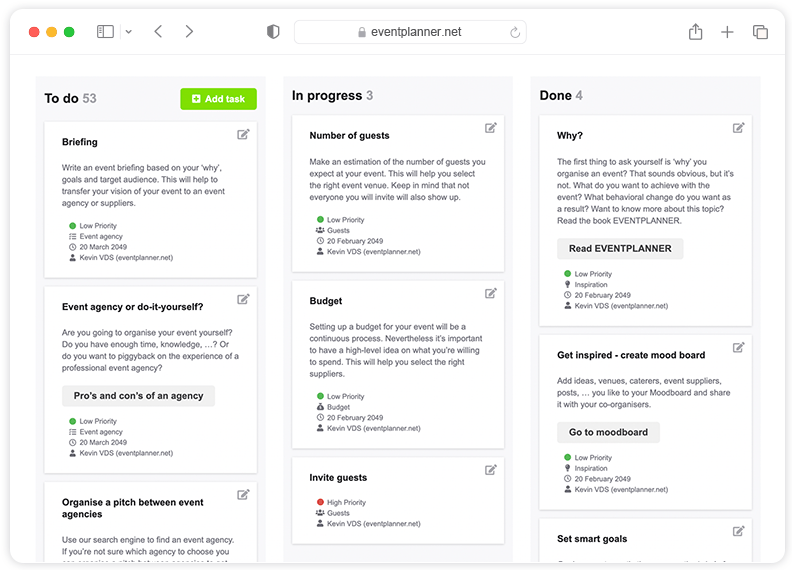
Even the simplest events generate endless to-do lists. Ours even come pre-filled with suggested items tailored to your type of event. Add, assign and update the status of tasks via simple drag and drop. Checklists is a fully fledged project management tool built especially for event planners and seamlessly intergrates with our other tools and the eventplanner.net platform.


How to use Checklists as a 'project management' tool for your event?
Checklists ensure that you don't lose track of any to-dos for your event. You can easily assign tasks to your team and follow the status in a clear manner. eventplanner.net now makes it even easier for you: we pre-fill the checklists for each type of event so that you don't have to start from scratch. If a certain topic is not relevant, you can delete it or adjust the tasks according to your needs.
To use the checklists, you must first create an event. Once you've done this, you're good to go.
Creating a new event can be done directly from the mood boards page, which can also be accessed via the 'event software' link in the header of our website (if you're logged in), or via the 'add to new event' link whenever you like a business page or save a post.
You can create a checklist for every event you organise. This can be done directly from the Checklist page, which is also accessible via the 'event software' link in the header of our website (if you are logged in). As indicated, we pre-fill your checklist based on the type of event you are organising. This way you have the most common to-dos for your wedding, corporate event, festival, etc. at hand right from the start.
Adding a task to your checklist is easy. Click on the green 'Add task' button. You will get a pop-up where you can enter the following:
- Title: state briefly and clearly what it is about.
- Description: here you can enter a more detailed description of the to-dos.
- Priority: Indicates whether the job has a low, medium, or high priority.
- Progress: put the task in the column 'to do' for tasks you want to do in the future, 'in progress' for tasks you are actively working on, or 'done' for tasks that you have completed.
- Category: Select a category for the task from the list. This helps to keep the checklist clear. Is there no suitable category for your task? Then just leave this field blank.
- Date: does your task have a deadline? Enter the date here.
- Assigned to: Here you assign tasks to colleagues so that they can follow up on them. If you don't see colleagues appearing yet, you must first add them to the 'contacts' of the event. Be sure to give them the correct rights so they can see the tasks.
Finally, click on 'add task' at the bottom and you will see that the task is added at the bottom of the list.
You can change a task by clicking on the pencil icon next to the task. You can then edit and save all fields or delete the task with the 'delete' button.
Some tasks have action buttons such as 'find event location'. You cannot adjust this yourself. If you want, you can delete the task and create a new one in its place.
You can quickly place a task from the 'to-do' column in the 'in progress' column by simply dragging the task to that column. For example, you can drag tasks between all three columns when you have finished a task or want to put it back in 'to-do' to pick it up again later.
When you have a long to-do list, it is useful to only see your own tasks or those of a colleague. That's possible! Click on 'filter by contact' at the top and select the person or people whose tasks you want to see on the board.
From your 'kanban' board, as the project methodology is called, where you visualise tasks in columns and follow them in priority, you can now click through to a detail page of the task. You do this by clicking on the title. Write your comments on the task to share additional information or facilitate conversation between team members.
You can also upload and share documents with your team. With each comment you have the option to upload and share 1 or more files.
Free Event Planning Software
Think of all the tools you use when planning truly memorable events: mood boards, checklists, call sheets, ... Now imagine having all those tools in one convenient place!
Discover all tools
Compare plans
Free
Free plan includes:
-
Moodboards
-
Checklists
-
Callsheets
-
Tickets
-
iOS & Android apps
.PRO
Includes Free, plus:
-
All premium features
-
Unlimited events
-
Unlimited team members
-
File uploads (up to 1GB storage)
-
Support
Enterprise
Includes .PRO, plus:
-
Enterprise-grade security & governance
-
Tailored onboarding
-
Premium support
A checklist for events? Worth the effort or not? As an event manager, there are a lot of tasks that you have to think about when you organise an event. A complete event checklist or to-do list is very useful! This way you don't forget a single detail, you work in a well-considered and structured way and that is exactly what makes a successful event a real experience!
A checklist, whether you need to pack your suitcase, book your vacation, organise your renovation, or launch a new event marketing campaign, a complete to-do list is useful for several reasons. Your memory is a great asset, but sometimes tasks can become routine and you forget steps. And sometimes there is too much distraction, your head is just too full, you lose focus, and oops, ... With a clear and complete checklist you prevent these shortcomings. You also save time (back to packing those suitcases: who has never been at the airport without a passport and got a return ticket home?) and you avoid mistakes (baking a cake and forgetting the eggs, anyone?).
The same applies to you as an event manager. Whether you're organising your first event or you're a seasoned event professional, an online event checklist is a must-have. This way you have a perfect overview of all the steps in your planning process and its status!
Steps in your event checklist
To get you started, we list the most important facets that come with organising an event, and that are part of a complete checklist if you are going to organise an (online) event.
Your event goals are important at any event, be it a business meeting, festival, seminar, roadshow or private party. In your event management software you can summarise exactly what you want to achieve with your event. Also add your target audience, which guests are you going to invite? This gives you an initial idea of the number of participants, which has an impact on, for example, which event venue you will choose, which catering you select, and so on. In the meantime, you can bring all your visual ideas together in an online mood board, such as venues, catering, decoration. You pin all those ideas together so that you have a nice overview that will determine the atmosphere of your business meeting, festival or private party. Next step, set your budget. How much can your party actually cost? Also choose a (party) date and an event location that has the right appearance for the goals you want to achieve with your event. The choice of event locations is very wide, from business environments to banquet halls, a tent in an outdoor environment or why not rent a castle for your event.
The next step in your event checklist is to determine the catering: which snacks and drinks you will offer your guests, from a food truck to a star meal. Make a note of that in your event checklist. When your event is taking shape, you should also create a script, an (online) reference book that describes in detail who should do what, when and where. Also, when relevant for business to business events, do not forget to take the necessary steps for your event marketing and determine how you will market your event (website, social media, print, ...). Then, close to your D-day, there is the construction, such as the technical infrastructure, furniture and decoration. And finally, enjoy the day of your event itself! There is one more important point in your event checklist after your event itself: just as the preparation and execution phase of the event is essential, don't forget to take the necessary actions to evaluate your event. Don't wait too long and do it while your event is still fresh in your mind. You can use this valuable input to make your next event even more memorable.
Don't miss the eventplanner.net event checklists
The eventplanner.net Checklists to organise an event is actually very simple. You create an event. Then you start by listing all tasks, including description, priority, progress (you can adjust the status of the tasks in an instant via a simple drag-and-drop) and responsible person. To make it even easier for you, our online event checklist is even pre-filled with items, tailored to the type of event you're organising. For example, if you are planning a wedding, we will prepare a 'wedding checklist' for you with all items and tasks that are specific to this type of event and that you should absolutely not forget. If there is a task that does not fit in your concept, you can easily remove it in the event management tool. If you are organising a business meeting, your to-do list will look completely different. The eventplanner.net Checklists therefore adapt like a chameleon to what you need for your event. If you are a seasoned event organiser and you do not need the detailed checklists, you can also choose to create a blank event so that you can build the list yourself. In short, the eventplanner.net event Checklists is a full-fledged project management tool, for any type of event, for any organiser.
Event checklists in an integrated software package
With the integrated event management software solution from eventplanner.net you have one central point where you can find all the information you need as an event manager. The checklists enable real digital collaboration with your (internal and external) team so that everyone plays synchronously on the same field. You choose who only gets reading rights and who can do more, like edit.
An overview of all this information also gives you insight into the total planning process. After your event, you can use these insights to further optimise your processes and thus create added value. A professional event planning software will support your flexibility, productivity and ultimately the ability of your business to grow.
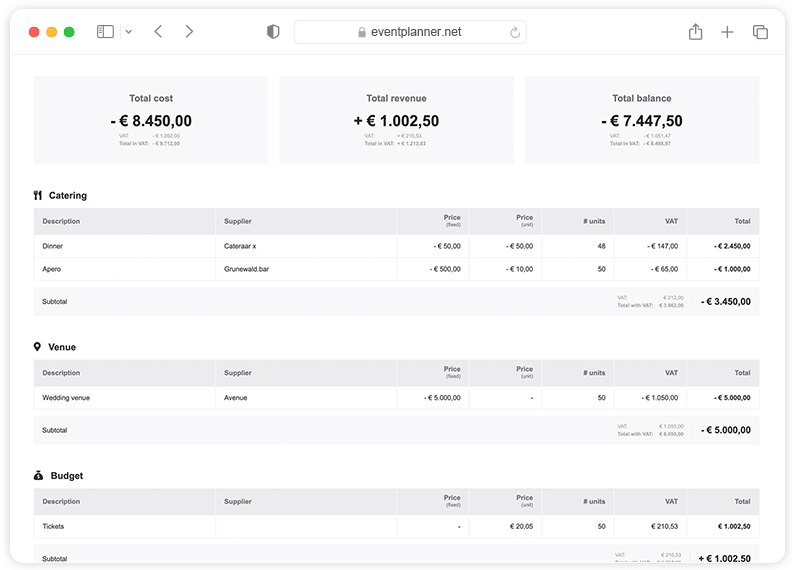
Take advantage of the free professional event planning software from eventplanner.net and enjoy all its benefits. In addition to event checklists, discover the event mood boards, the ideal tool to collect, organise and share your visual ideas with your co-organisers as well as the event budgets and the call sheets with which you can easily manage all action items and integrate them seamlessly. Moreover, the use of these planning tools is completely free. Would you like to familiarise yourself with this software? Take a quick look at our instructional video. Convinced? Then you can get started immediately.

