


How to add the rooms and floor plans of your venue?
How big is the room, how many people fit in it for a dinner or a conference, and what does it look like? Those are the first questions an event planner asks a venue. The Rooms tab of your business page answers them for every room you rent out: its size, its capacity per setup, a floor plan drawn to scale and the photos that show it. Once we have approved a room, it appears on your business page, and organisers can import its floor plan straight into their own event in the event software of eventplanner.net.
Where to find it: log in, open your business page in your account and click the tab Rooms.
1. Only for event venues
The Rooms tab is only there for business pages with a venue as their main category. Your main category is the one category that says what your company is, chosen from the categories you are active in. A castle, a conference centre or a party hall with a venue category as main category gets the tab. A caterer or a sound and light company does not, also when it ticks a venue category next to its main category: rooms and floor plans are for the place itself, not for the companies that work there.
Do you not see the tab, but are you a venue? Check your main category under Change categories and regions in your account, and choose the venue category that fits under Choose a main category. A change of main category is reviewed by our team before it goes online.
The tab works the same for a free and for a paid business page.
2. Add a room
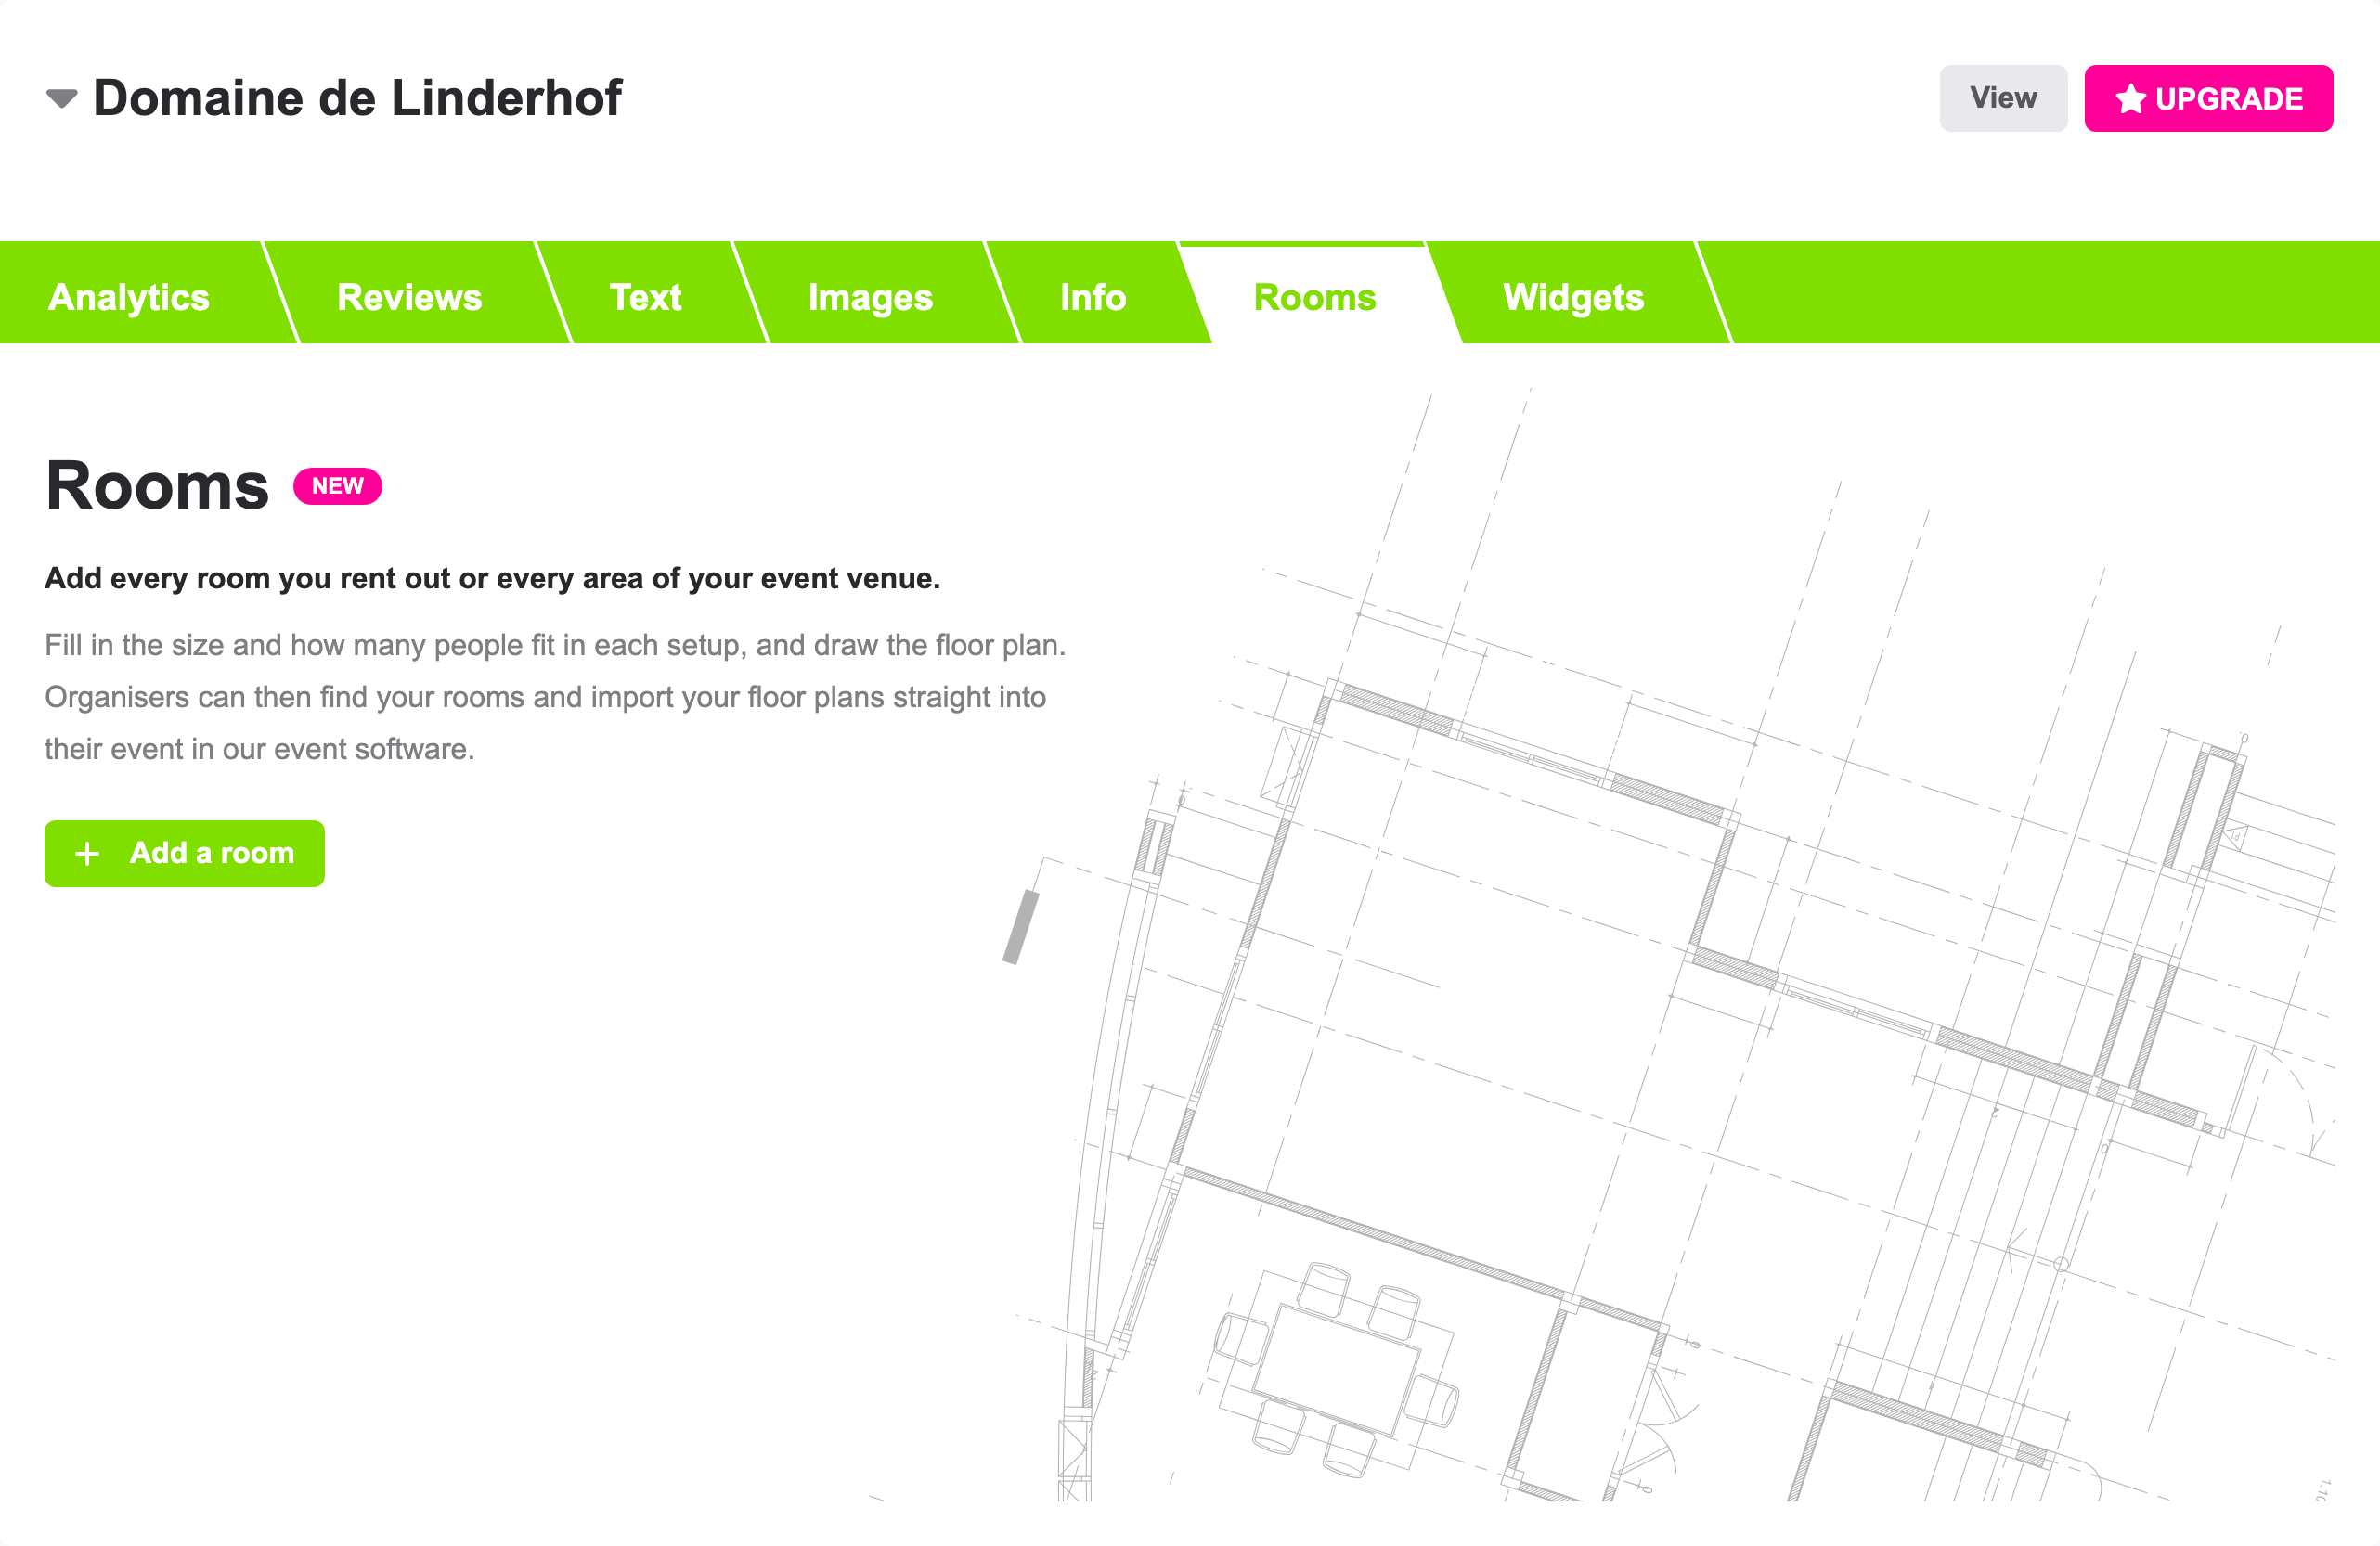
The first time you open the tab, it is empty. Click Add a room.
A window opens with two parts.
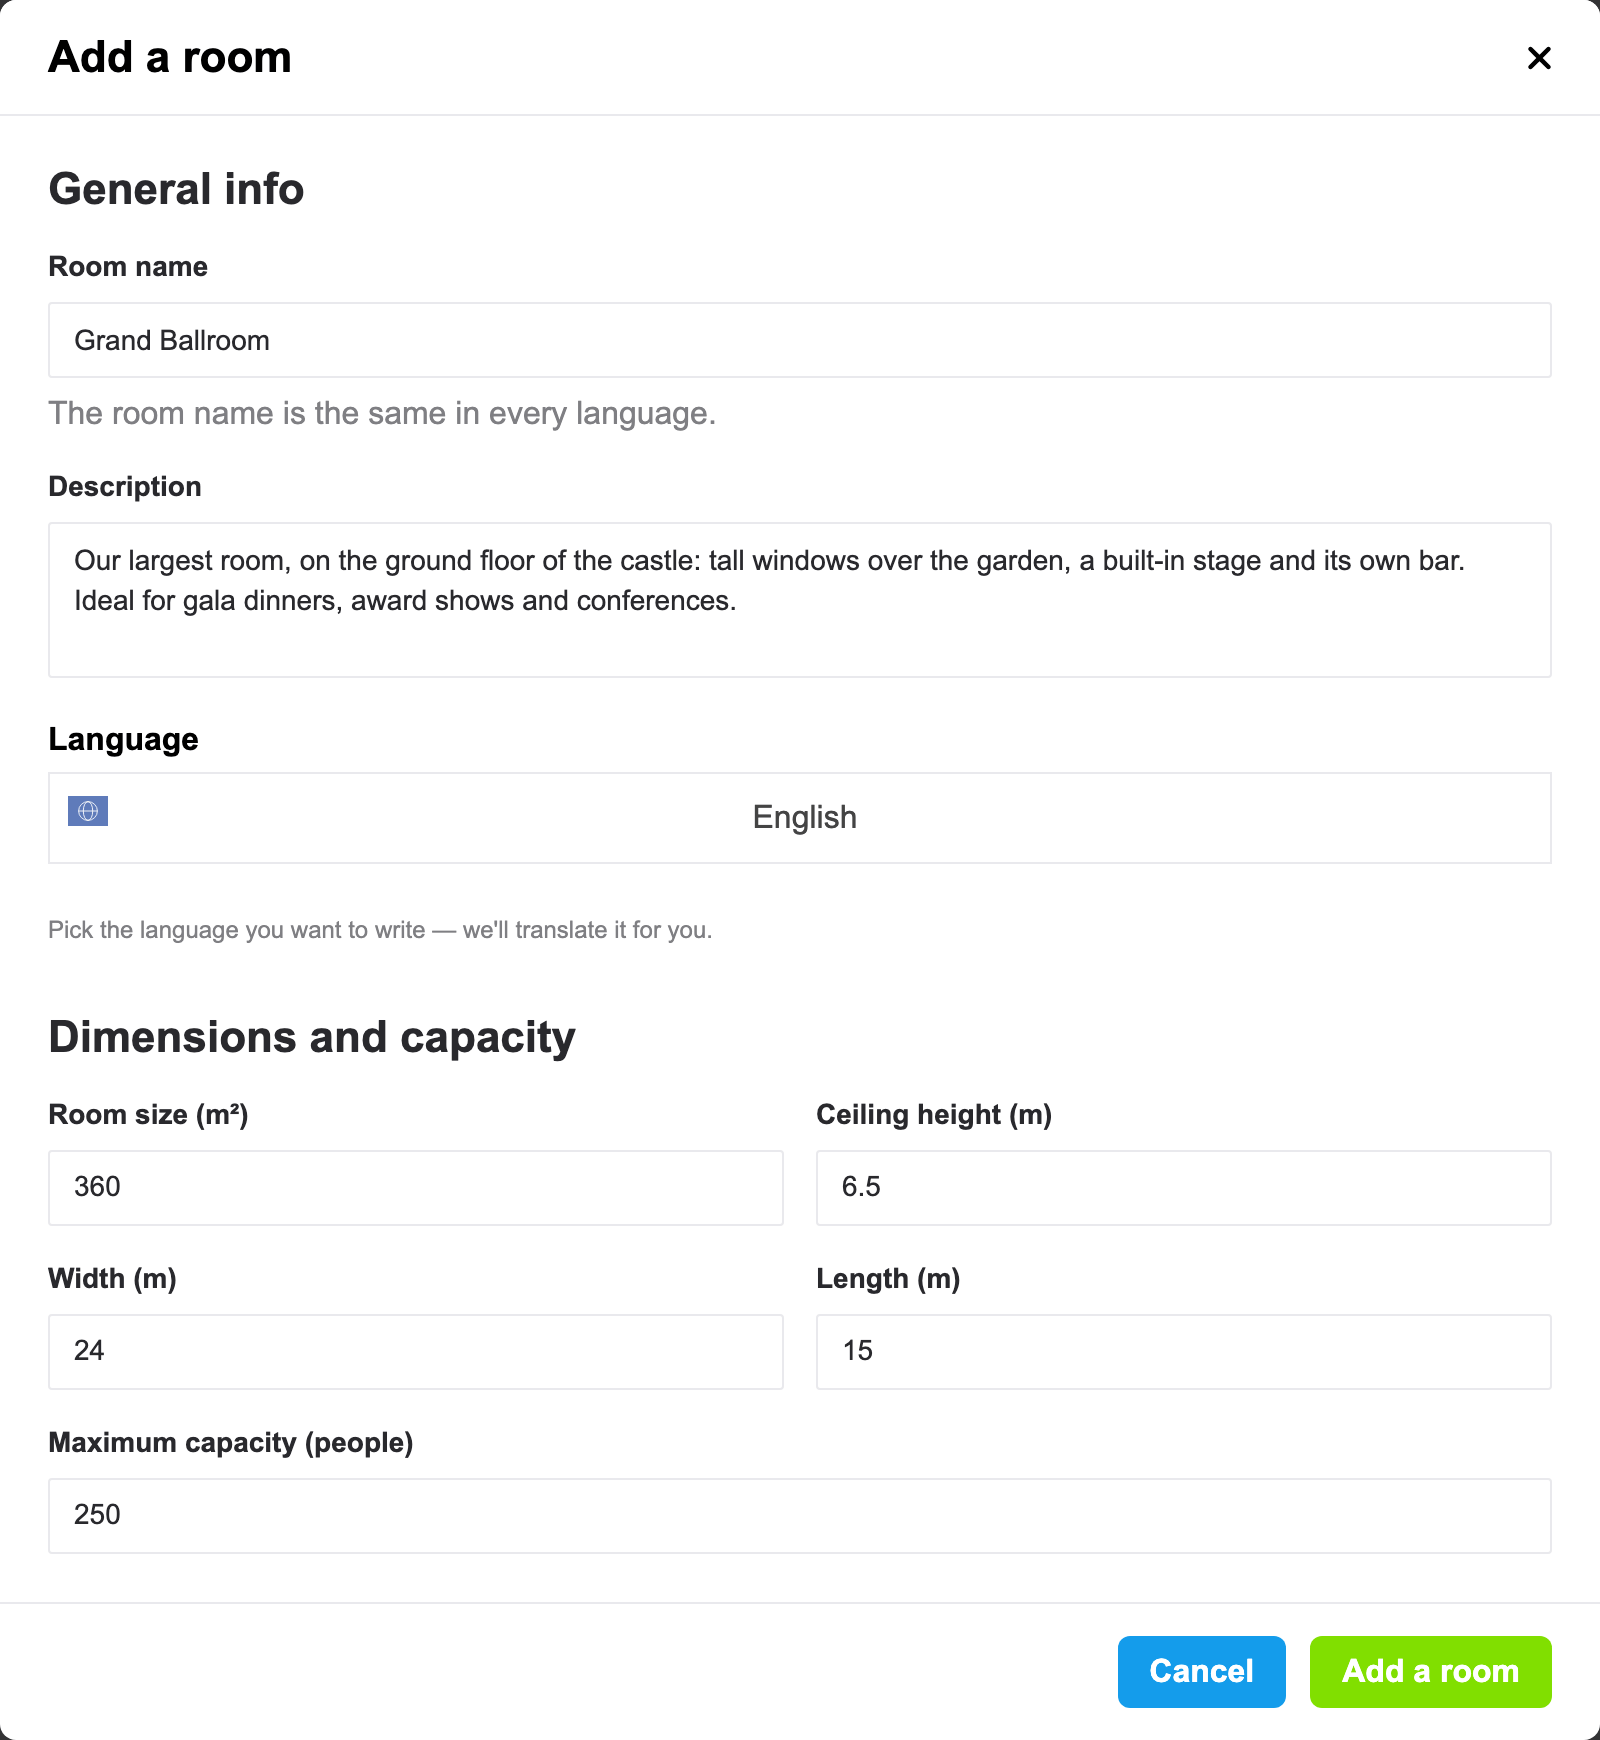
Under General info:
- Room name: the name event planners know the room by, such as "Grand Ballroom" or "Meeting room 2". The room name is the same in every language.
- Description: what makes the room special, such as daylight, a view, a stage or direct access to the garden. Pick the Language you write it in. We translate it into the other languages of eventplanner.net for you, and you can open each language and correct the translation by hand later.
Under Dimensions and capacity:
- Room size (m²): the floor area of the room.
- Ceiling height (m), Width (m) and Length (m).
- Maximum capacity (people): the most people the room can hold, in its largest setup.
You fill in these numbers yourself: we never take them from your drawing, because a drawing is often bigger than the walls on it. All fields except the name are optional, but event planners filter and compare on them, so fill in what you know. The sizes are in metres or in feet, depending on the country of your account.
Click Add a room. The room gets its own page, and the steps below are all on that page, from top to bottom.
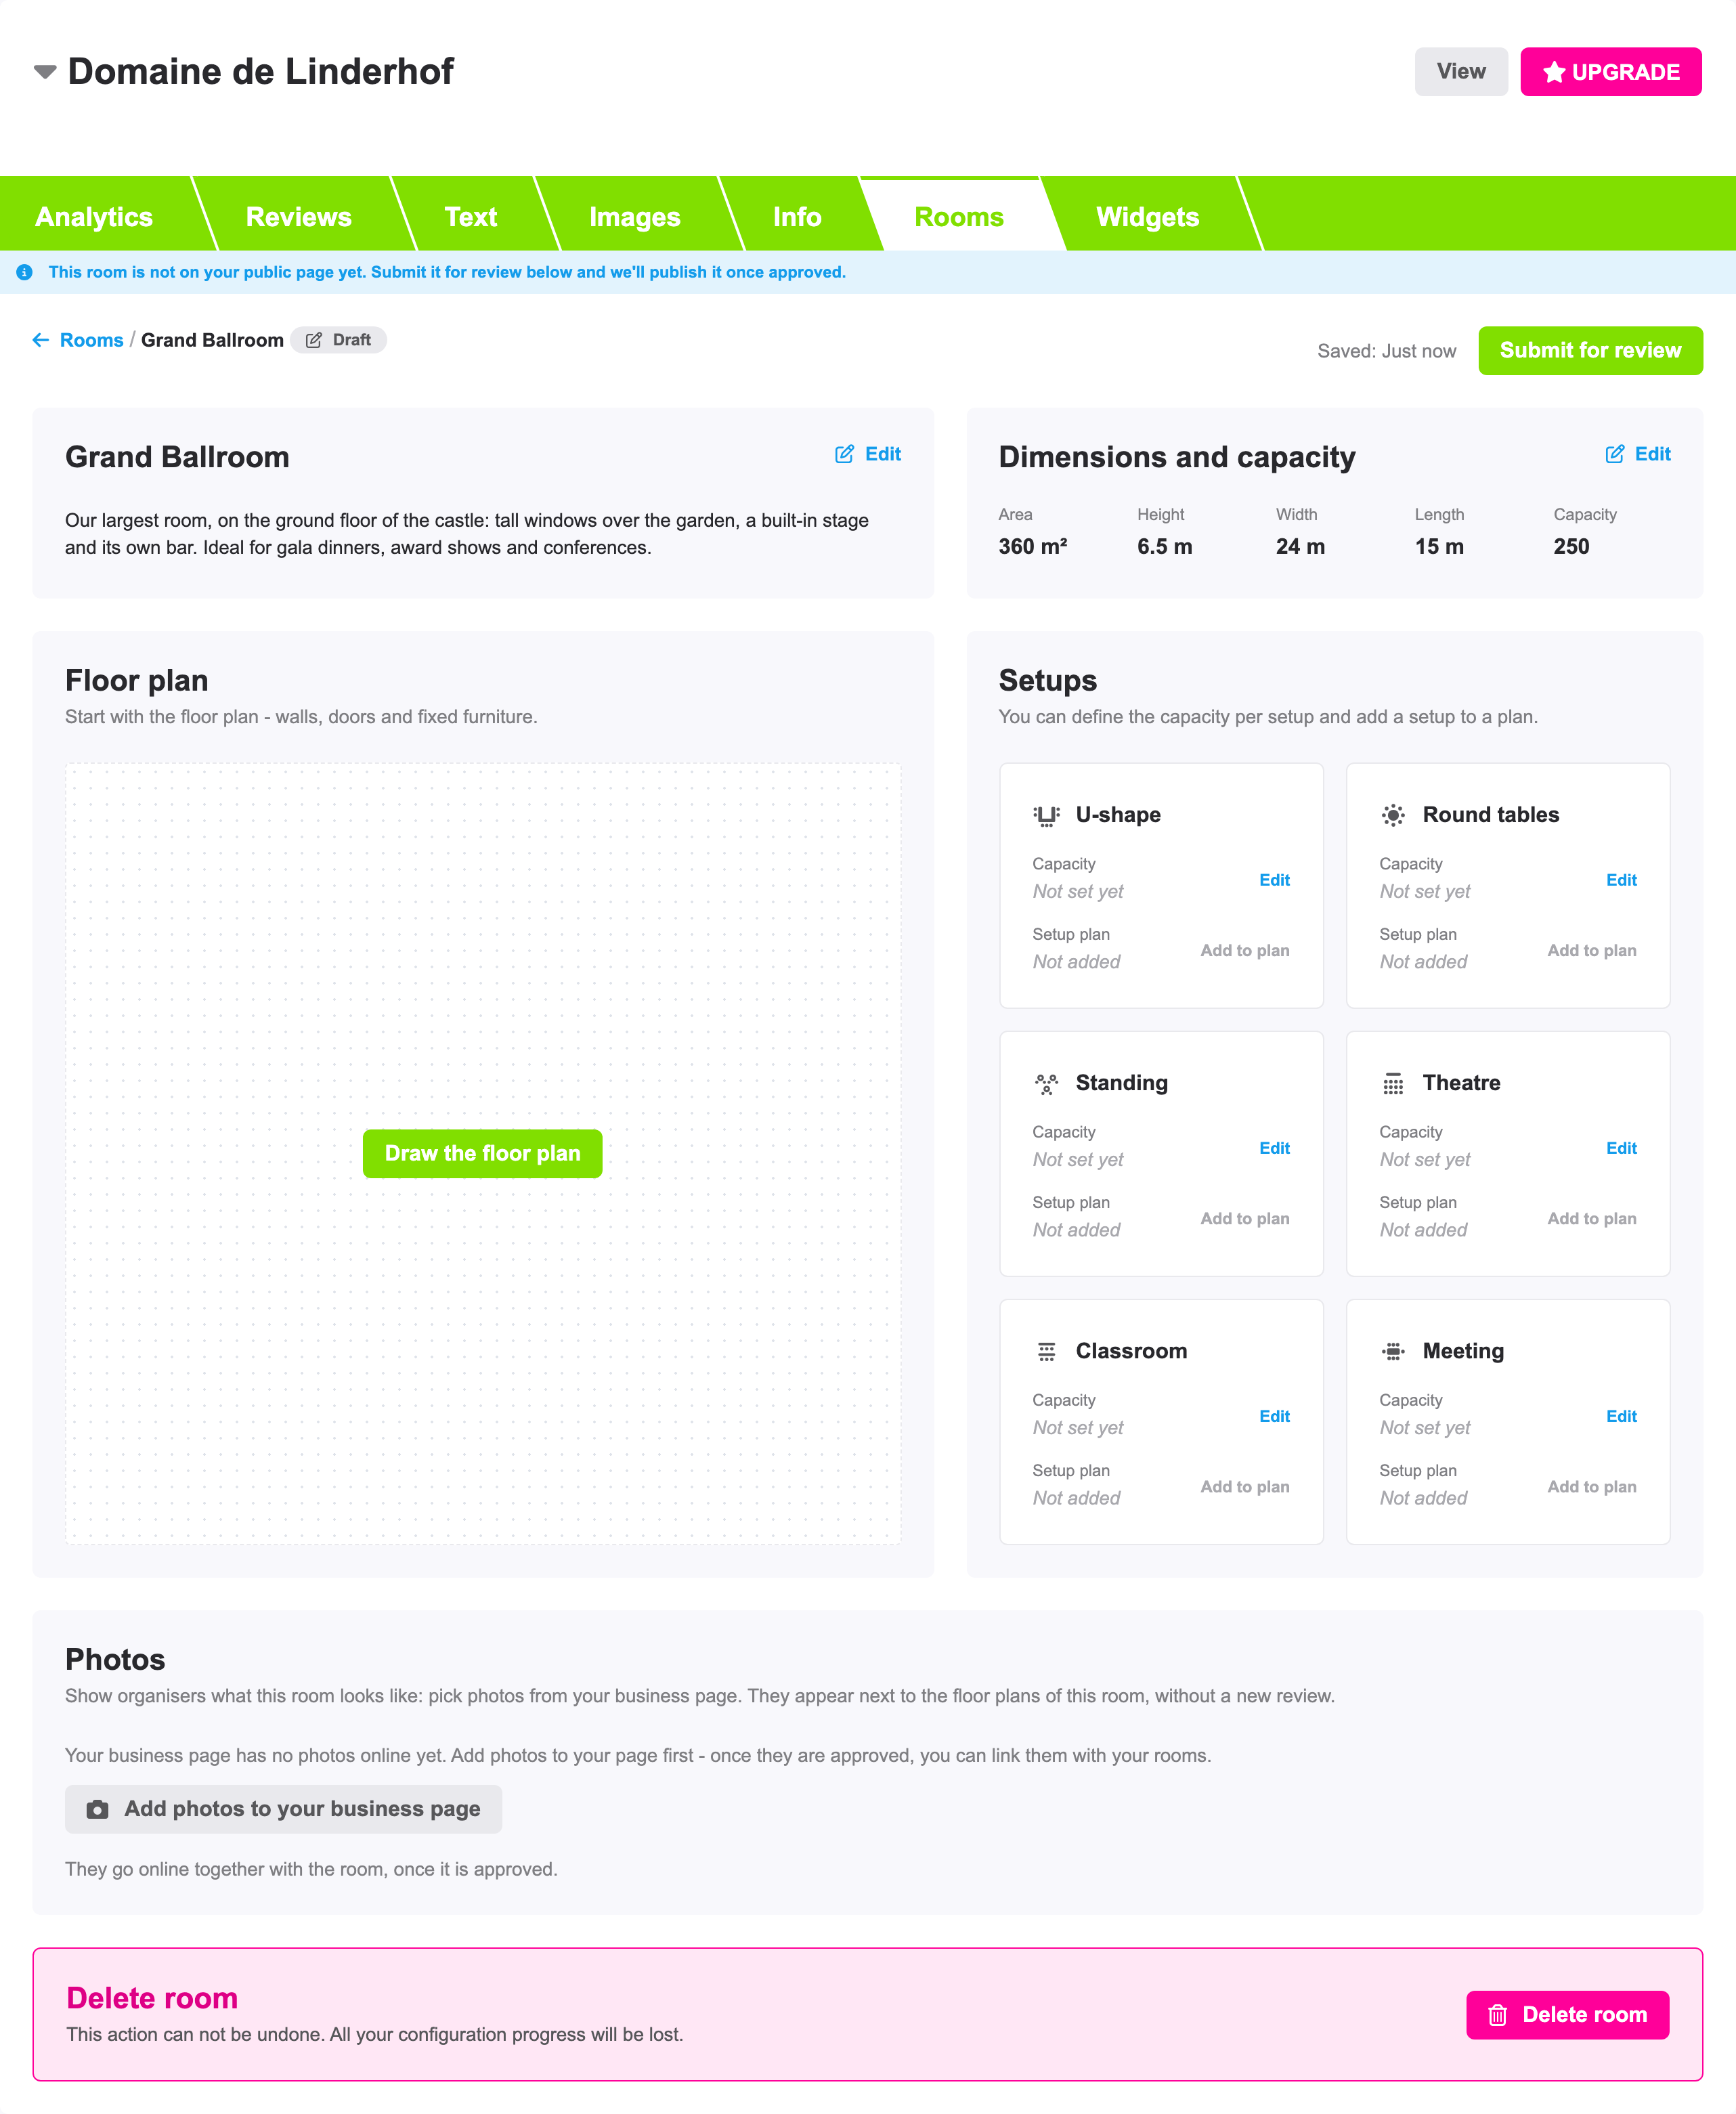
Click Edit on a card at any time to change the general info or the numbers.
3. Draw the floor plan
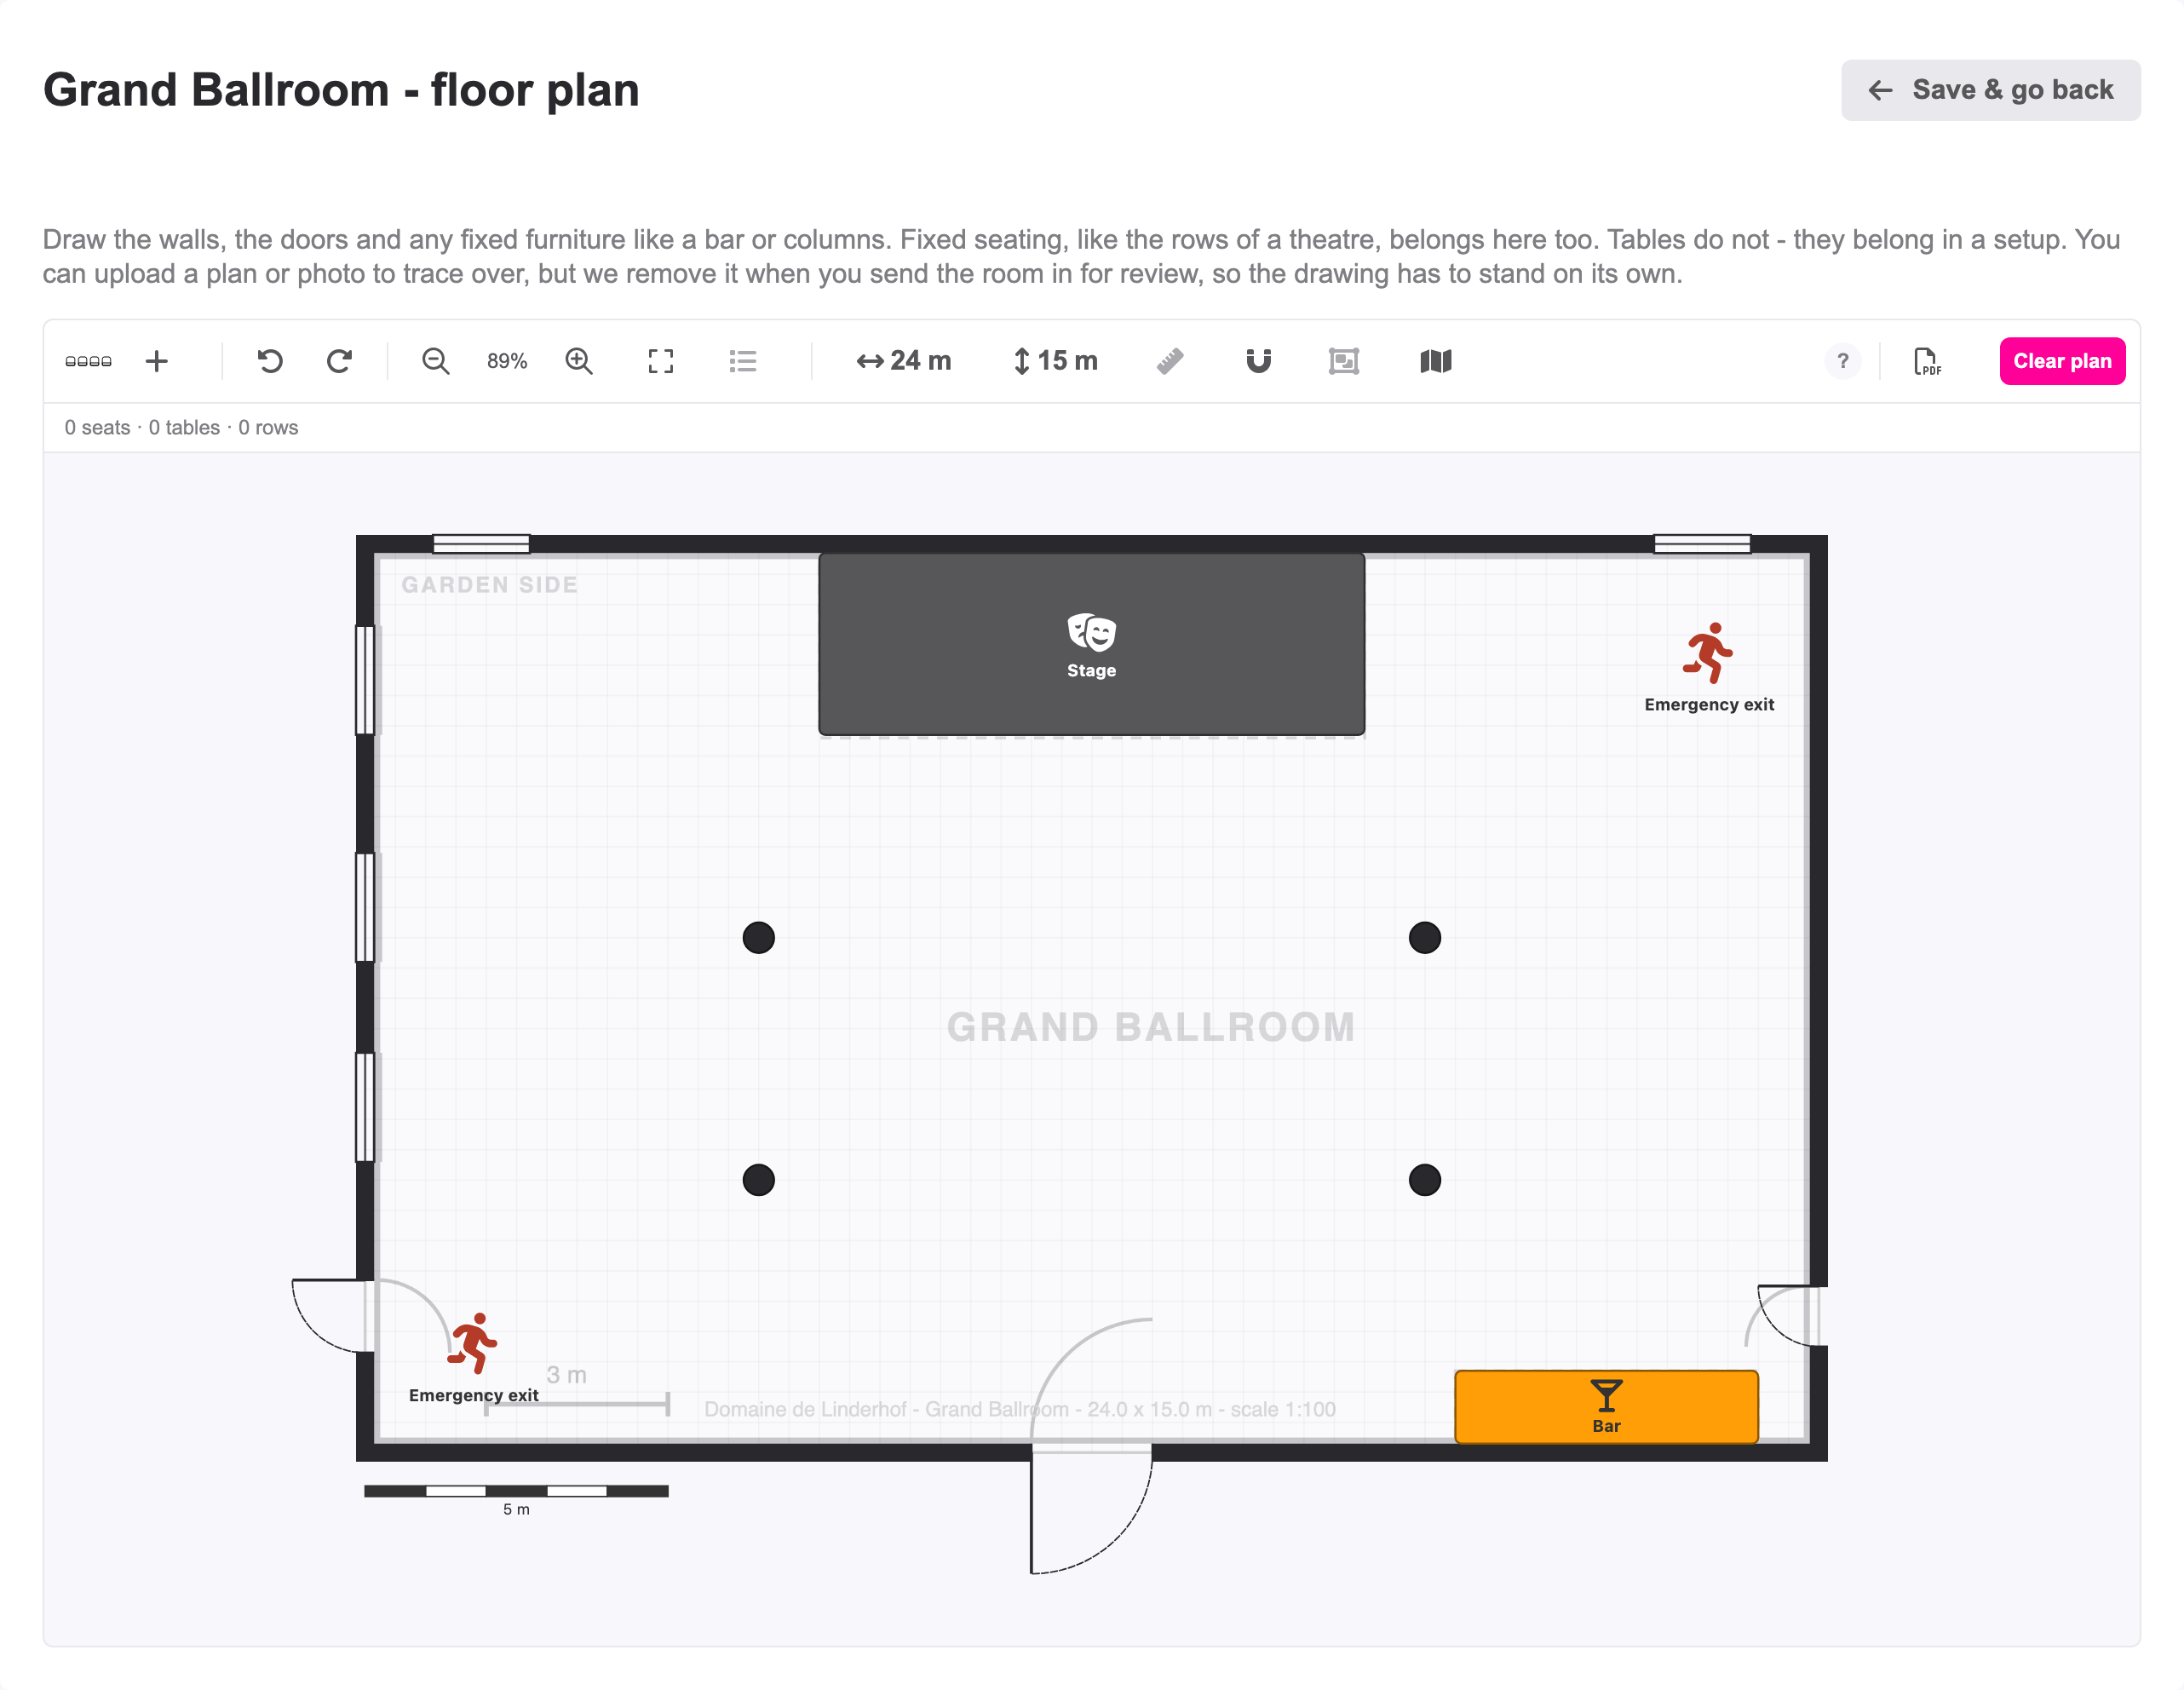
The floor plan is the drawing of the empty room, to scale: the walls, the doors and the windows, and everything that is fixed and stays in the room whatever the event. Click Draw the floor plan on the room page. The designer opens: the same floor plan designer organisers use in the event software.
Only what is fixed in the room
Draw on the floor plan only what an organiser cannot move:
- the walls, doors, windows and pillars;
- fixed furniture such as a built-in bar or a stage that cannot be taken away;
- fixed seating, such as the rows of chairs of a theatre or an auditorium.
Tables, loose chairs and standing tables do not belong on the floor plan. They change with every event, so they go in the setups (section 4). The designer helps you: on the floor plan there are no buttons for round and rectangular tables, and no standing table in the catalogue. If a table ends up on it anyway, you cannot send the room in until you remove it.
Trace over a plan you already have
Most venues have a plan of their rooms, from the architect or for the fire brigade. You do not have to measure everything again. Click Venue plan (the map icon) in the toolbar, then Upload venue plan and pick the file: PNG, JPG or PDF, up to 15 MB. Of a PDF, the first page is used. The plan appears under your drawing, half transparent, and you draw the walls and doors on top of it.
A plan has no scale of its own, so tell the designer how big it is: click Set the scale, click two points you know the real distance between, such as the two ends of a wall, type the distance and click Apply. Then click Resize the room to the drawing so your drawing is as big as the real room.
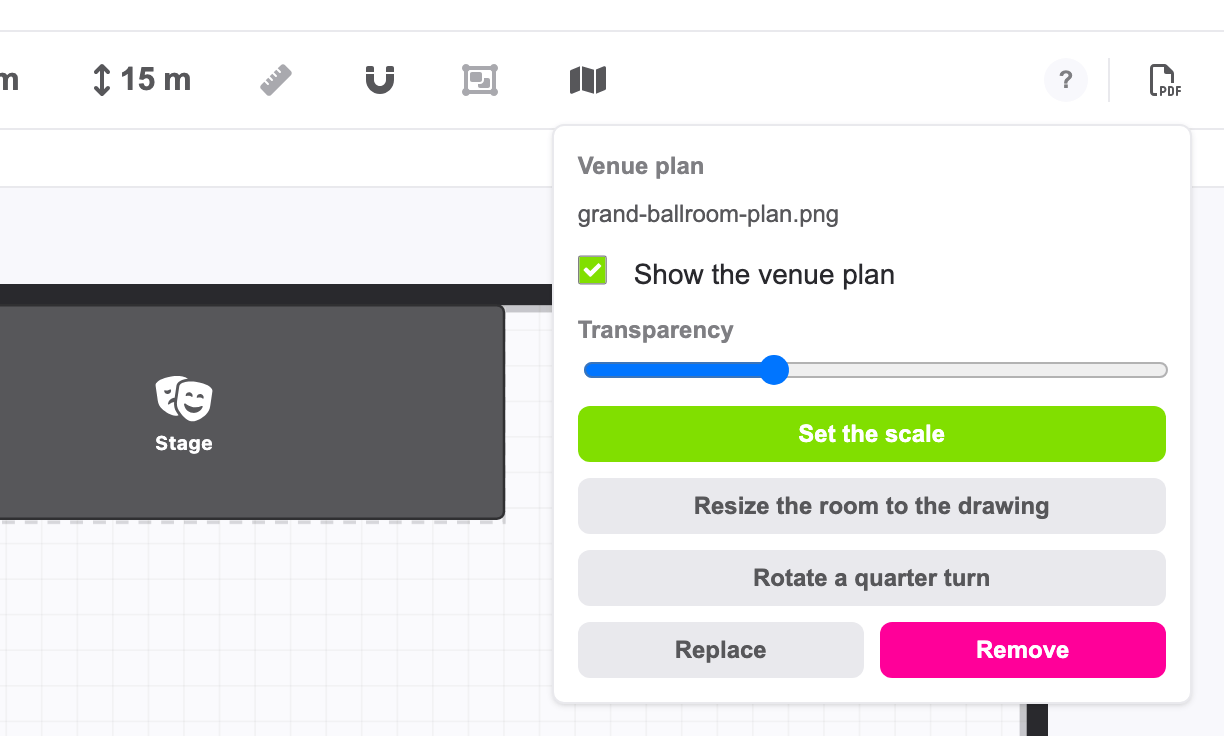
Good to know: the uploaded plan is only a tracing aid. We remove it when you send the room in for review, so organisers never see it. Your own drawing has to be complete and readable on its own: what you did not draw over is not on the floor plan.
Read how to use Floor plans for everything the designer can do: walls and corners, doors that attach to a wall, the element catalogue, measuring, moving and copying. A venue room works the same way, with two differences: there are no guests, zones or seat numbers to assign, and there is no print button (the PDF download is there).
Every change is saved on its own. Click Save & go back to return to the room page. The Floor plan card now shows your drawing.
4. Add the setups and their capacity
A setup is a way to arrange the room for an event: the same room holds 200 people for a lecture but 120 for a dinner. Organisers want to know both. The card Setups has six of them:
| Setup | What it is |
|---|---|
| U-shape | Tables in the shape of a U, for a meeting or a workshop where everyone sees each other. |
| Round tables | Round tables for a dinner, a wedding or a gala (banquet). |
| Standing | A reception or a walking dinner, with standing tables (cocktail). |
| Theatre | Rows of chairs facing a stage or a screen, without tables. |
| Classroom | Rows of tables with chairs, all facing the front. |
| Meeting | One large table with chairs around it (boardroom). |
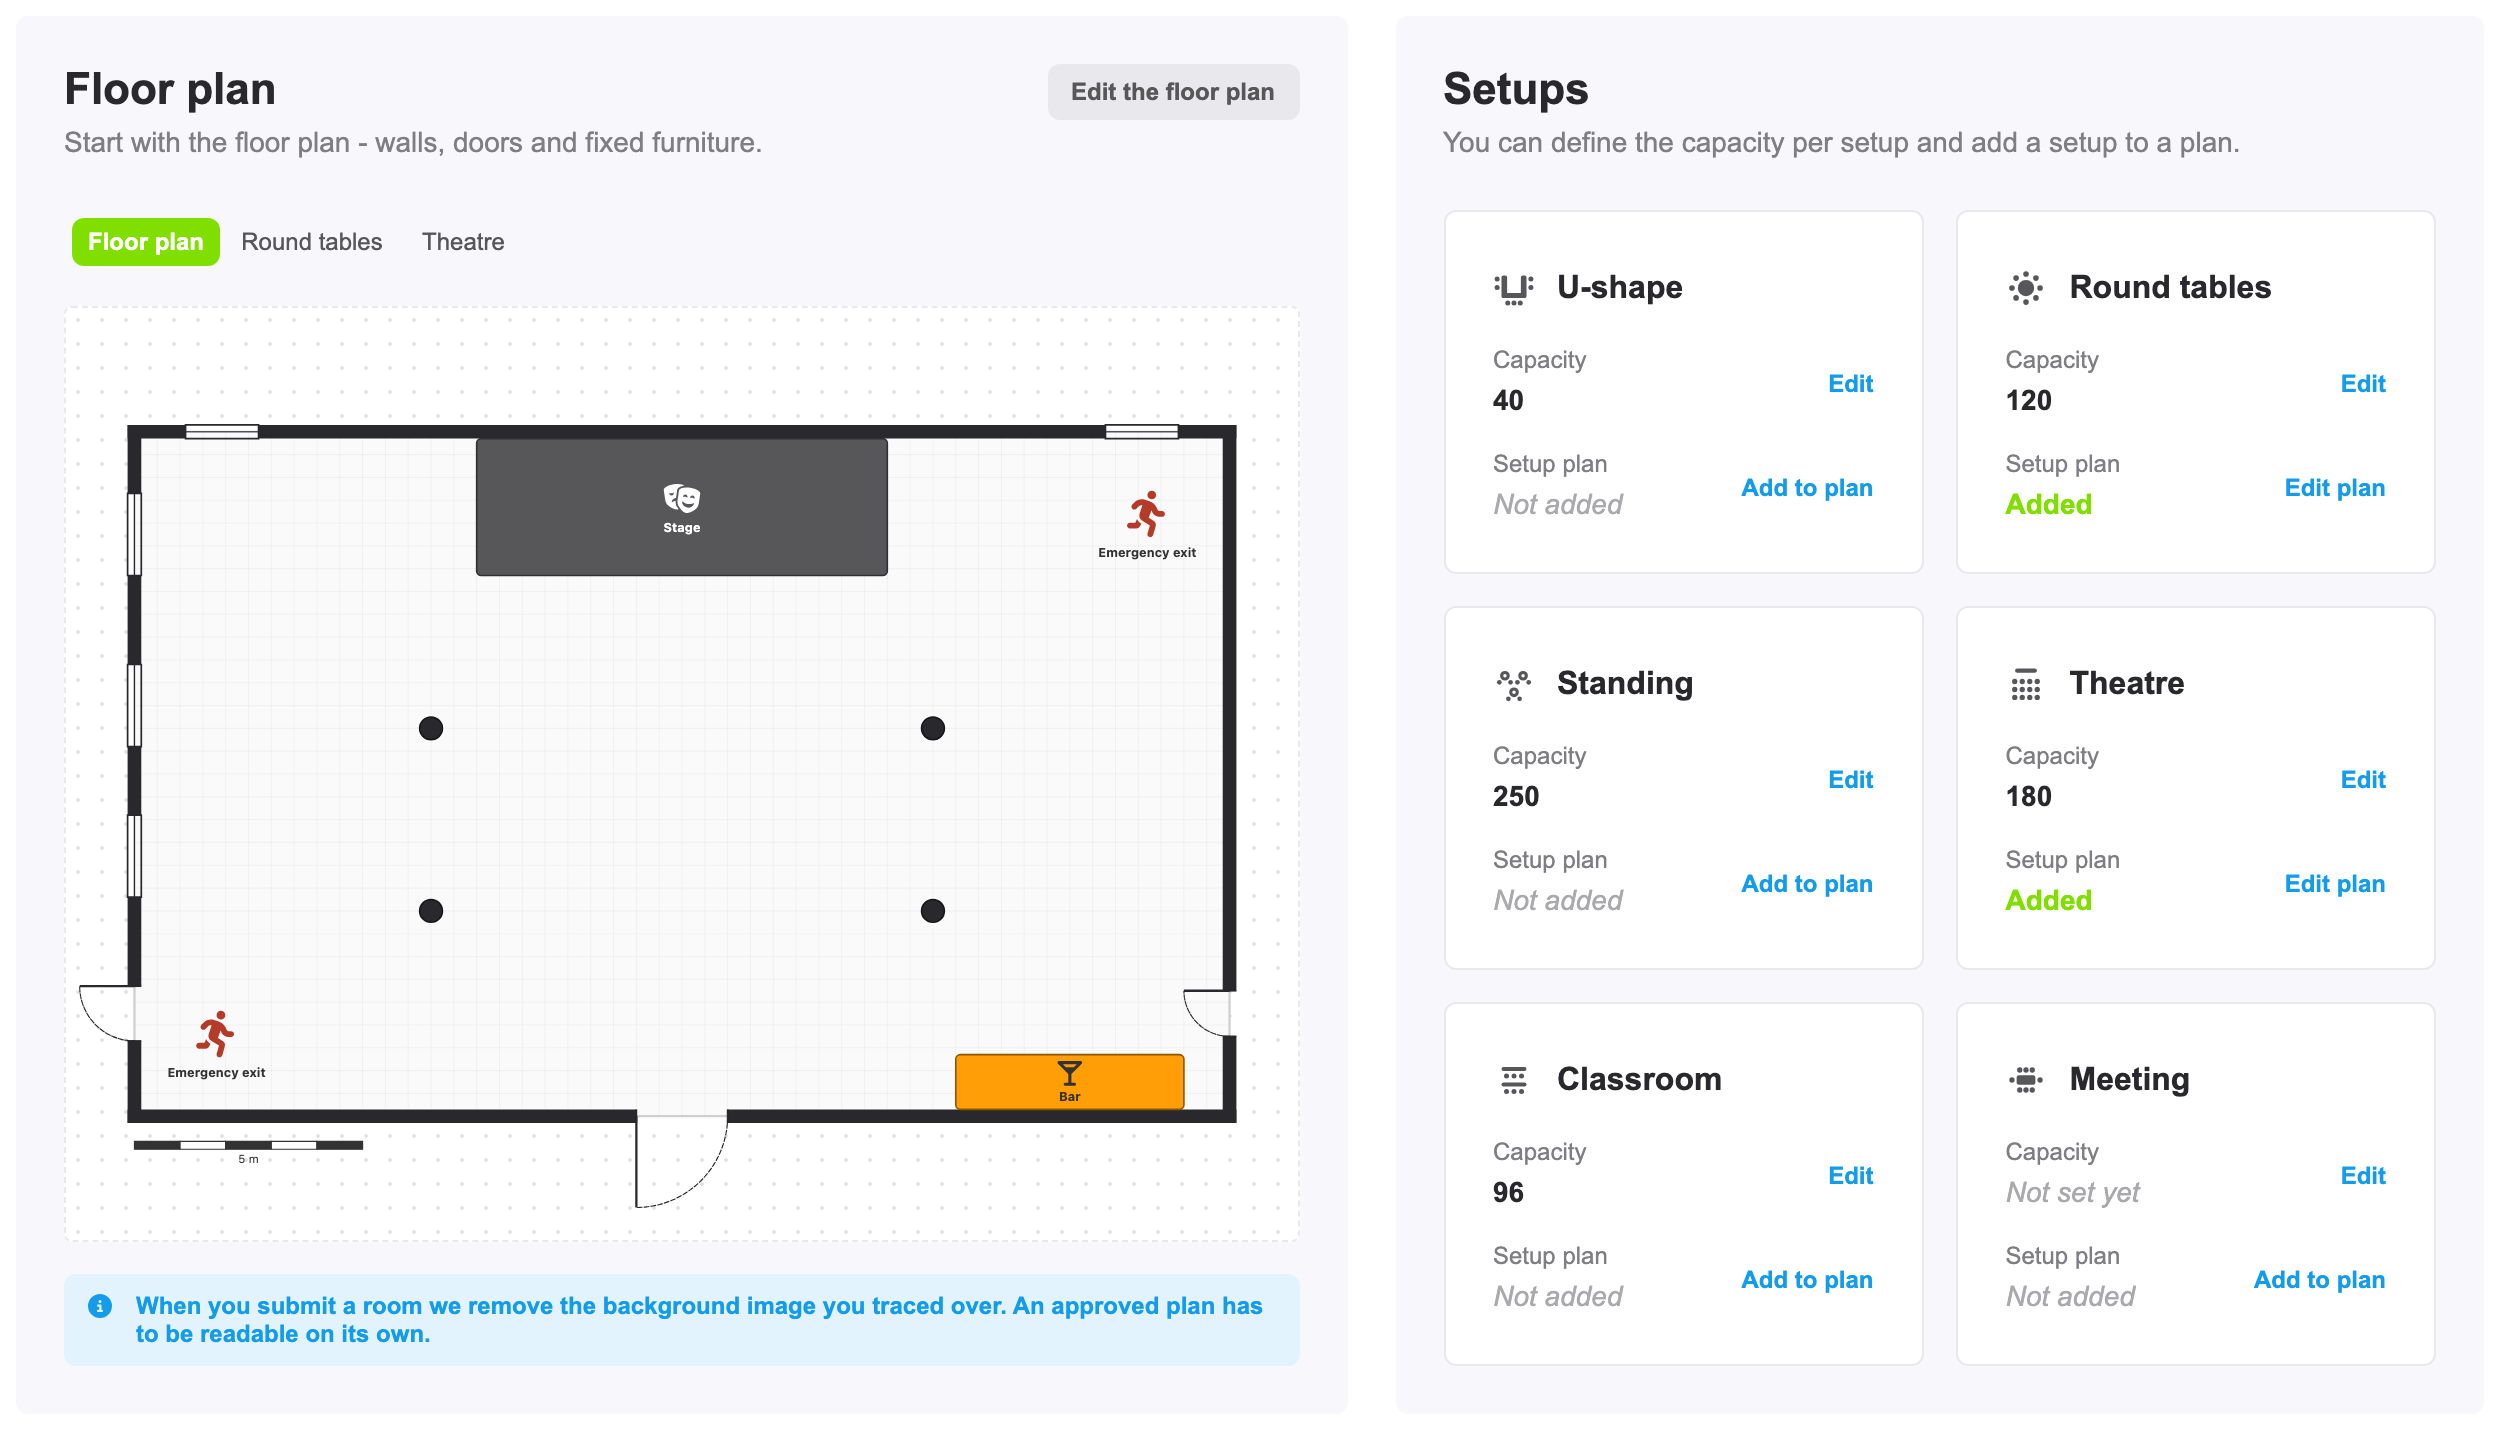
The capacity per setup
Click Edit next to Capacity on a setup, type the Number of people and click Save capacity. Leave a setup empty if it does not apply to this room: a boardroom has no theatre setup. The capacity per setup is what event planners compare on your business page.
Did you not fill in a Maximum capacity (people) for the room? Then the room page shows the capacity of your largest setup instead, with a warning sign. Click Edit on Dimensions and capacity to give the room its own number.
A plan per setup
You can also draw each setup on top of the floor plan. Click Add to plan on a setup. The designer opens with your floor plan already on it: the walls, the doors and the fixed furniture are there, and you only add the tables and chairs of this setup. All furniture is available here, round and rectangular tables and standing tables included.
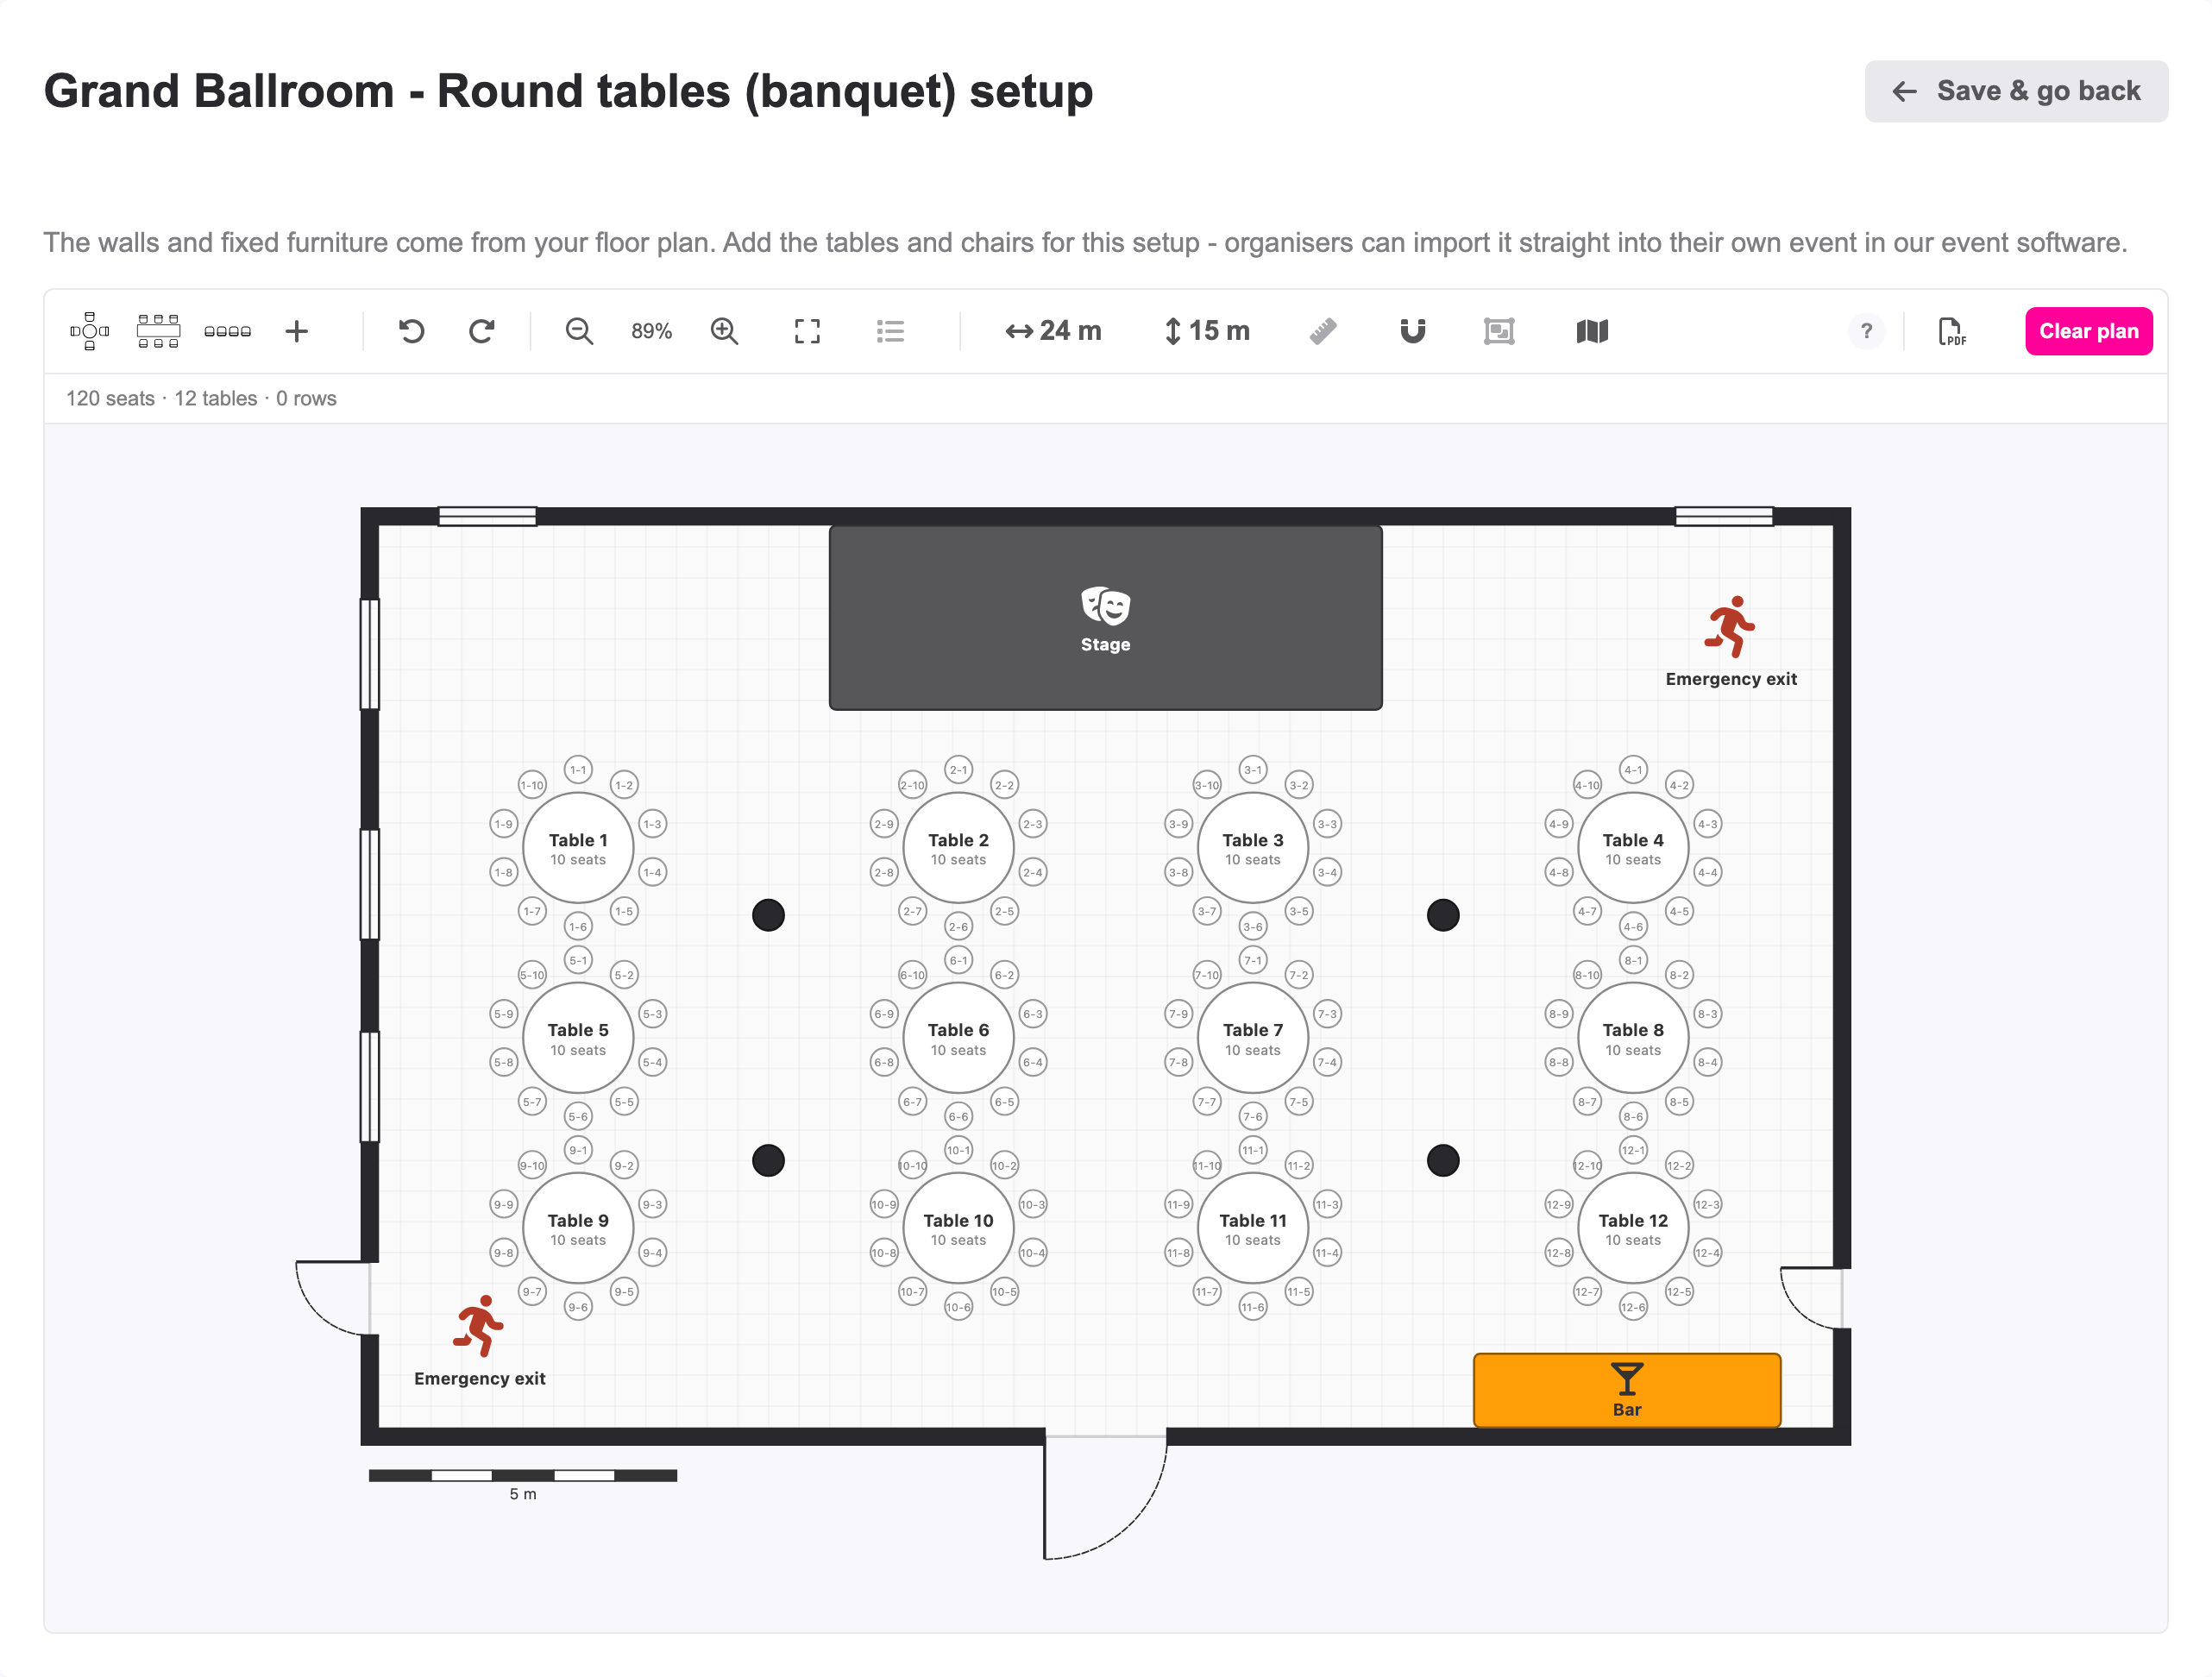
A setup plan is the strongest argument you have. An organiser who imports it into their event starts with your room, already furnished, and only has to seat the guests.
Two rules:
- The floor plan comes first. As long as there is no floor plan, Add to plan is not available and the setup says You have to design the floor plan first.
- The floor plan stays the boss. Change a wall or a door in the floor plan, and the change goes into every setup plan as well, while the tables you placed in a setup stay where they are. Change the room in the floor plan, never in a setup: a wall you move in a setup is put back the next time you change the floor plan.
A setup you open but leave without drawing anything in it is simply not used: it does not appear on your business page.
The Floor plan card on the room page shows the floor plan and every setup you drew. Click a setup name above the drawing to switch between them.
5. Link the photos of the room
Show organisers what the room looks like. You do not upload new photos here: you pick the photos of this room from the photos that are already online on your business page. Click Select photos on the card Photos.
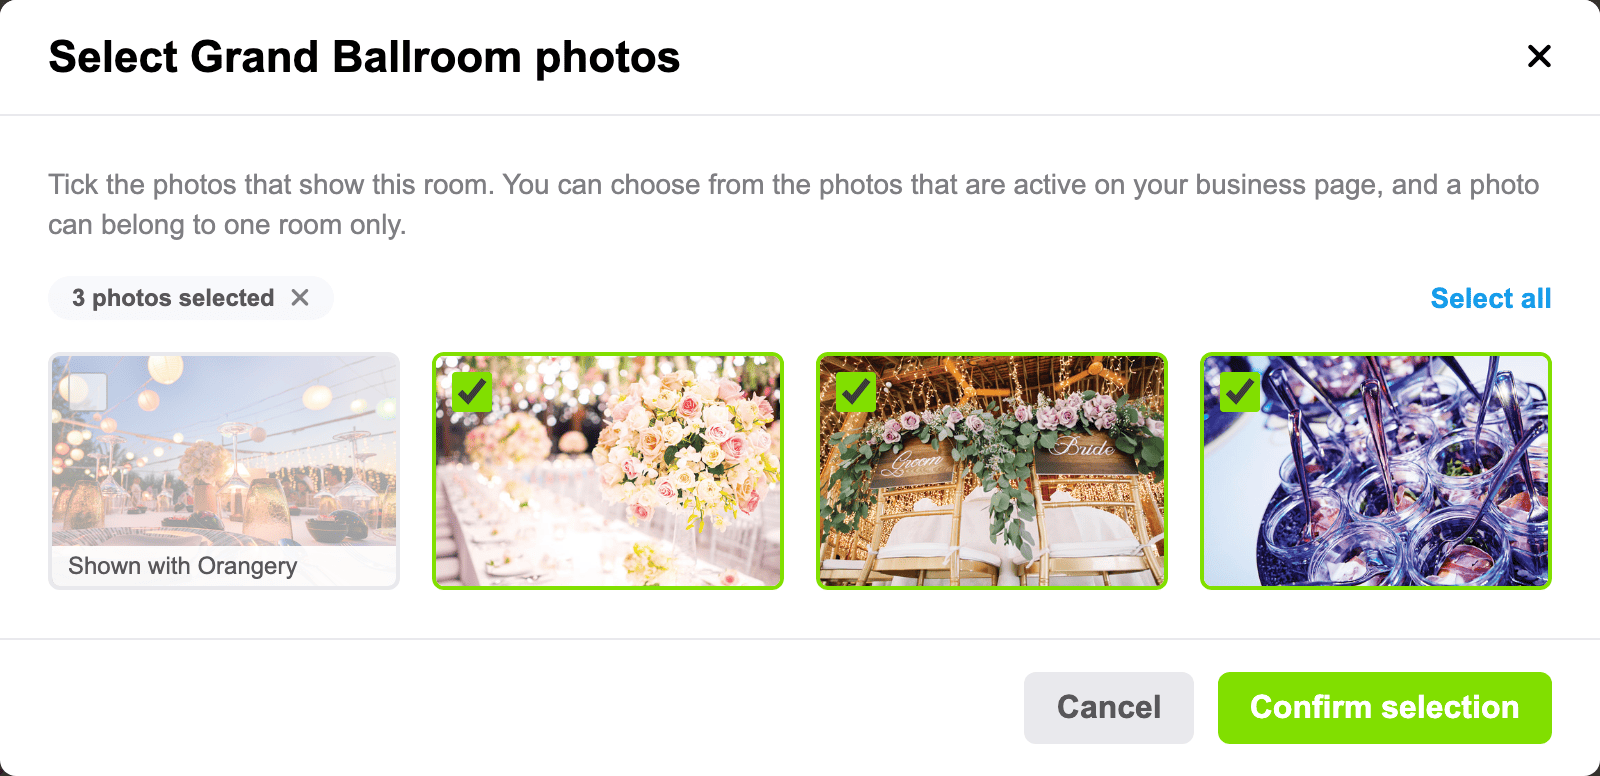
Tick the photos that show this room and click Confirm selection. A photo can belong to only one room: a photo already linked to another room is greyed out and shows which room, such as "Shown with Grand Ballroom". Untick it there first if it belongs to this room. Your main photo can be linked too.
- Photos do not need a new review. Once your room is online, any changes to its photos are visible straight away. Before that, they go online together with the room.
- Does your business page have no photos online yet? The card says so, with a button Add photos to your business page. New photos are approved by our team first, and then you can link them.
- A 360° photo cannot be linked to a room.
Click Manage photos later to change the selection.
6. Send the room in for review
Every room is checked by our team before it appears on your business page. When the room is complete, click Submit for review at the top of the room page.
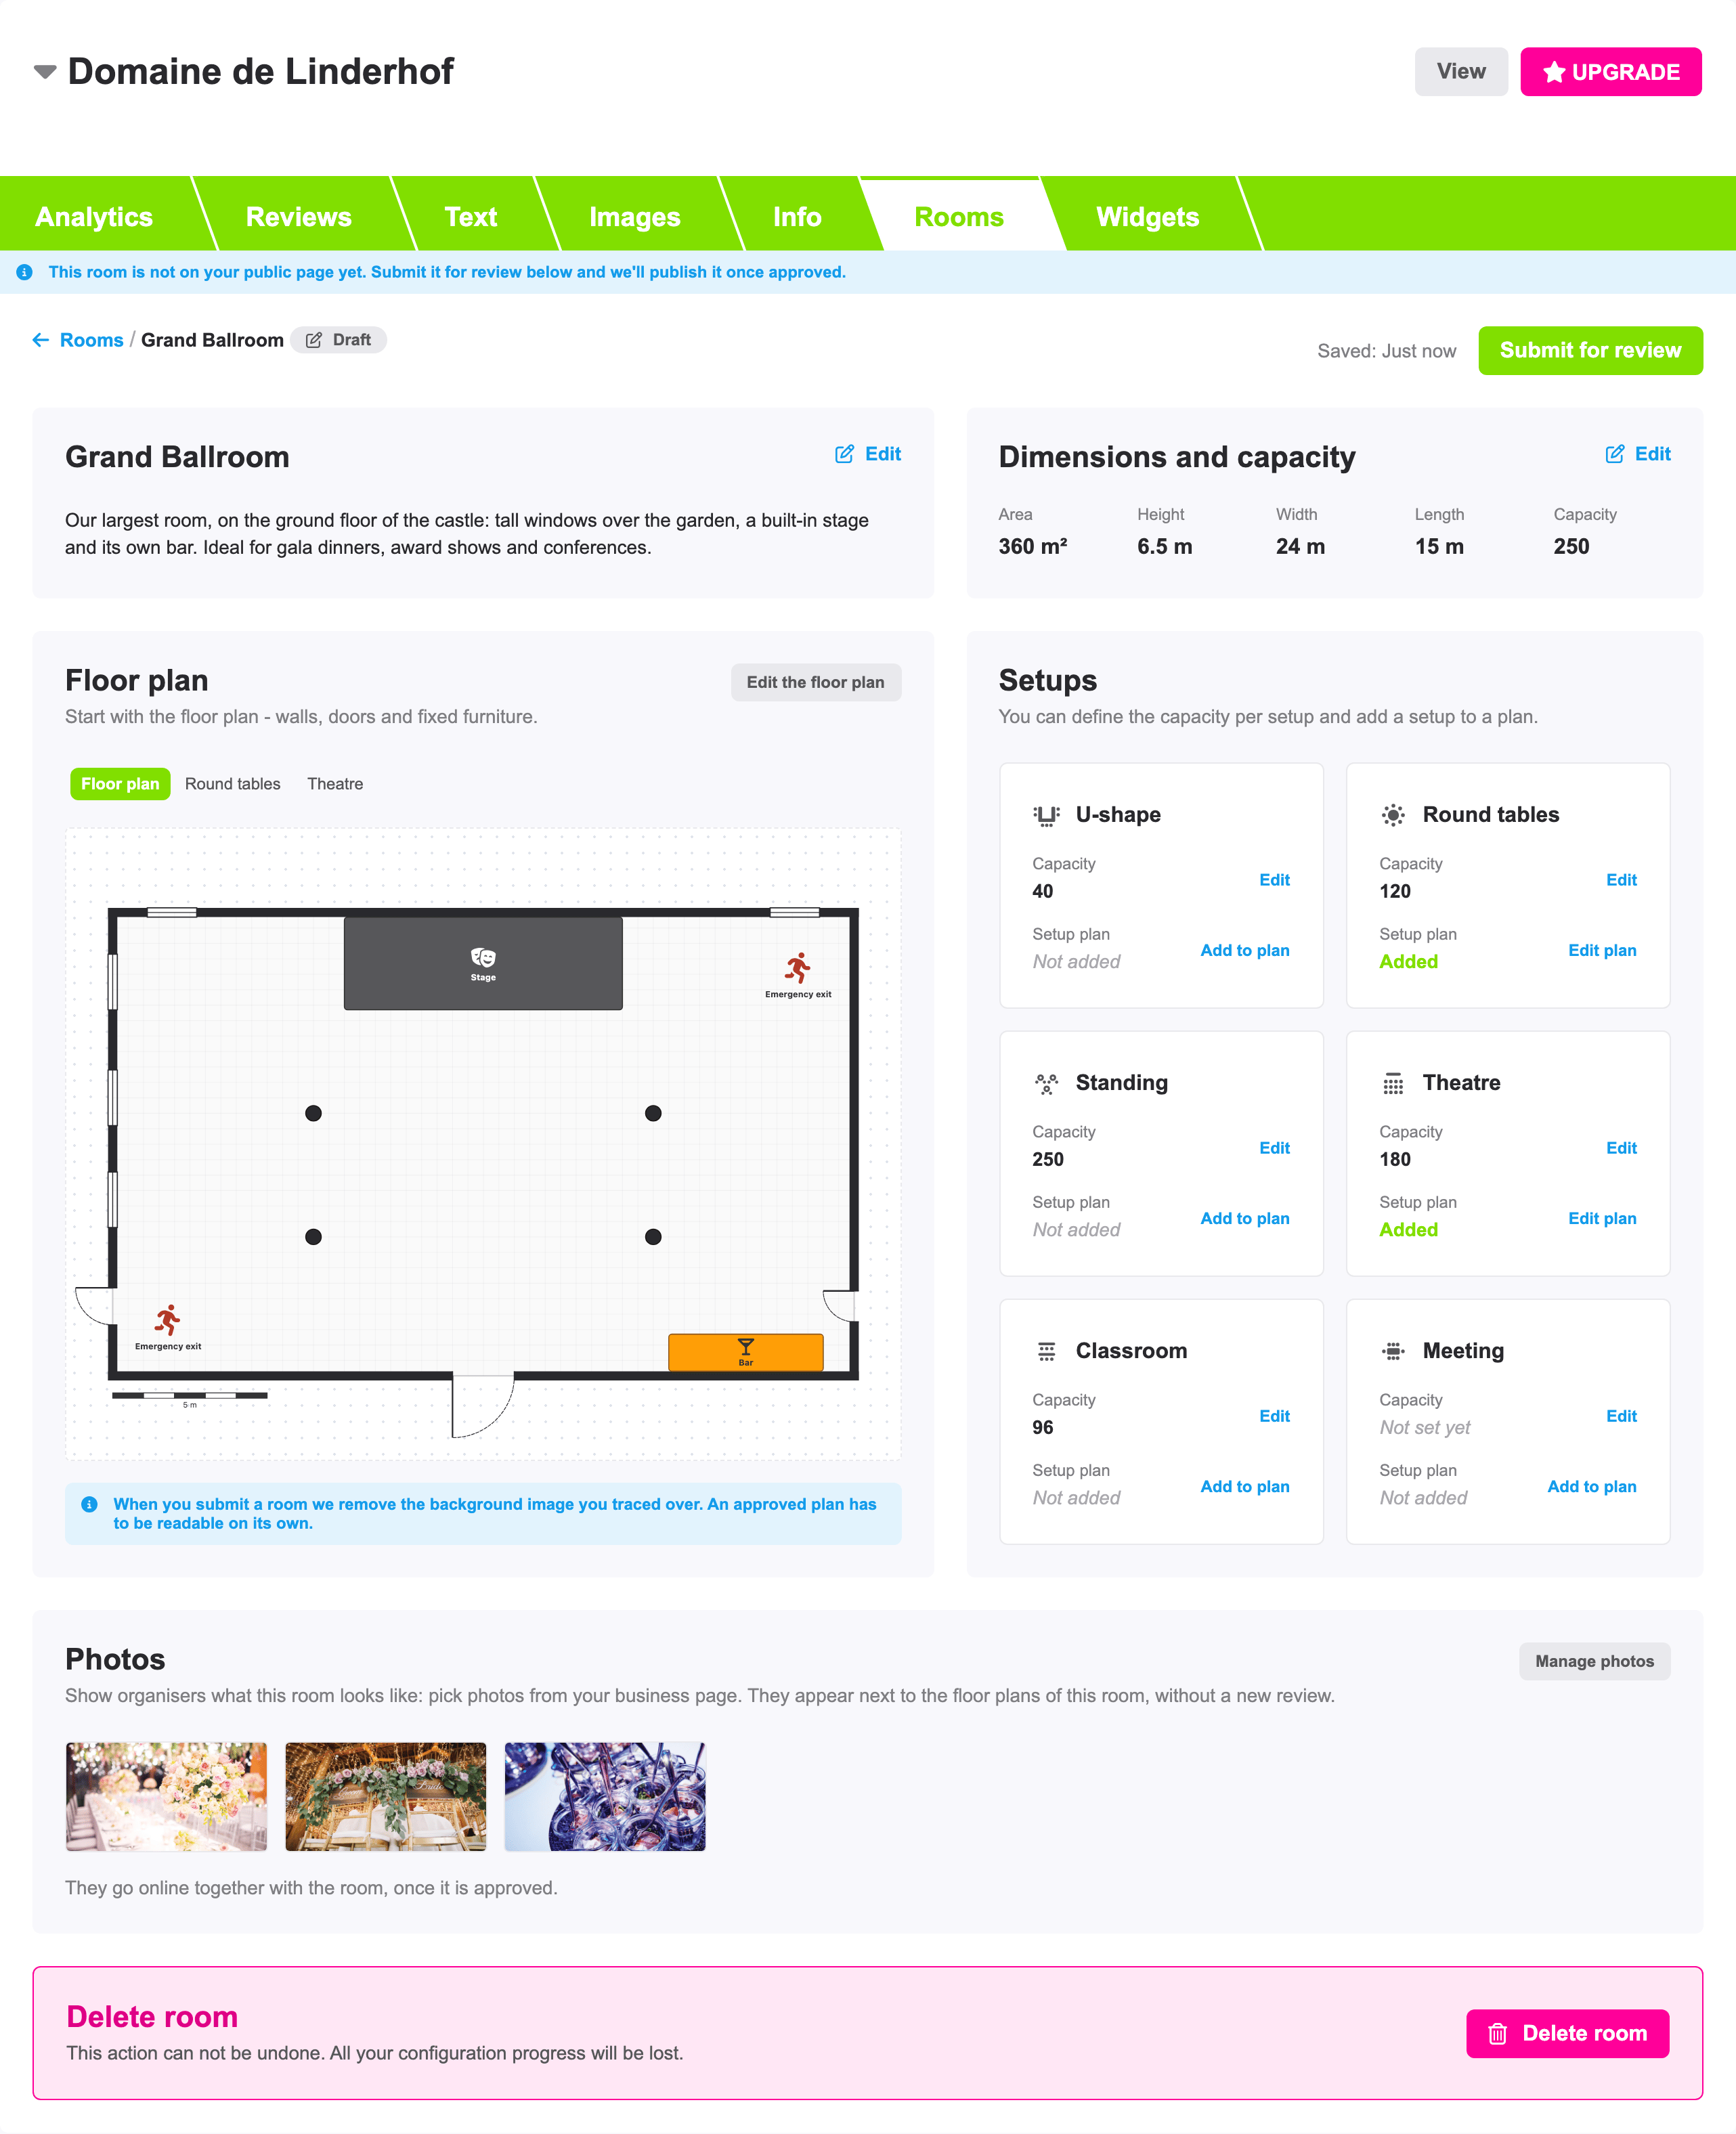
The button only works when the room is ready. As long as something is missing, a box above the cards lists what to do under Before you can submit this room for review:. A room needs at least:
- a name;
- a Maximum capacity (people) or the capacity of at least one setup;
- if you drew a setup plan: a floor plan with the room in it;
- a floor plan without tables.
A floor plan is not required: a room with only its numbers can be sent in too, and appears on your business page without a drawing. But the floor plan and the setups are what make organisers choose your room, so we recommend them.
While the room is in review
The room shows In review, and you cannot change it while we look at it: the numbers, the floor plan and the setups are read-only. Want to change something anyway? Click Withdraw from review, make your change and send it in again. Picking photos stays possible during the review.
What happens next
Every room carries a status, on its card in the Rooms tab and at the top of its page:
| Status | What it means |
|---|---|
| Draft | You are still working on it. The room is not on your business page yet. |
| In review | You sent it in, and our team is checking it. |
| Changes needed | We did not approve it yet. The room page shows what we would like you to change under What we would like you to change, and you also get a message in your eventplanner.net inbox. Make the change and send it in again. |
| Online | We approved the room, and it is on your business page. |
Changing an approved room: every change to an online room goes through the review again, the numbers and the description included. The approved version stays online while we look at your changes, and the button reads Submit my changes for review. Only the photos change straight away.
Once organisers start using your room, the room page tells you how often: Organisers imported this room 3 times.
7. What event planners see on your business page
Your approved rooms get their own block on your business page: Rooms followed by the name of your venue.
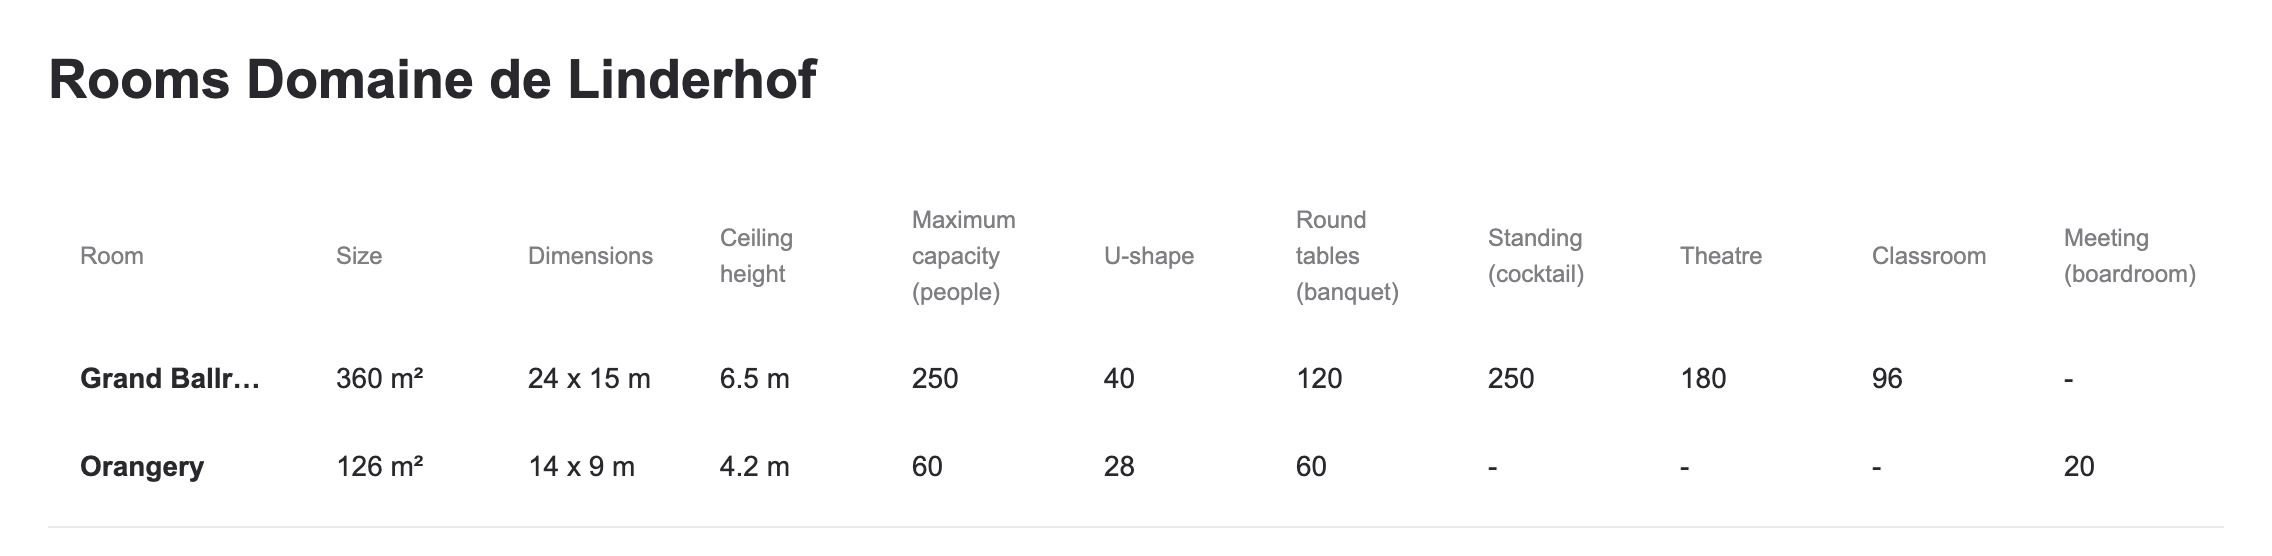
At the top, a table compares all your rooms at a glance: the size, the dimensions, the ceiling height, the maximum capacity and the capacity per setup. Only the columns you filled in for at least one room are shown. Click a room in the table to jump to it.
Below the table, every room has a section with its description, its five measurements, the Floor plans and the photos. The floor plan is shown as Empty room, followed by every setup you drew, with its capacity. A click on a plan or a photo shows it larger. The floor plans carry the eventplanner.net watermark, and the uploaded plan you traced over is never shown.
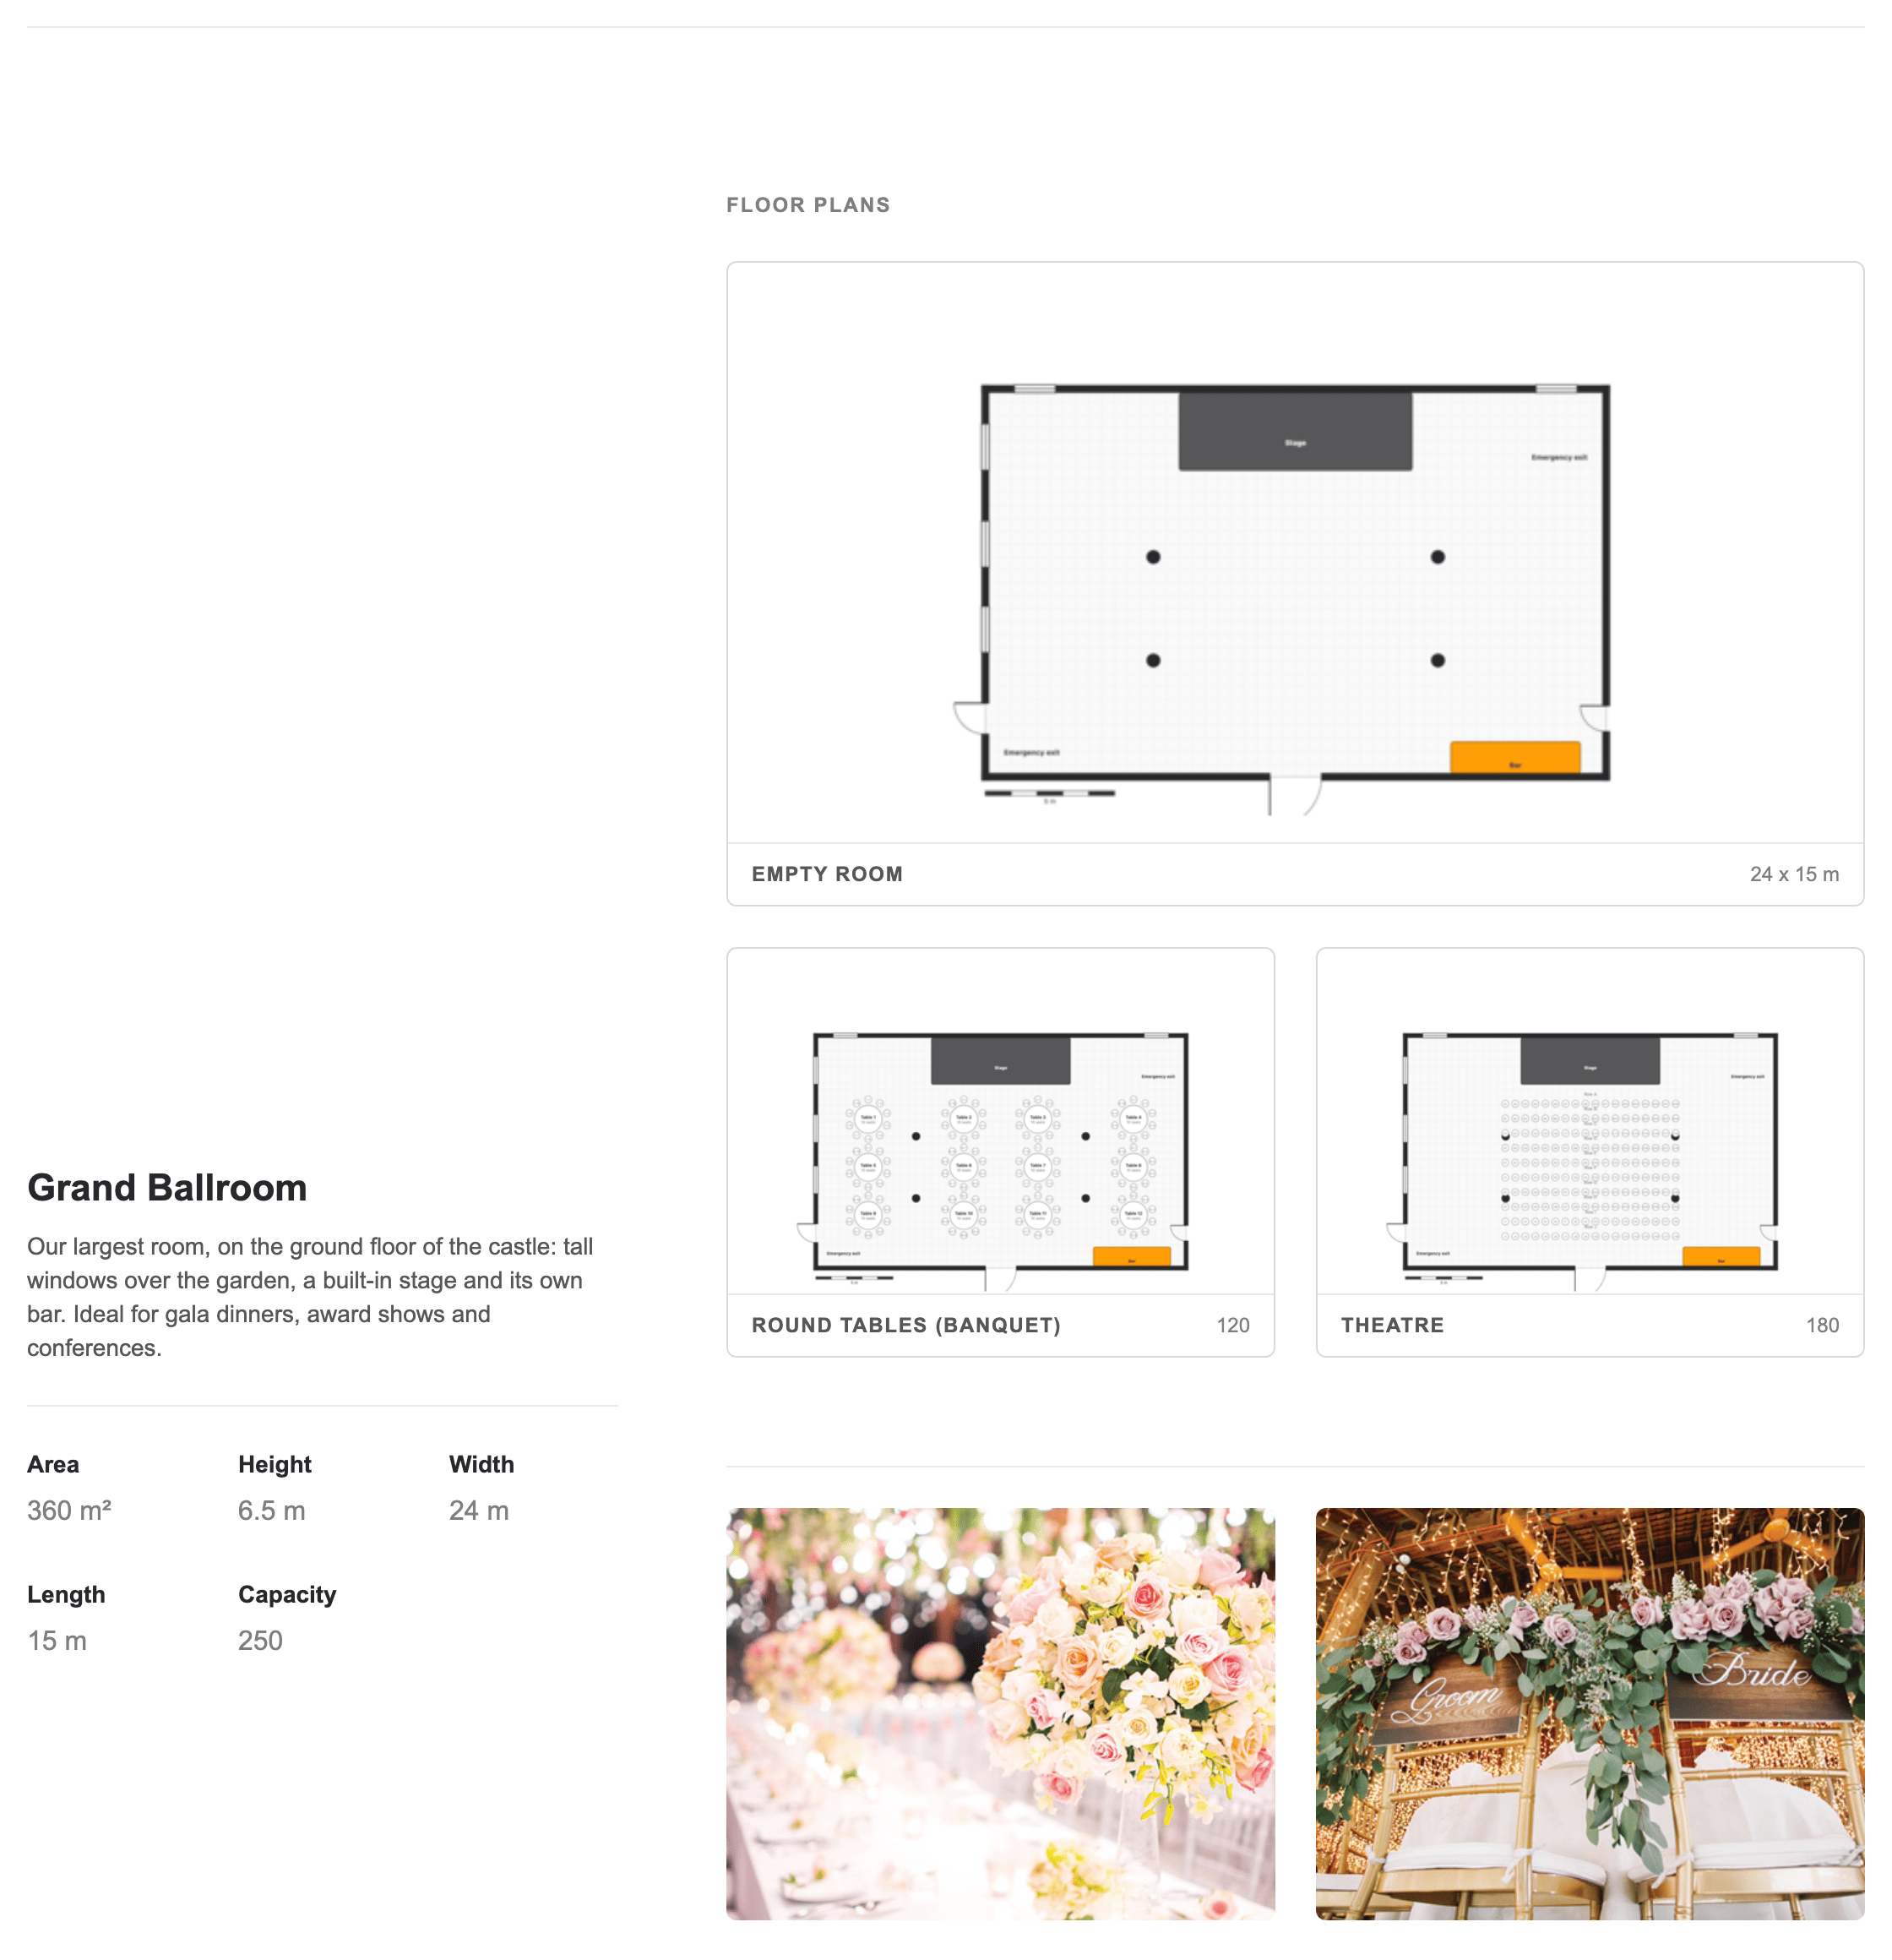
The sizes on your business page are shown in the unit that is usual in the country of the site: in metres, or in feet on the British site. The description is shown in the language of the site.
When you are logged in and look at your own business page, a pencil next to the title brings you back to the Rooms tab.
Organisers import your floor plans
In the event software, an organiser who draws the floor plan of their event clicks Venue plan and searches for your venue under Import a venue floor plan. They pick your room and the floor plan or one of your setups, and start from your real room, drawn by the people who know it. Read how to use Floor plans to see it from their side.
Tip: an organiser who does not find your floor plans yet can ask you for them with one click. You get their message in your eventplanner.net inbox, related to their event. Add the room, send it in, and answer them once it is online.
8. Delete a room
At the bottom of the room page, click Delete room and confirm. The room, its floor plan and its setups are removed, and it disappears from your business page. This cannot be undone. Deleting is always possible, also while the room is in review. The photos stay on your business page: only their link with the room is removed.
Floor plans that organisers already imported into their event stay in their event: they have their own copy.
9. Limits
| What | Limit |
|---|---|
| Rooms per business page | 200 |
| Width, length | 0.5 to 500 metres |
| Ceiling height | 0.5 to 100 metres |
| Room size | 1 to 250,000 m² |
| Capacity of a room or a setup | 1 to 100,000 people |
| Uploaded plan to trace over | PNG, JPG or PDF, 15 MB |
Frequently asked questions
I am a venue, but I do not see the Rooms tab. Why? The tab is only there when your main category is a venue category. A venue category that you ticked next to another main category is not enough. Change your main category under Change categories and regions.
Is the Rooms tab free? Yes. Rooms work the same on a free and on a paid business page.
Do I have to draw a floor plan? No. A room with its numbers alone can be sent in and appears in the table on your business page. But organisers can only import a room that has a floor plan, so we recommend drawing it.
Why can't I add a table to the floor plan? The floor plan is the empty room, with only what is fixed in it. Tables change with every event, so they go in a setup. Click Add to plan on a setup to place tables on top of your floor plan.
Where did the plan I uploaded go? We remove the uploaded plan when you send the room in for review. It is a tracing aid, and organisers only see your own drawing. Draw everything that matters before you send the room in.
I changed a wall in my floor plan. Do I have to redraw my setups? No. A change in the floor plan goes into every setup plan by itself, and your tables stay where they are. Check the setups afterwards: a table may now stand in a new doorway.
My room is in review and I want to change something. What now? Click Withdraw from review at the top of the room page, make your change and click Submit for review again.
I changed my approved room, but my business page still shows the old version. Why? Every change to an online room is reviewed first. The approved version stays online until we have approved your changes. Only a change of photos is online straight away.
My second room does not appear on my business page. Why? A room only appears once it is approved. Check its status in the Rooms tab: a Draft still has to be sent in with Submit for review.
Why is a photo greyed out in the photo selection? It is already linked to another room. A photo can belong to one room only. Open the other room, click Manage photos and untick it there.
Why don't I see a new photo in the photo selection? Only photos that are online on your business page can be linked. A photo you just uploaded is approved by our team first.
Can I write the description in more than one language? Yes. Write it in your own language and we translate it into the other languages for you. Open a language in the description field to correct its translation. The room name stays the same in every language.
Who can work on the rooms? Everyone who may manage your business page in your account.
